In this tutorial you will learn more core C# and look at regular expressions and collections. This will allow you to write a simple C# program that you will then compile. The program will be a Visual Studio Form application
About this Tutorial
Objectives
Delegates will learn to develop applications using C# 4.5. After completing this course, delegates will be able to:
Use Visual Studio 2012 effectively
Create commercial C# Web Applications
Develop multi-threaded applications, Use WCF and LINQ
Audience
This course has been designed primarily for programmers new to the .Net development platform. Delegates experience solely in Windows application development or earlier versions of C# will also find the content beneficial.
Prerequisites
No previous experience in C# programming is required. But any experience you do have in programming will help. Also no experience in Visual Studio is required. But again any experience you do have with programming development environments will be a valuable.
Experience using a contemporary OO language such as C++ or C# would be useful but is not required.
This Tutorial will be Covering the .NET APIs, The three main parts that will be covered are exception handling in C# using a try-catch-finally statement. Working with Collection that are already pre-made and need only to be referenced e.g. ArrayList. The final part of the tutorial is regular expression also known more commonly as Regex and allows you to search for text/patterns in a string and much more.
Estimated Time – 1 Hour
Not what you are looking? Try the next tutorial – File Handling and Serialization
Lab 1: Exception Handling
Lab 1: Exception Handling
Overview
Exceptions are a run-time mechanism for indicating exceptional conditions in .NET:
If you detect an “exceptional” condition, you can throw an exception.
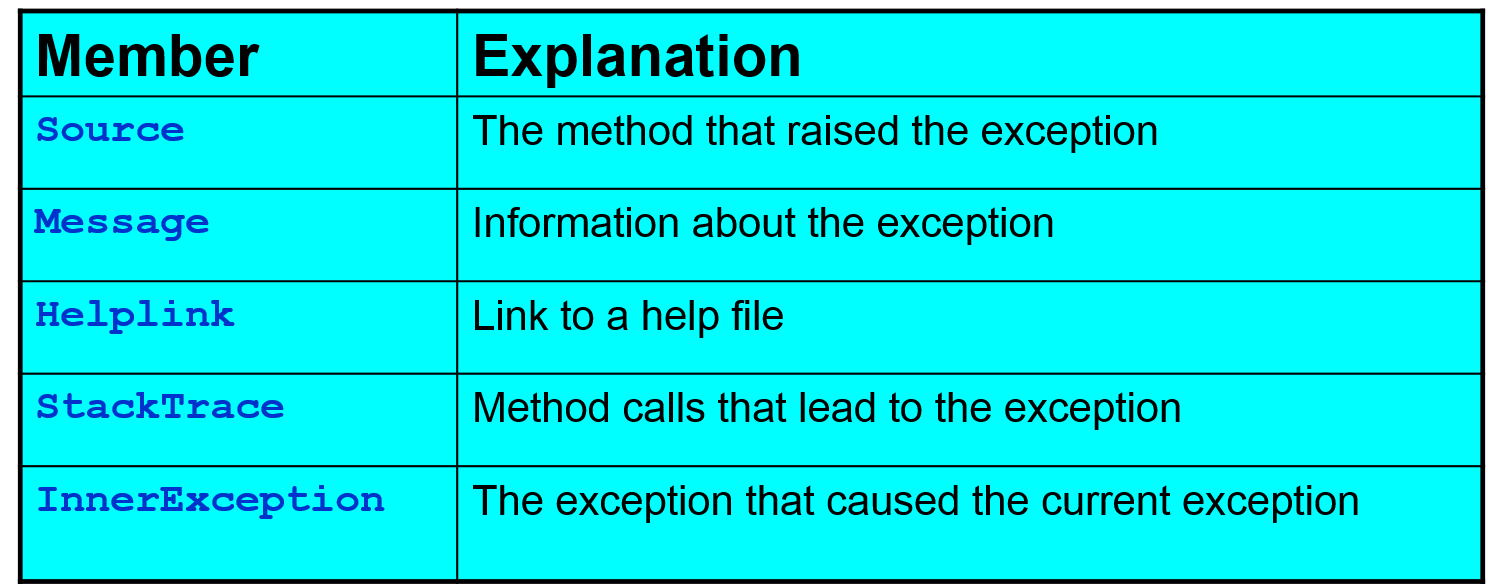
An exception is an object that contains relevant error info.
Somewhere up the call stack, the exception is caught and dealt with:
If the exception is not caught, your application terminates.
There are lots of things that can go wrong in a .NET app:
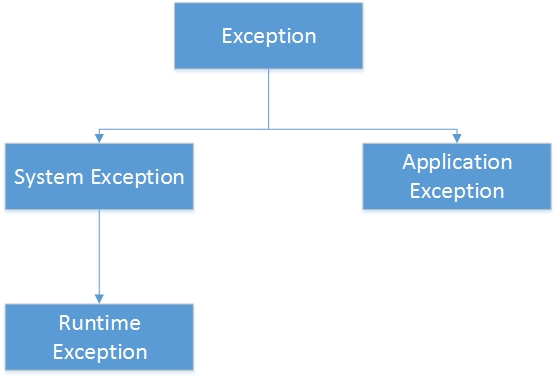
Therefore, there are lots of different exception classes – All exceptions inherit from System.Exception.
Each exception class represents a different kind of problem.
The .NET Framework library defines hundreds of standard exception classes.
Lab
How to Handle Exceptions:
try block– Contains code that might
cause an exception.
catch block(s) – Zero or more; Specify an exception class,
to catch exception object; Perform recovery code.
finally block (optional) – Will always be executed, Perform tidy-up code.
try {

 // Code that might cause an exception ...

} catch (ExceptionType1 ex) {

 // Code to handle ExceptionType1...

} catch (ExceptionType2 ex) {

 // Code to handle ExceptionType1...

}

...

finally {

 // Performs unconditional tidying-up...

}
Exceptions Hierarchies:
When you define a catch handler it will catch that exception type, plus any subclasses.
You can define multiple catch handlers:
When an exception occurs, the runtime examines the catch handlers in sequence, looking for a suitable handler.
You must organize your catch handlers from specific to general – try
{
...
}
catch (FileNotFoundException ex)
{
...
}
catch (IOException ex) {
...
}
Use the throw keyword, to re-throw the current exception – try
{
...
}
catch (ExceptionType1 ex)
{
...
throw;
}
Lab 2: Collections
Lab 2: Collections
Overview
Arrays are fixed-size types:
Access items by integer index, starting at [0]
Can iterate over items, using a for or foreach loop e.g. – public static void DemoArrays()
{
Random rand = new Random();
int[] lotteryNumbers = new int[6];
for (int i = 0; i < lotteryNumbers.Length; i++)
{
int num = rand.Next(49);
lotteryNumbers[i] = num;
}
Console.WriteLine("Array of random numbers:");
foreach (int num in lotteryNumbers)
{
Console.WriteLine(" {0}", num);
}
}
Arrays are most useful for creating and working with a fixed number of strongly-typed objects.
Collections provide a more flexible way to work with groups of objects. Unlike arrays, the group of objects you work with can grow and shrink dynamically as the needs of the application change. For some collections, you can assign a key to any object that you put into the collection so that you can quickly retrieve the object by using the key. A collection is a class, so you must declare a new collection before you can add elements to that collection.
Safer and potentially more efficient than raw collections.
Examples of generic collection classes:
List<T>, LinkedList<T>, SortedList<T>.
HashSet<T>, SortedSet<T>.
Stack<T>, Queue<T>.
Dictionary<K,V>, SortedDictionary<K,V>.
Using what we have learnt from Lab one and lab two we can now create a banking system that uses exceptions and collections to enhance a bank application that was used in a previous tutorial.
In the solution that can be downloaded from the top of the page I have included a BankAccountInitial solution so as to build on it what we have learned and so will be using this for the lab.
First open the solution and there will be 2 classes BankAccount that contains the wire-frame of the business logic and program.cs that contains Main() to run the application with 3 exercises.
To start we are going to create a BankException class that will handle any exceptions that might occur when withdrawing and depositing money. One exception message will be just a message and the other more personalized – class BankException : ApplicationException
{
public DateTime Timestamp = DateTime.Now;
public string accountHolder;
public double transactionAmount;
public BankException(string message)
: base(message)
{}
public BankException(string message, string holder, double amount, Exception innerException = null)
: base(message, innerException)
{
accountHolder = holder;
transactionAmount = amount;
}
}
Now to create the code that will cause this class to be used in our BankAccount class. The code will go in the withdraw and deposit methods and will throw the BankAccountException class. The deposit methods is first and the exception caused will not allow more than 100,000+ to be deposited at one time – public void Deposit(double amount)
{
// If attempt to deposit more than 100000, disallow this deposit!
if (amount > 100000)
{
throw new BankException("Cannot deposit more than 100000.", accountHolder, amount);
}
// Deposit money, and store transaction amount.
balance += amount;
transactions.Add(amount);
// If balance has exceeded the government's protection limit, raise a ProtectionLimitExceeded event.
if (balance >= 50000 && ProtectionLimitExceeded != null)
{
ProtectionLimitExceeded(this, new BankAccountEventArgs(amount));
}
}
Next is the withdraw method where an exception is thrown if the account tries to withdraw and the amount in the account is less than 0 to simulate someone going into credit/overdraft – public void Withdraw(double amount)
{
// If account is already overdrawn, disallow this withdrawal!
if (balance < 0)
{
throw new BankException("Cannot withdraw from an overdrawn account.", accountHolder, amount);
}
// Withdraw money, and store transaction amount as a negative amount (to denote a withdrawal).
balance -= amount;
transactions.Add(-amount);
// If account is now negative, raise an Overdrawn event.
if (balance < 0 && Overdrawn != null)
{
Overdrawn(this, new BankAccountEventArgs(amount));
}
}
We can now create and test exercise one and two by using this sample code which you are encouraged to change and try new functions with using the bank account class (maybe interest could be good). For exercise one should notice the try catch statement that will then deal with any exceptions that are caused in a specific way as oppose to a generic message – private static void Exercise1Test()
{
...
BankAccount acc1 = new BankAccount("Brendan");
// Do some stuff that will cause exceptions.
try
{
acc1.Deposit(10000);
...
}
catch (BankException ex)
{
Console.WriteLine("Bank exception at {0}", ex.Timestamp);
...
}
}
Now for exercise two that will print all the transactions connected to a specific account – private static void Exercise2Test()
{
...
BankAccount acc1 = new BankAccount("Brendan");
// Do some stuff that won't exceptions.
acc1.Deposit(10000);
...
Console.WriteLine("Transactions on account:");
foreach (double transaction in acc1.Transactions)
{
Console.WriteLine("{0:c}", transaction);
}
}
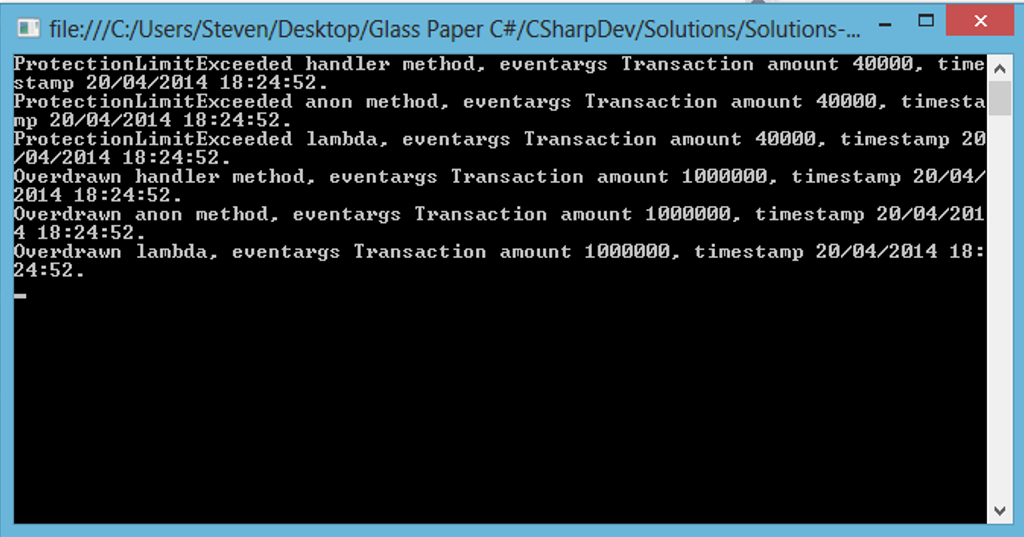
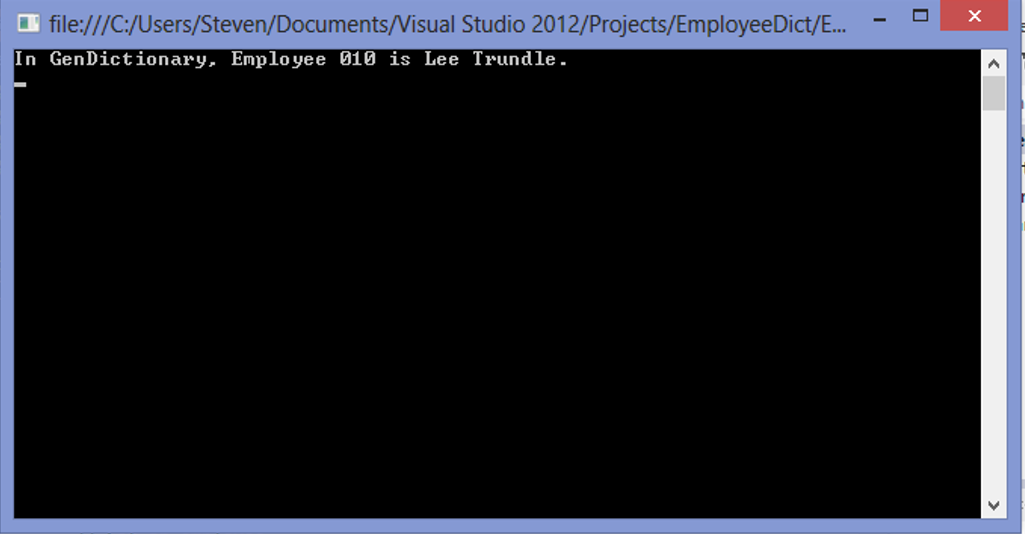
On running the application you should see something similar to this –
For exercise three we are going to a collection of bank accounts in a BankAccount class. So obviously we are going to need to create a Bank class to hold the accounts and to do this we will use a generic collection (Dictionary) that will allow us to get the information using the accountID or the ID using the account – public class Bank
{
private Dictionary accounts = new Dictionary();
public BankAccount this[int accountID]
{
get { return accounts[accountID]; }
set { accounts[accountID] = value; }
}
public bool ContainsAccountID(int accountID)
{
return accounts.ContainsKey(accountID);
}
public bool ContainsAccount(BankAccount account)
{
return accounts.ContainsValue(account);
}
}
Now to include the code to test this for exercise three that will create a new Bank, add three new accounts and their account ID’s and then use the account with ID 123 to make some withdrawals and deposits – private static void Exercise3Test()
{
...
// Create a Bank object.
Bank theBank = new Bank();
// Create some BankAccount objects and add to Bank, via Bank's indexer (i.e. "this" method).
theBank[123] = new BankAccount("John");
...
// Find a BankAccount object by its accountID, and so some stuff with it.
if (theBank.ContainsAccountID(123))
{
BankAccount acc = theBank[123];
acc.Deposit(10000);
...
}
Console.WriteLine("Details for account with ID 123: {0}", theBank[123]);
}
Located in System.Text.RegularExpressionsnamespace.
There are two ways to use Regex:
Create a Regex object with a fixed pattern, and then invoke Regex instance methods.
Or call Regex static methods and specify a pattern each time.
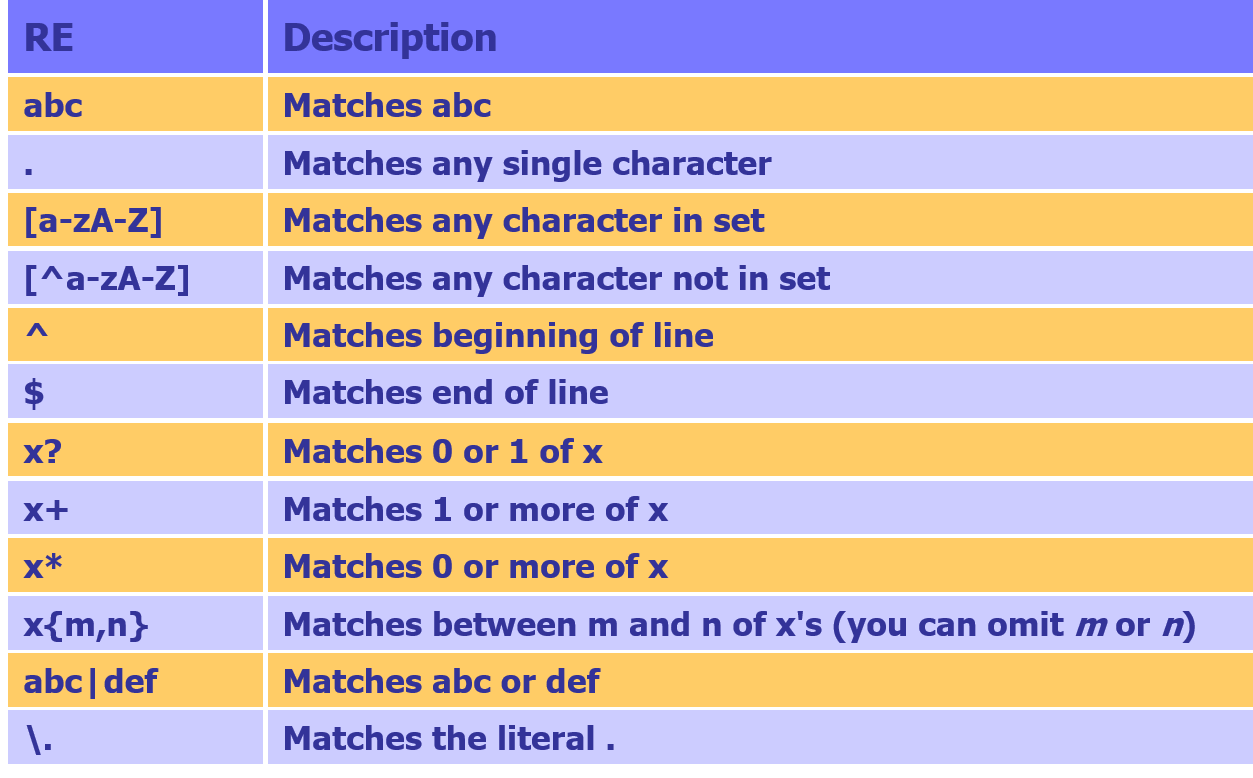
Regex use literal characters and meta-characters –
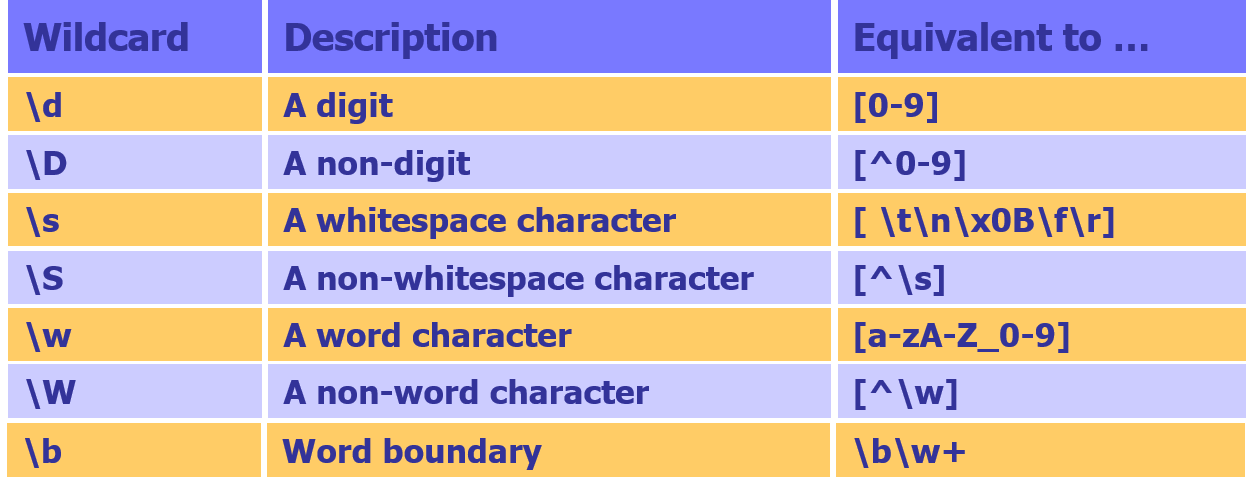
You can use wildcards to indicate a number of common character types –
Pattern Testing:
Create a string to represent the Regex pattern that you want to test for – Postcode example below. 1-2 letters, then 1-2 digits, the a digit followed by 2 letters – string pattern = @"^[a-z]{1,2}\d{1,2}\s\d[a-z]{2}$";
Call Regex.IsMatch() to determine if a string matches the regular expression – string swansPostcode = "SA1 2FA";
if (Regex.IsMatch(swansPostcode, pattern, RegexOptions.IgnoreCase))
{
Console.WriteLine("{0} is a valid postcode", swansPostcode);
}
Lab
A great way to use Regex is to check input from the user, and a good example of this is when a user is entering their email address so we have made a lab to show you how to do this.
First open visual studio, C#>windows>Console Application and call this EmailValidator.
In the declarations part of the program.cs include these to enable us to use Regex – using System.Text.RegularExpressions;
using System.Threading.Tasks;
Next is to add in our Regex expression just above Main() that will allow us to check the user input against. Refer to the tables above and try and work out what is allowed and not allowed and test this once the app is built (hint this is using pattern testing) – private static Regex emailRegex = new Regex(@"^[\w\.\-']+@[\w\.\-']+\.[a-z]{2,3}$", RegexOptions.IgnoreCase);
In the Main() method add this code to get input from the user and check it against the Regex expression – List validEmailAddresses = new List();
List invalidEmailAddresses = new List();
while (true)
{
Console.Write("Enter email address [or 'quit']: " );
string input = Console.ReadLine();
if (input.ToLower() == "quit")
...
if (emailRegex.IsMatch(input))
...
else
...
}
If you liked this post, please comment with your suggestions to help others.
If you would like to see more content like this in the future, please fill-in our quick survey.
Manage cookie consent
You can view this website without consenting to extra cookies. However you will need to accept the 'marketing' cookies to send messages via the contact forms & see any maps displayed on the site
Functional
Always active
Cookies necessary for the website to work.
Preferences
The technical storage or access is necessary for the legitimate purpose of storing preferences that are not requested by the subscriber or user.
Statistics
The technical storage or access that is used exclusively for statistical purposes.Cookies used to track user interaction on the site, which helps us to evaluate & improve the website.
Marketing: Forms & additional content (Marketing)
We need your permission to place ‘marketing’ cookies, so you are able to use the contact forms & see embedded content e.g. videos and maps. - - - - We have added protection to our contact forms to help prove that a human (rather than a spambot) is filling


If you would like to see more content like this in the future, please fill-in our quick survey.