About this Tutorial –
Objectives –
Delegates will learn to develop web applications using C# 4.0. After completing this course, delegates will be able to:
- Use Visual Studio 2012 effectively
- Windows Forms with C# using Visual Studio 2012
Audience
This course has been designed primarily for programmers new to the .Net development platform. Delegates experience solely in Windows application development or earlier versions of ASP.Net will also find the content beneficial.
Prerequisites
Before attending this workshop, students must:
- Be able to manage a solution environment using the Visual Studio 2012 IDE and tools
- Be able to program an application using a .NET Framework 4.0 compliant language
Contents
Copyright 20/12/12 – David Ringsell
Quick Access
Lab 1
Exercise 1 – Creating the Customer Form
Exercise 2 – Enhancing the Customer Form
Exercise 3 – Explore further Windows Forms features
Lab 2
Exercise 1 – Creating a Custom Text Box
Exercise 2 – Testing the Custom Text Box on a Form
Exercise 3 – Creating a User Control
Exercise 4 – Testing the User Control on a Form
Exercise 5 – Creating a Custom About Box Form
Exercise 1
Creating the Customer Form
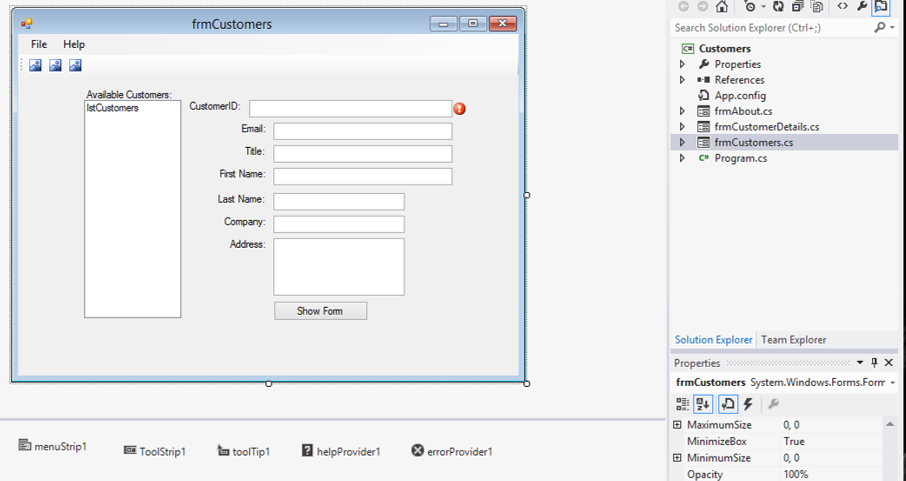
In this exercise, you will create a form that to show customer information. You will later add a MenuStrip, ToolStrip and other controls to this form.
- Create the Windows Application project:
- Start Visual Studio 2012.
- Select the File menu, then New, then Project.
- Make sure (if you are using the Professional Version) that Visual C# and
then Windows is selected at the left of the screen under Installed Templates. - Name the project and the solution: Customers.
- Browse to the place on your computer where you wish Visual Studio
to create the directory for your solution (keeping the tick box selected). - Select Windows Forms Application.
- Add a Windows Form to the project called frmCustomers:
- Right-click on the project name: Customers.
- Select Add.
- Select New Item.
- Select Windows form.
- Add the list box and text boxes to the form as shown above.
- Set the Anchor properties of the text box controls.
- Test the project confirm that all controls are anchored correctly.
- Using the Toolbox, add a MenuStrip control.
- Add a File and a Help menu to the MenuStrip control.
- Add the following sub-menus:
- File: Load Customers, Exit.
- Help: About.
Exercise 2
Enhancing the Customer Form
In this exercise, you will enhance the customer form by adding a ToolStrip and a ToolTip control. You will also add functionality to the MenuStrip and ToolStrip.
- Using the Toolbox, add a ToolStrip control.
- Add 3 buttons to the ToolStrip.
- Set the Text and the ToolTipText properties for the buttons to:
- Load Customers
- Exit
- Help
- Add an About box to the project by right clicking the project name in Solution Explorer.
- Add event handlers for the menu items. For example:
private void loadCustomersToolStripMenuItem_Click(object sender, EventArgs e)

{

this.Close();

} - Add event handlers for the tool strip button. For example:
private void ToolStripButton2_Click(object sender, EventArgs e)

{

//The Exit toolstrip button calls the Exit menu event handler

loadCustomersToolStripMenuItem_Click(sender, e);

} - Add ToolTip user assistance by dragging a ToolTip control on to the form designer, then setting the list box’s ToolTip property.
Exercise 3
Explore further Windows Forms features
In this exercise, you will enhance the customers form to open a second form. You will add container controls & provider controls to this second form.
- Add another form to the project called frmCustomerDetails and open this form from the customers form:
- using the ShowDialog method (modal).
- as an owned form (non-modal).
- You can do this by double-clicking the button and adding this code to the event handler:
//Show a second form

frmCustomerDetails f = new frmCustomerDetails();

//Show as a dialog box (modal)

f.ShowDialog();

//Show as a owned form (non-modal)

//this.AddOwnedForm(f);

//f.Show();
By adding the forward-slash to the beginning of the sentence, the following text in the sentence is not treated as code by the compiler; it is commented out. For it to compile and execute as code, just remove the forward slash characters from the sentence. By commented out code you can choose which code you want to have activated in your program.
- Add some container controls to the new form, for example:
- SplitContainer
- TableLayoutPanel
- FlowLayoutPanel
- Populate the container controls with further controls.
- Add an ErrorProvider and HelpProvider control to the form.
- Configure the ErrorProvider and HelpProvider control to show appropriate messages for associated controls.
- View code file.
Lab 2. Customising Windows Forms and Controls
Exercise 1
Creating a custom text box that only shows characters in upper case
In this exercise you create a custom text box by inheriting from the text box class. The new text box will convert characters to upper case by overriding the OnTextChanged method.
- Create a new Windows Class Library project called UpperText.
- Add a reference to the System.Windows.Forms namespace:
- Select the Project Menu or right-click the solution name.
- Then select Add Reference.
- Make sure the .NET tab is selected and search for the above namespace.
- Select it and then click ok.
- Type using System.Windows.Forms; into the beginning of the Class1.cs file.
- Rename the Class1.cs file to UpperText.cs
- In the class declaration include an inherits statement:
public class UpperTextBox : TextBox - At the top of the UpperText.cs file import the forms namespace:
using System.Windows.Forms; - Override the base textbox’s OnTextChanged() method with:
protected override void OnTextChanged( EventArgs e )

{

int sel = SelectionStart;

Text = Text.ToUpper();

SelectionStart = sel;

base.OnTextChanged( e );

} - Build the project
- View code file.
Exercise 2
Creating a new Windows Application that tests the custom text box on a form
- Add a Windows Applications project to the solution and call it ControlTester.
- Set this project as the start-up project.
- Drag the upper text box from the toolbox to the form designer.
- Test the control by running the project and typing text in lower case in to the text box.
- Create a new Windows Applications project in a separate .Net solution.
- Add the custom text box to the designer toolbox by right clicking, then selecting Choose Items … from the context menu.
- Browse to the .dll file for the custom text box.
- Drag the custom text box on to the form and again test the project.
Exercise 3
Creating a user control that shows product information
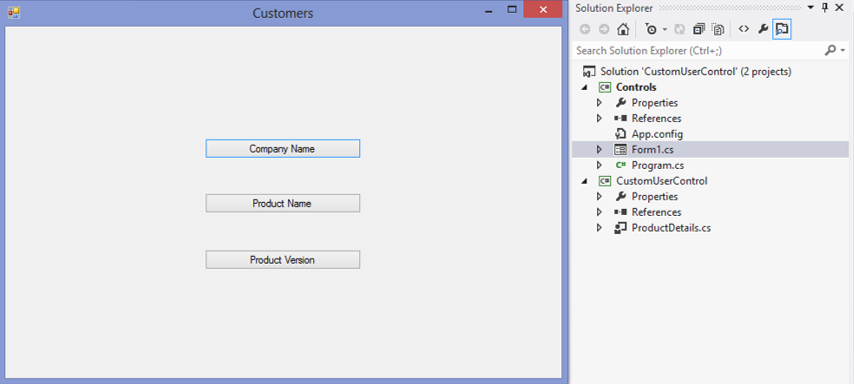
In this exercise you create a user control. The control contains three buttons; each will display different product information.
- Create a new Windows Control Library project called CustomUserControl.
- Rename the UserControl1.cs file to ProductDetails.cs
- Drag three button from the toolbox on to the user controls designer.
- Add this code to the each of the button’s event handlers (the 1st statement goes in the 1st event handler, etc.):
MessageBox.Show("The company name is PCTalk");

MessageBox.Show("The product name is customers application");

MessageBox.Show("The product version is 1.0.0.0"); - Run the project. The user control is shown in a TestContainer dialog box.
- View code file.
Exercise 4
Creating a Windows Application that tests the user control on a form
In this exercise you will test the user control you have created. You will do this on from a new Windows Application project.
- Add a Windows Forms Applications project to the solution and call it Controls. This is achieved by:
- Right-clicking the solution name: ControlTester.
- Select Add.
- Select New Project.
- Set this project as the start-up project.
- Drag the custom control from the CustomUserControl tab on toolbox to the form designer.
- Run the project and test the user control by clicking the buttons.
Creating a custom about box form
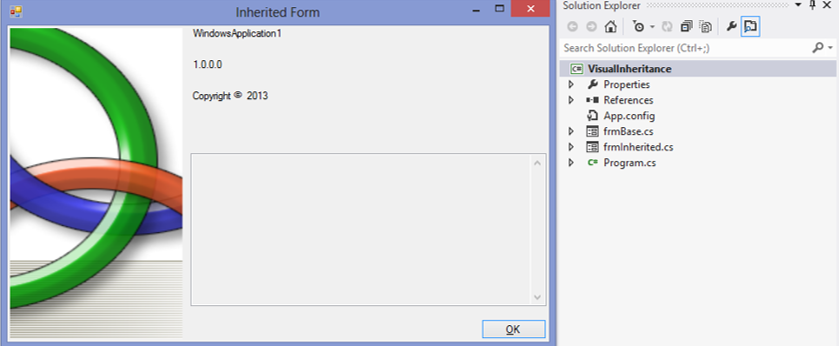
In this exercise you will create a custom About Box with an OK button. You will then add another form that inherits from the About Box, but changes the behavior of the button.
- Create a new Windows Forms Application project called VisualInheritance.
- Add an About Box to the project called frmBase. Make the scope of the class frmBase public.
- Customize the About Box with appropriate labels.
- Add code to the button’s event handler to close the form, make the event handler virtual and have protected scope
protected virtual void okButton_Click(object sender, EventArgs e) - Make this form the start up form for the project and test it.
- Add a second Windows Form to the project called frmInherited.
- In this form’s code file (frmInherited.cs), edit the class definition to:
public partial class frmInherited : VisualInheritance.frmBase - Override the OK button’s event handler, so that it also displays a message:
protected override void okButton_Click(object sender, EventArgs e)

{

MessageBox.Show("The form will close");

this.Close();

} - Run the project and test the inherited About Box by clicking the OK button.
- View code file.


If you would like to see more content like this in the future, please fill-in our quick survey.