Use the skills taught on our Java course to help build a simple Java game using multi-threading, swing and much more and if you are up for it maybe even your own AI bot to play against
About this Tutorial –
Objectives –
This tutorial is aimed at object-oriented developers (e.g. C++ or C#) who need to transition into Java. It is also aimed at those learning to program for the first time; the tutorial covers the Java programming constructs and APIs quickly, focussing on the differences between Java and other OO languages.
Audience
This tutorial is aimed at OO developers who need to transition into Java.
Prerequisites
No previous experience in Java programming is required. But any experience you do have in programming will help. Also no experience in Eclipse is required. But again any experience you do have with programming development environments will be a valuable.
Contents
The Java tutorial covers these topics and more:
- Multi-threading – Many clients playing on one server with the possibility for AI
- Inheritance – Many game items inheriting of one superclass
- Concurrency – when working with multiple objects on one class you need to protect certain things
Exam Preparation
The Java tutorial will help you prepare for these certifications:
- Oracle Certified Java Associate – Exam 1Z0-803
- Oracle Certified Java Professional – Exam 1Z0-804
Quick Access
Lab 1: Understanding the Game
Lab 2: Designing the Architecture
Lab 3: Basic Setup and ClientGUI creation
Lab 4: Server creation
Lab 5: ClientThread – Allowing multiple users
Lab 6: Add functionality to the server
Lab 7: Add functionality to the client
Lab 8: Creating the map
Lab 9: Implementing all the game items
Lab 10: Creating the player
Lab 11: Creating the GameLogic
Lab 12: Creating the GUI
Overview
Estimated Time – 10+ hours
Lab 1: Understanding the game
- Why are we making a game?:
- To help teach and consolidate your Java skills
- Create a program that is fast and fun to do
- Learn how all your Java skills come together to make a project with some advanced skills
- The idea of the game:
- Players are spawned in a darkened dungeon
- They can only see so much of the map and the rest is dark and not visible
- The aim is to collect a certain amount of gold laying in the map
- Then make it to the exit before another player and without dying
- You can pick-up items that can help you along the way such as lanterns and swords
- It is a turn based game, meaning you have to be strategic
- The components of the game:
- Multi-player
- Chat System
- Graphical UI with graphical game
-
The game has many parts to it which you will soon see and is easily extensible such as being able to fight in the game and kill opponents and also the ability to run an AI bot on and off-line which I have partially implemented that will allow you to test your skills while still having some direction in how to do it.
- The Rules of the game:
- Each player starts off with six APs (Action Points) which dictates how many things they can do in one turn (this can change depending on items they hold)
- A player has three HPs that will be used if you decide to implement the ability to attack opponents
- The player can move one block at a time using one AP
- To pick up an item will use one AP
- Picking up a sword or shield will lower your APs for each round by one for each item; e.g. owning both a sword and shield means you only get 4 APs per turn instead of 6
- Picking up a lantern will increase your FOV (Field of View) by one allowing you to see your enemies before they can see you
- Picking up health potion will restore one HP
- The player starts with zero gold and will need to pick up a certain amount of gold before being able to exit (gold changes depending on map) and win the game
- Two people cannot occupy the same square on the map
Lab 2: Designing the Architecture
-
When creating any project that is going to involve many classes it is a good idea to think about its design and where we can use inheritance sensibly. From experience I can say it is best to spend time at the start designing than create a project and realise that you need to refactor most of your code to add a new feature.
-
When I was creating this I have tried to create it in an MVC style- this is a Model View Controller design, with the Views being the user interface, the Controller that would control inter with the user and the back-end; next would be the Model which would handle all of the back-end work that would revolve around processing.
-
Also after thinking about the game there would be many items that the user can pickup and hence it would be useful to create inheritance for game items and then just change the specific actions that the item would do when the user picks it up. This will save re-writing code and will also help with maintenance and upgrades.
- With the above in mind I have created a quick diagram that should help explain how the structure should look, however when creating all applications often things will change as you develop them as you need to introduce new classes and it is just about making sure you keep classes separated and self-contained as much as possible and use inter-class communication as little as possible. However it is still often needed.
Lab 3: Basic Setup and ClientGUI creation
- We are not going to be using a base project that is provided to for you, instead we are going to be building everything from scratch – I am going to be using the Eclipse IDE to do this but you are welcome to use IntelliJ, Netbeans, any other Java IDE or even just use a text editor and compile everything via command line – First Java Tutorial
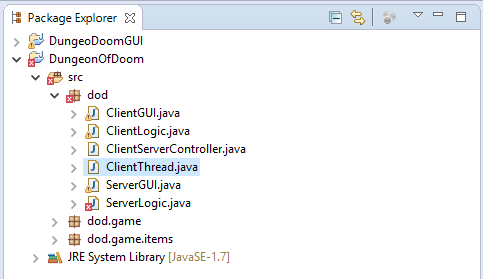
- Open Eclipse and create a new Java Project which contains three packages and layout as shown below:
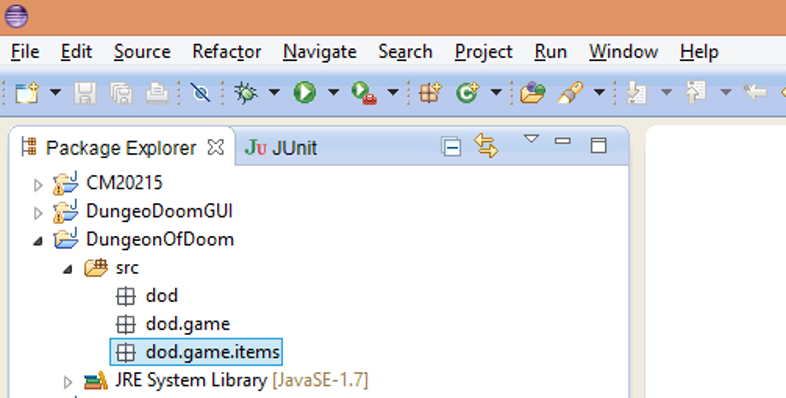
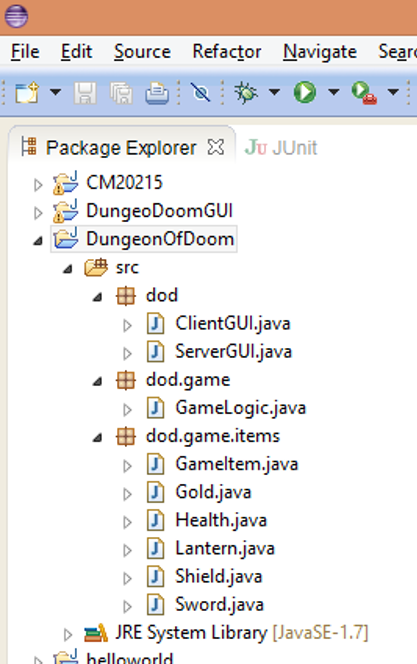
- Now we need to create a few things – We are going to create two classes in dod called ClientGUI and ServerGUI; in dod.game we are adding a class called GameLogic and finally in dod.game.items we are adding classes Armour, Lantern, Sword, Health, Gold and GameItem. All the classes above can be created by right clicking the src folder -> New -> class and using the package dod, dod.game and dod.game.items respectively and using the names as above and just click finish so as to create empty classes that we can then write the code for. These are not all the classes but these will be all we will create for now.
- First we will tackle the problem of trying to have multiple clients running off one server which means we will need to use multi-threading, this can be considered something more advanced in terms of Java and can be hard to understand Multi-Threading Java Tutorial. For this we will need to create three more classes, one that is going to handle the flow of communication from the interfaces and go to a controller like class that will then deal with the information and pass this to two model classes to do the actual processing. The reason for two models is that the server and client should be two separate entities and therefore do different processing requirements.
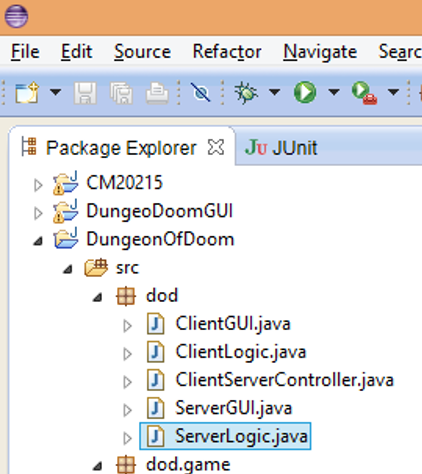
- To start the ClientGUI and ServerGUI will be run via commandline, this is for ease of use and testing purposes at the start, later on we will refactor these classes to use Java swing and create a graphical interface that will be easier for normal users. This is just to clear up any confusion now to why I have named them GUI but will be creating a command line interface now.
- Lets start with ClientGUI and get it sending it messages to ClientLogic (We will implement this after we create the server). First thing that pops into my head is that we need to implement a BufferReader that will read input from the console allowing us to take server details and then send commands to ClientLogic with our commands. To do this we need to import three libraries to start off with in ClientGUI
import java.io.BufferedReader;

import java.io.IOException;

import java.io.InputStreamReader;
- Next add a private variable for the BufferReader allowing us to use it in multiple methods and initialise the BufferReader making sure it is taking input from “System.in” and add variables for the server IP address and port value
public class ClientGUI {

  private BufferedReader br = new BufferedReader(new InputStreamReader(System.in));

  private String ServerIP;

  private int PortValue;

  ...
- In the constructor get the server IP and port from the user remembering to have try catch to get any exceptions that could occur when using BufferReader
try {

  System.out.println("Please Enter The Sever Name or IP: ");

  ServerIP = br.readLine();

  System.out.println("Please Enter the Port number for the server: ");

  PortValue = Integer.parseInt(br.readLine());

} catch (IOException e) {

  System.out.println("Buffer Reader does not exsist");

} catch (NumberFormatException e1) {

  System.out.println("Port can only be a number");

}
- Now add a method that can be called. This will go into a loop always taking user input so that we can do actions such as move north etc…
 public void TakeInputAndAct() throws IOException{

  while (true){

   System.out.println("Command: ");

   String InputMessage = br.readLine();

   switch (InputMessage){

    case "N": // Call N Method in ClientLogic

     break;

    case "W": // Call W Method in ClientLogic

     break;

    case "E": // Call E Method in ClientLogic

     break;

    case "S": // Call S Method in ClientLogic

     break;

    case "PICKUP": // Call PICKUP Method in ClientLogic

     break;

    case "EXIT": System.exit(0);

     break;

   }

  }

 }
- Lastly for now we will add our main method that is called when we run the class that will start everything
 public static void main(String args[]){

  ClientGUI client = new ClientGUI();

  try {

   client.TakeInputAndAct();

  } catch (IOException e) {

   System.out.println("Buffer Reader does not exsist");

  }

 }
Lab 4: Server creation
- We are now going to create a server so that we can have multiple clients connecting; this is going to be via command line to start as stated in the tutorial above just to create a thin slice that we can then make into a GUI later. All we are going to be doing for ServerGUI for now is to implement a BufferReader and send data to ServerLogic. So similar to ClientGUI implement a BufferReader and make the necessary imports.
import java.io.BufferedReader;

import java.io.IOException;

import java.io.InputStreamReader;

public class ServerGUI {

  private BufferedReader br = new BufferedReader(new InputStreamReader(System.in));

  private static int serverPort;

  private static boolean created = false;

  private static ServerLogic serverLogic;

  etc...
- Now create the constructor to read in the port number that we want the server to run on, this will later on send the port number to ServerLogic.
public ServerGUI() throws NumberFormatException, IOException {

  System.out.println("Please Enter The Sever Port: ");

  serverPort = Integer.parseInt(br.readLine());

}
- Now create the main method that will create the ServerGUI – This will give errors for now as we have not dealt with the exceptions which we will do later
public static void main(String args[]) {

  ServerGUI server = new ServerGUI();

}
- Now we can introduce the more interesting part in ServerLogic where we create the game and then allow clients to join and then we can modify the main method of ServerGUI to work with this. In ServerLogic we will make a our variables, these will be a serversocket, a game and a port number making sure to add any imports that are needed.
import java.io.IOException;

import java.net.ServerSocket;

import java.net.Socket;

import java.text.ParseException;

import dod.game.GameLogic;

public class ServerLogic {

 private int portValue;

 static GameLogic game = null;

 static ServerSocket serverSocket;
- Now add the constructor that will initialise any variables, create the server socket and then create the game that users will play on
public ServerLogic(int portValue) throws IOException {

  this.portValue = portValue;

  serverSocket = new ServerSocket(portValue);

  System.out.println("Started Server");

  game = new GameLogic("defaultMap"); // use one map which is the default, implement a file chooser

}
- We will now add two methods – waitForPlayers and kill – waitForPlayers will enter a loop and will just wait for clients to connect and then handle them by creating a new thread for each client. kill does what it says on the tin and will attempt to close the serversocket that will then free up the port on the computer.
public void waitForPlayers() throws IOException{

  int ClientNo = 1;

  while (true)

   {

    Socket Client = serverSocket.accept();

    System.out.println("Client Arrived");

    System.out.println("Start Thread for " + ClientNo);

    // create new client thread for multiple clients

    ClientThread task = new ClientThread(Client, game, ClientNo);

    ClientNo++;

    new Thread(task).start();

   }

}

public void kill(){

  try {

   serverSocket.close();

  } catch (IOException e) {

   System.out.println("Could not Close ServerSocket");

  }

}
- Now we can go back to serverGUI and change our main method to work with this – this will create a new serversocket and wait for players to join and is in a try loop as if it fails due to the port being in use it will just loop again and they can enter a new port; if it succeeds then it will enter the loop waiting for clients – if this ends it will then hit the finally clause and will free the port.
while (!created){

   try {

     ServerGUI server = new ServerGUI();

     serverLogic = new ServerLogic(serverPort);

     serverLogic.waitForPlayers();

   } catch (IOException IOE) {

     System.out.println("Could not create Server - Use different Port - IO");

   } catch (ParseException PE) {

     System.out.println("Could not create Server - Use different Port - PARSE");

   } catch (NumberFormatException NFE){

     System.out.println("Entered Server Port Incorrectly");

   }

   finally{

     if (serverLogic != null){

       serverLogic.kill();

    }

   }

}
- In the next lab we will now deal with an error that you will have received as there is no ClientThread class but this is the more difficult part to understand hence we will did it in a lab
Lab 5: ClientThread – Allowing multiple users
- A picture to help describe the idea behind a client server architecture
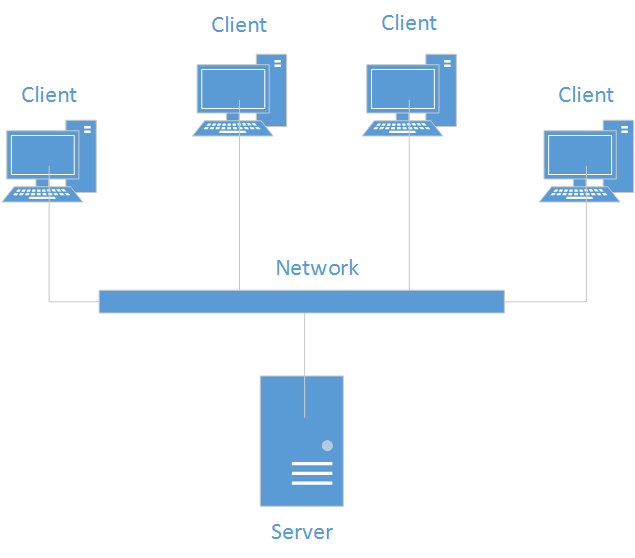
- Lets get down and dirty and create our client thread – this will be more complex but you can find out more from tutorial 15 – Multi-Threading Java Tutorial. Create our client thread class as we have done before and just make it empty in dod.
- Import our libraries we are going to use
import java.io.*;

import java.net.*;

import dod.game.GameLogic;
- Make it so the class can handle threading – do this by implementing runnable
public class ClientThread implements Runnable{

... }
- Add variables to use with the constructor and server – we will need an input and output channel for sending message to and from the server. We will need for each client a unique number for them; we will also hold the game object being used by the server and the socket object that is specific to each client.
private BufferedReader input;

private PrintWriter output;

private int clientno;

private Socket socket;

private GameLogic Game;

private ClientServerController CSC;
- Now create the constructor – this will not be complete but we will implement the rest when we get round to it.
public ClientThread(Socket Client, GameLogic game,int clientNo){

  this.Game = game;

  this.clientno = clientNo;

  this.socket = Client;

  CSC = new ClientServerController();

  // So we can see what unique clients have joined

  System.out.println(Client.toString());


  // creates streams

  try{

   input = new BufferedReader(new InputStreamReader(socket.getInputStream()));

   output = new PrintWriter(new OutputStreamWriter(socket.getOutputStream()), false);


   // adds player to the game and tells them the goal required

   // super.addGame(game, this); IMPLEMENT AT A LATER DATE

  }

  catch (IOException e)

  {

   // this should never happen anyways

   System.err.println("Streams Not set Up for Client");

  }

 }
- Why is there still and error? – We need to implement all the methods used by the runnable interface; amazingly this method is called run and is used when the thread is processing. But a big question is what do we put in run? This is where we start to need to add some form of functionality.
@Override

public void run() {

// What do we want the client to do?

}
- But before we do that, why don’t we just add a few more bits a pieces. Then test that we are able to run multiple users from one server – While we are on client thread we can just add this code. This will just output to the client from the server a set number of times with intervals allowing us to see if the server can send message to multiple clients at the same time.
 @Override

 public void run() {

  // take input from client AND deal with it

  try {

   for (int i = 1; i <= 10; i++) {

    outputMessage("Test to Client : " + Integer.toString(clientno));

    System.out.println("Test to Client : " + Integer.toString(clientno));

    Thread.sleep(5000);

   }

  } catch (InterruptedException e) {

   e.printStackTrace();

  }

 }

// Sends a message to the client

protected void outputMessage(String message) {

 CSC.ServerToClientMessage(output, message);

}
- Now in our ClientServerController which will control the flow of messages we will implement the method above that sends a message to the client – So we will just make an empty constructor and a new method. Remember to import java.io.PrintWriter to allow the method to work
public ClientServerController() {

}

public void ServerToClientMessage(PrintWriter output, String message){

  output.println(message);

  output.flush();

}
- Now we just need to build the client side to receive these message and display them – So go to ClientLogic that was made at the start, firstly lets import the libraries that we are going to be using.
import java.io.BufferedReader;

import java.io.IOException;

import java.io.InputStreamReader;

import java.io.PrintWriter;

import java.net.Socket;
- Now we will add the variables we are going to use
private PrintWriter output;

private BufferedReader input;

private ClientGUI clientGUI;

private Thread thread;

private Socket server;

private ClientServerController CSC;
- Change the class so that it implements runnable that will be used later so that we can receive and send message at the same time later.
public class ClientLogic implements Runnable {

  ....

}
- Add the constructor for the class that will initalise everything for the class.
public ClientLogic(String Name, int Port, ClientGUI clientGUI) throws IOException{

  server = new Socket(Name, Port);

  output = new PrintWriter(server.getOutputStream(), false);

  input = new BufferedReader(new InputStreamReader(server.getInputStream()));

  CSC = new ClientServerController();

  this.clientGUI = clientGUI;

  // start thread

  thread = new Thread(this);

  thread.start();

}
- Implement the run method that is needed when interfacing with runnable.
@Override

public void run() {

  try {

    waitforserver();

  } catch (SocketException e1) {

    CSC.ClientToClientMessage(clientGUI, "Connection lost to server");

  }

  catch (IOException e) {

    CSC.ClientToClientMessage(clientGUI, "Connection lost to server");

  }

  catch (RuntimeException e2) {

    CSC.ClientToClientMessage(clientGUI, "Connection lost to server");

  }

}
- Create our wait for server method that will just wait for a message from the server and then send it to clientGUI.
private void waitforserver() throws IOException, SocketException, RuntimeException {

  while(true)

  {

    String serverReply = input.readLine();

    CSC.ClientToClientMessage(clientGUI, serverReply);

  }

}
- Now going to ClientServerController add the method ClientToClientMessage.
public void ClientToClientMessage(ClientGUI clientGUI, String serverReply){

  clientGUI.OutputSent(serverReply);

}
- We are almost there now and just need to update ClientGUI to work with ClientLogic – so just have ClientGUI create a ClientLogic object when its created.
private ClientLogic clientLogic;

public ClientGUI() {

  try {

    ...

    clientLogic = new ClientLogic(serverIP, portValue, this);

  } catch (IOException e) {

    System.out.println("Buffer Reader does not exsist");

  } catch (NumberFormatException e1) {

    System.out.println("Port can only be a number");

  }

}
- And finally just add the last method to output to standard out on the ClientGUI.
public void OutputSent(String Reply){

  System.out.println(Reply);

}
- Lets test to see if all this works – Just start the ServerGUI and enter the port number for this (I normally choose 8569 but will differ per machine used).

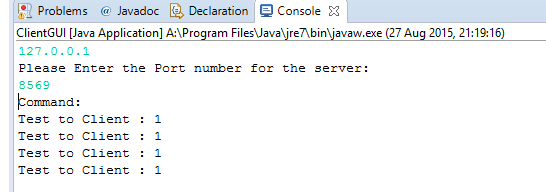
- Now just start two ClientGUI’s and you should see something similar to this – For Client 1
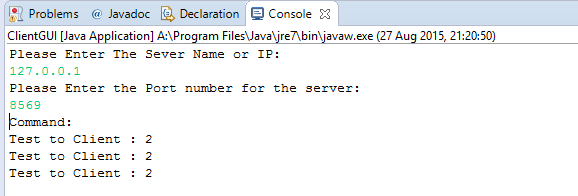
- For client 2 it should look like this
- And what the server log looks like afterwards:
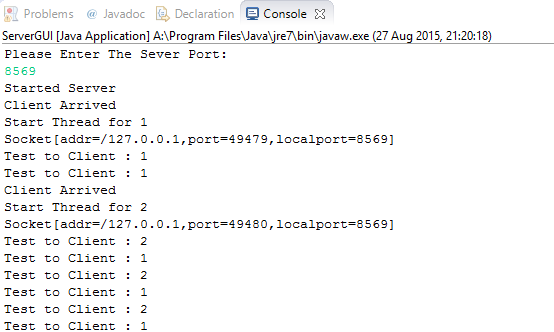
- As you can see it will just keep sending messages to the clients, this is good however as it shows we now have a working connection that allows multiple clients to connect and they are seen as separate objects and will allow us to now add functionality.
Lab 6: Add functionality to the server
- We are now going to be creating a player; but what actions do we want the player to be able to take? …Quite obviously we want to move and be able to pickup objects, but how do we implement this?
- To create what we have described above we are going to use an interface to describe the type of operations we want to be able to perform. Then we will use a class that will act as a parent class to be inherited allowing us to easily extend our application if we want to enable AI bots or Monsters etc….
- So to start coding this – create a new interface in dod.game and called PlayerListener and add these set of methods to it – because its an interface there is no need to implement them Interfaces Tutorial and they are merely like a guideline of rules to follow.
public interface PlayerListener {

 public void sendMessage(String message);

 public void sendChatMessage(String message);

 public void startTurn();

 public void change();

 public void endTurn();

 public void win();

 public void lose();

 public void hpChange(int value);

 public void treasureChange(int value);

}
- Next we will create the class that implements this PlayerGuide that will reside in dod – this will need to be created as new and will be an abstract class as we will only use it to inherit from.
package dod;

import dod.game.PlayerListener;

public abstract class PlayerGuide implements PlayerListener {

 ...

}
- We will add a few things at the start – One being a variable that will hold the current game that will be used throughout many of the methods and two abstract methods that will ensure any class that extends these will implement them.
private GameLogic game;

private ClientServerController ChildCSC;

// Handled by ClientThread as this uses network

public abstract void run();

// Handled by ClientThread as this uses network

abstract protected void outputMessage(String message);
- We will add all of our methods used by PlayerListener first that will output messages to the player from the server.
@Override

public void sendMessage(String message) {

  outputMessage("MESSAGE " + message);

}

@Override

public void sendChatMessage(String message) {

  outputMessage("CHAT" + System.getProperty("line.separator") + message);

}

@Override

public void startTurn() {

  outputMessage("STARTTURN");

}

@Override

public void change() {

  outputMessage("CHANGE");

}

@Override

public void endTurn() {

  outputMessage("ENDTURN");

}

@Override

public void win() {

  outputMessage("WIN");

}

@Override

public void lose()

{

  outputMessage("LOSE");

}

@Override

public void hpChange(int value) {

  outputMessage("HITMOD " + value);

}

@Override

public void treasureChange(int value) {

  outputMessage("TREASUREMOD " + value);

}
- Now are going to start adding functionality for the client and server we need to ensure that we send the correct message that the server is expecting to receive.
So what is easiest to do is to create all of the actions that you want to use in one class such as just on the server and then mirror those actions from the client; this can really help in making sure you understand what is happening and will cause less errors than building both sides at the same time.
- We will add two methods to start – One method will add a player to the game and will be one of the first things to be done when a client first joins and also sets the game variable for other methods to use. The second method will be one of the last methods to be called when a client leaves the game and will make sure everything cleanly ends.
public void addGame(GameLogic game, ClientThread thread)

{

  ChildCSC.addGame(this,game,thread);

  // The first message must be GOAL

  outputMessage("GOAL " + this.game.getGoal());

}

public void UserConnectionGone(ClientThread thread)

{

  // kill the player in the game

  ChildCSC.die(game, thread);

  // remove them from the turns list

  ChildCSC.playerleft(game, thread);

}
- Now add these methods to the ClientServerControler
public void addGame(PlayerGuide playerGuide, GameLogic game, ClientThread thread) {

  game.addPlayer(playerGuide, thread);

}

public void die(GameLogic game, ClientThread thread) {

  Player player = game.getPlayerThreadMap(thread);

  game.die(player);

}

public void playerleft(GameLogic game, ClientThread thread) {

  Player player = game.getPlayerThreadMap(thread);

  game.playerleft(player);

}
- We will now create the methods that will deal with taking user input and reacting to them in the game – this is done in a generic way so as to easily add new commands later on. The method is called processCommand that will split a string into a command and argument.
public void processCommand(String commandString, ClientThread thread) {

  commandString = commandString.toUpperCase();

  // Process the command string e.g. MOVE N

  final String commandStringSplit[] = commandString.split(" ", 2);

  final String command = commandStringSplit[0];

  final String arg = ((commandStringSplit.length == 2) ? commandStringSplit[1]: null);

  try {

    processCommandAndArgument(command, arg, thread);

  } catch (final CommandException e) {

    outputMessage("FAIL " + e.getMessage());

  }

}
- The above deals with a custom exception that will be used in processCommandAndArgument so it is easiest to deal with this now and create this exception class – To do this in Eclipse, click and hover over the error CommandException and click “Create class CommandException” and put this in dod.game.
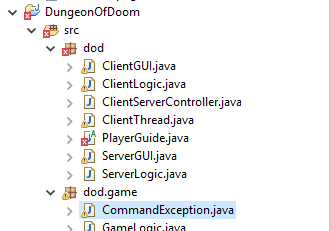
- Now in CommandException generate a new serial version ID by clicking CommandException and hovering over this and selecting “Add generated serial version ID” – This will then add something similar to this below.
private static final long serialVersionUID = 8327609090573079633L;

- Now in CommandException just add this constructor that will go to and send the string message to the parent class Exception.
public CommandException(String message) {

  super(message);

}
- Now we have a new custom exception we can move onto PlayerGuide and the method that we need to implement called processCommandAndArgument – this method deals with the command and argument sent by the user and calls the relevant method in CSC that will control all our communications from the server and client to the models used like GameLogic.
This will eventually be extended from a class, this just happens to be ClientThread that already has an object of CSC so we can use the super method with a setter to set this in our class instead of creating a new one , the same can be done with GameLogic at the sametime, so we will do that now.
// In PlayerGuide

public void setCSC(ClientServerController CSC)

{

  ChildCSC = CSC;

}

public void setGame(GameLogic game) {

  this.game = game;

}

// In ClientThread

public class ClientThread extends PlayerGuide implements Runnable {

  ...

  public ClientThread(Socket Client, GameLogic game, int clientNo) {

    this.Game = game;

    this.clientno = clientNo;

    this.socket = Client;

    CSC = new ClientServerController();

    super.setCSC(CSC);

    super.setGame(game);

  ...

  }

...

}
- Now this is done lets add our code to deal with input from the user – see the code file/downloadable solution for a full implementation.
private void processCommandAndArgument(String command, String arg, ClientThread thread) throws CommandException {

  if (command.equals("HELLO")) { // HELLO

    if (arg == null) {throw new CommandException("HELLO needs an argument");}

    String name = sanitiseMessage(arg);

    ChildCSC.clientHello(game, name, thread);

    outputMessage("HELLO " + name);

  } else if (command.equals("LOOK")) { // LOOK

    if (arg != null) {throw new CommandException("LOOK does not take an argument");}

    outputMessage("LOOKREPLY" + System.getProperty("line.separator") + game.clientLook(thread));

  } else if (command.equals("PICKUP")) { // PICKUP

    if (arg != null) {throw new CommandException("PICKUP does not take an argument");}

    ChildCSC.clientPickup(game, thread);

    outputSuccess();

  } else if (command.equals("MOVE")) { // MOVE

    if (arg == null) {throw new CommandException("MOVE needs a direction");}

    ChildCSC.clientMove(getDirection(arg), game, thread);

    outputSuccess();

  } else if (command.equals("CHAT")) { // CHAT

    ...

  ...

}
- You will notice there are many errors – In Eclipse click and hover over any error message from ChildCSC and click “Create method … in type ClientServerController”; this will then create the methods that we can then implement in ClientServerController. For any other errors click and hover over them and click “Create Method …” that will add a new private method to PlayerGuide. The last thing to do is to click import dod.game.CompassDirection at the top or add this and click “Create enum …” and make sure this is added to dod.game. Your CSC class should look similar to this when you are done.
public void clientHello(GameLogic game, String name, ClientThread thread) {

  game.clientHello(game, name, thread);

}

public void clientPickup(GameLogic game, ClientThread thread) {

  game.clientPickup(thread);

}

public void clientMove(Object direction, GameLogic game, ClientThread thread) {

  game.clientMove(direction, thread);

}

...

public String clientLook(ClientThread thread) {

  String reply = game.clientLook(thread);

  return reply;

}
- This will also throw errors and you will need to using Eclipse go to the error click it and hover over it and select “Create method … in type GameLogic” – We will implement all these later. There should be no errors in the project once this is done.
- All that is left to do for this lab is to finalise our enum CompassDirection and our three un-implemented methods in PlayerGuide – So to start we will do getDirection that will use the CompassDirection enum, so first we will implement our method getDirection that will simply call compassDiecrtion with a string and expect a compass direction in return e.g. North = N.
private CompassDirection getDirection(String string)throws CommandException {

  try {

    return CompassDirection.fromString(string);

  } catch (final IllegalArgumentException e) {

    throw new CommandException("invalid direction");

  }

}
- Now to create the CompassDirection enum that simply enough will take the first character of the string as the movement direction and will return an exception if it the first letter is not N,W,E or S being either captials or lowercase. To start we will do the enum part, the constructor and a customer toString method.
public enum CompassDirection {

  NORTH('N'), EAST('E'), SOUTH('S'), WEST('W');

  private char text;

  CompassDirection(char text) {

    this.text = text;

  }

  @Override

  public String toString() {

    // Convert to string

  return String.valueOf(this.text);

  }

  ...

}
- Now we will just add two methods, one to convert from a char to a CompassDirection and another to convert from a string to a CompassDirection.
public static CompassDirection fromString(String string) {

  if (string == null) {

    throw new NullPointerException();

  }

  if (string.length() != 1) {

    throw new IllegalArgumentException("invalid compass direction");

  }

  return fromChar(string.charAt(0));

}

public static CompassDirection fromChar(char ch) {

  for (final CompassDirection direction : CompassDirection.values()) {

    if (ch == direction.text) {

      return direction;

    }

  }

  throw new IllegalArgumentException("invalid compass direction");

}
- Now we just need to add our three methods – We will start with santiseMessage, the idea behind this is that we can strip the message of anything that we dont want before sending it. This is mainly going to be used for when chat is working as you dont want the users inadvertently creating any errors in the html that you send.
private static String sanitiseMessage(String s) {

  return sanitise(s, "[a-zA-Z0-9-_ \\.,:!\\(\\)#]");

}

private static String sanitise(String s, String regex) {

  String rv = "";

  for (int i = 0; i < s.length(); i++) {

    final String tmp = s.substring(i, i + 1);

    if (tmp.matches(regex)) {

      rv += tmp;

    }

  }

  return rv;

}
- Finally we will implement the method outputSuccess which is fairly obvious.
private void outputSuccess() {

  outputMessage("SUCCESS");

}
- Now this is done we are ready to receive these messages from the client; so next we will implement the client functionality to send these to the server and once this is done we can then add the game code to deal with these messages and do the necessary changes to the clients.
Lab 7: Add functionality to the client
- To add functionality to the client what we can do is go through PlayerGuide and more specifically the processCommand method – this deals with client input to the server. So what we can do is make it so the client has the functionality to send all of these messages to the server that we have defined. So to start go to ClientGUI and in the TakeInputAndAct method we will add the full list of commands we want to send. Again this will change when we create the GUI but this will do for now while we test. To see the full implementation see the code file or downloadable solution.
public void TakeInputAndAct() throws IOException {

  while (true) {

    System.out.println("Command: ");

    String InputMessage = br.readLine();

    switch (InputMessage) {

    case "MOVE N": clientLogic.MOVEN();

      break;

    case "MOVE W": clientLogic.MOVEW();

      break;

    ....

    case "CHAT MESSAGE": clientLogic.SENDCHAT(InputMessage);

      break;

    case "ATTACK N": clientLogic.ATTACKN();

      break;

    ....

    case "ENDTURN": clientLogic.ENDTURN();

      break;

    case "SHOUT MESSAGE": clientLogic.SHOUT(InputMessage);

      break;

    case "EXIT":

      System.exit(0);

      break;

    }

  }

}
- There will be many errors – Again in Eclipse all you need to do is click on the error, hover over it and then select “Create method …. in type ClientLogic” and do this for all the errors. This will set up the methods in ClientLogic to which we can then just add the implementation to make sure things are sent correctly to the server and in the correct order.
- Now go to ClientLogic and lets implement a few methods – First we will create a new method called sendToServer which will just send our message via the ClientServerController that will be used lots by all the unimplemented methods.
private void sendToServer(String message){

  CSC.ClientToServerMessage(output, message);

}
- Now just implement this in the ClientServerController
public void ClientToServerMessage(PrintWriter output, String message){

  output.println(message);

  output.flush();

}
- Now in ClientLogic we will implement out methods that we auto-generated earlier – See the code file or downloadable solution for a full implementation.
public void MOVEN() {

  sendToServer("MOVE N");

  LOOK();

}

...

public void LOOK() {

  this.currentLookReply = null;

  // Have a look at the map

  sendToServer("LOOK");

  try { // Let the server reply come back so just wait a bit

    Thread.sleep(500);

  } catch (InterruptedException e1) {

    e1.printStackTrace();

  }

}

...

public void SHOUT(String inputMessage) {

  if (inputMessage.equals(" ") | inputMessage.equals("") | inputMessage == null ){

    CSC.ClientToClientMessage(clientGUI, "You Need to enter a Message First");

  }

  else{

    sendToServer("SHOUT" + " " + inputMessage);

  }

}
- Now we have done a lot of work, It would be a good idea to test it – First change the run method in ClientThread so it now deals with taking user input from a client which will just be in a continuous while loop and send it off too processCommand in the parent class.
@Override

public void run() {

  String command = "";

  try{

    while (command  != null){

      command = input.readLine();

      if (command == null || command.equalsIgnoreCase("STOP")){

        System.out.println("Client " + clientno + " left");

      }

      else{

        System.out.println("command sent was '" + command + "' by client No " + clientno );

        super.processCommand(command, this);

      }

    }

  }

  catch (IOException e)

  {

    System.out.println("Client " + clientno + " left");

    try {

      socket.close();

    } catch (IOException e1) {

      e1.printStackTrace();

    }

  }

}
- Now just add to one method in GameLogic, a System.out so we can check to see if the message has been received.
public void clientMove(CompassDirection direction, ClientThread thread) {

  System.out.println("MOVING " + direction.toString());

}
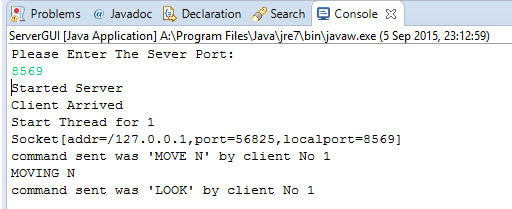
- Now just run the server.

- Next run the client and type in as a command “MOVE N”.
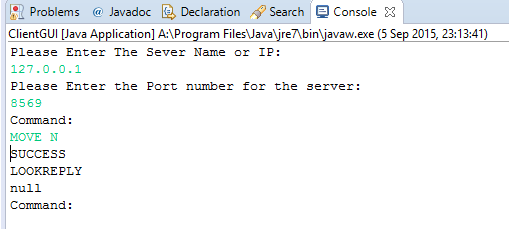
- Check that “MOVING N” is shown in the server console.
- Hopefully everything is now working – Next thing we will do is implement a player and a map.
Lab 8: Creating the map
- The map is a text file that uses different symbols to represent different things such as swords and means you can easily create and change maps. The only thing that needs to be done is to read in a map and transform this into a two dimensional array allowing us to perform operations on it in the game. This may sound easy but the map is integrated throughout the whole project and so has many features and classes associated with it. To see an example map, look in the code file below or the downloadable solution at “defaultMap”.
- The structure of the file is the first line being the map name, the second line being the goal required to win (Gold amount user has to pickup before going to the exit) and then all subsequent lines are the actual map that must be a square.
- First create the Map class in dod.game making sure it is empty – We will then add the variables that we are going to be using, the only one with any explanation needed really is the two dimensional array of type Tile. A Tile will represent a single part of the map e.g. A wall or sword and will have different properties associated with it hence it has its own class and is crucial to the GUI and functionality of the game.
// The name of the map
private String name;
// Lines - e.g. each row of the map
private Listlines;
// The tiles of the map, stored in row-major order, i.e. [row][col]
private Tile map[][];
// The number of gold required to win
private int goal;
// The lines containing the name and goal, and rest of the map
private static final int NAMELINE = 0;
private static final int GOALLINE = 1;
private static final int MAPBEGINLINE = 2;
// Minimum number of lines
private static final int MINLINES = 3;
- To fix any errors use Eclipse – for List you will want to import java.util.list and for Tile you will want to create a class called Tile in dod.game.
- Before we continue on with the Map class I think it is a good idea to complete the Tile class first as this will help with understanding how the Map class actually works – So go to the Tile class and we will implement the variables and the enum that will be used in this class. A tile can be any of the enum below and will hold a value for the character e.g. “P” and a boolean for if it can be walked on e.g. for a FLOOR it would be TRUE.
public class Tile {

  public enum TileType {

    FLOOR('.', true), WALL('#', false), EXIT('E', true), PLAYER('P', false);

    private final char character;

    private final boolean walkable;

    private TileType(char character, boolean walkable) {

      this.character = character;

      this.walkable = walkable;

    }

    public boolean walkable() {

      return this.walkable;

    }

    public char toChar() {

      return this.character;

    }

  }

}
- Now to add the constructors for Tile and the variables used in the class – We have two constructors one for a normal Tile where it is in the enum or for an item.
// The type of the tile

private final TileType type;

// A tile may contain an item

private GameItem item = null;

public Tile(TileType type) {

  this.type = type;

}

public Tile(GameItem item) {

  // Only a floor tile can have an item

  this(TileType.FLOOR);

  this.item = item;

}
- Now just to add a few basic methods to return values or determine properties of a tile that will be used throughout the game – view code file for full implementation or downloadable solution.
public char toChar() {

  if (!hasItem()) {

    return this.type.toChar();

  } else {

    return this.item.toChar();

  }

}

public boolean isWalkable() {

  return this.type.walkable();

}

public boolean isExit() {

  return (this.type == TileType.EXIT);

}

...

public GameItem getItem() {

  return this.item;

}

...

public static Tile fromChar(char character, int Gold) {

  for (final TileType type : TileType.values()) {

    if (character == type.toChar()) {

      return new Tile(type);

    }

  }

  // If we get here, it must be an tile with an item

  return new Tile(GameItem.fromChar(character, Gold));

}
- Now to fix the errors, click on the error, hover over it and create the necessary methods in GameItem and then in GameItem make sure to change the return type of the fromChar method to GameItem. Everything should now be fixed in Tile and we can carry on with the Map class and will come back to GameItem later.
- In the Map class – create the constructor for the class that will take the filename for the map and will create a 2D array from this.
public Map(String filename) throws ParseException, FileNotFoundException {

  lines = readFile(filename);

  if (lines.size() < MINLINES) {

    throw new ParseException(

      "a map file must contain at least three lines",

        lines.size());

  }

  // The first line should always be the name of the map.

  parseMapName(lines.get(NAMELINE));

  // The second line should be the goal.

  parseMapGoal(lines.get(GOALLINE));

  // Read in the map data from the file

  readMap(lines);

}
- Fix the errors in the usual way of using Eclipse help – import both the exceptions and then create the four methods used in the constructor.
- First method to implement would be the readFile method – which will run through the file and create an array for each row of the file, remember that you will need to import java.util.Scanner and java.util.ArrayList.
private ListreadFile(String filename) throws FileNotFoundException {
Scanner scanner = null;
lines = new ArrayList(); // final List
try {
// Use a scanner to read all the lines
scanner = new Scanner(new FileReader(filename));
// Store all the lines in the file
while (scanner.hasNextLine()) {
lines.add(scanner.nextLine());
}
} finally {
if (scanner != null) {
scanner.close();
}
}
return lines;
}
- The next method to implement is parseMapName that will take the first line of the file as the argument.
private void parseMapName(String firstLine) throws ParseException {

  name = getStringAfterTag(firstLine, "name", NAMELINE);

}
- Create the method getStringAfterTag that will return the rest of the line after the value you are looking for.
private String getStringAfterTag(String line, String tag, int lineNum) throws ParseException {

  // The first space will be after the tag

  final int firstSpace = line.indexOf(" ");

  // There may not be a first space

  if (firstSpace == -1) {

    throw new ParseException(

      tag + " not specified in file; the " + tag + " should be be preceded with \"" + tag + "\"",

      lineNum);

  }

  // Check that the tag is the first "word"

  if (line.substring(0, firstSpace).equals(tag)) {

    return line.substring(firstSpace + 1);

  } else {

    throw new ParseException("The map" + tag + "should be preceded with \"" + tag + "\"", lineNum);

  }

}
- Now implement parseMapGoal that works very much in the same fashion.
private void parseMapGoal(String secondLine) throws ParseException {

  final String goalString = getStringAfterTag(secondLine, "win", GOALLINE);

  try {

    goal = Integer.parseInt(goalString);

  } catch (final NumberFormatException e) {

    throw new ParseException("map goal should be an integer", GOALLINE);

  }

}
- Lastly lets create the readMap method to put the map from the file into the 2D arrays called map, this creates the size of the array based off the size of one line of the map as width and the overall number of lines from the start of the map as its height. Next it will move through each character for the map and transform that into a tile inside the 2D array this is done using two for loops one for each row and one for each column until there are no more rows and columns to go through.
private void readMap(Listlines) throws ParseException, IllegalStateException {
final int mapWidth = lines.get(MAPBEGINLINE).length();
final int mapHeight = lines.size() - MAPBEGINLINE;
map = new Tile[mapHeight][mapWidth];
for (int row = 0; row < mapHeight; row++) {
final int lineNum = row + MAPBEGINLINE;
final String line = lines.get(lineNum);
if (line.length() != mapWidth) {
throw new ParseException("all lines must be the same length", lineNum);
}
for (int col = 0; col < line.length(); col++) {
try {
map[row][col] = Tile.fromChar(line.charAt(col), 1);
} catch (final IllegalArgumentException e) {
throw new ParseException("Invalid character (col:" + col + ")", lineNum);
}
}
}
}
- Now we need to add some more methods – some of which are just getter/setter methods and some of which work with a player which we will add but will not implement until we have done the player class. First I am going to add some getters, one of which use a class called Location that we will implement after this.
public int getMapWidth() {

  return map[0].length;

}

public int getMapHeight() {

  return map.length;

}

public int getGoal() {

  return goal;

}

public String getName() {

  return name;

}

public Tile getMapCell(Location location) {

  return map[location.getRow()][location.getCol()];

}
- click on the error for location and select “create class location” make sure this is in dod.game and create the two methods using the same method for both getRow and getCol.
- Lets create Location now and then finish off Map – For Location add these variables with this constructor and these implementations for getCol and getRow. Location is simply a helper method that will just make our code simpler to read and allows you to work out locations in the map that will be called many times throughout Player and GameLogic..
public class Location {

  private final int row;

  private final int col;

  public Location(int col, int row) {

    this.row = row;

    this.col = col;

  }

  public int getRow() {

    return row;

  }

  public int getCol() {

    return col;

  }

  ...

}
- The next two methods are used to return new locations based on your current location. One for using movements; to find if something is N,S,E or W of a location and the other for a specific location.
public Location atOffset(int colOffset, int rowOffset) {

  final Location offsetLocation = new Location(col + colOffset,

  row + rowOffset);

  return offsetLocation;

}

public Location atCompassDirection(CompassDirection direction) {

  switch (direction) {

  case NORTH:

    return atOffset(0, -1);

  case EAST:

    return atOffset(1, 0);

  case SOUTH:

    return atOffset(0, 1);

  case WEST:

    return atOffset(-1, 0);

  default:

    throw new RuntimeException("invalid compass direction");

  }

}
- Now back to Map, we will add the last few methods – for these next methods we will add but will not implement yet as we have yet to create a player and will add this functionality once this has been done.
public void playerPlace(Location location, Player player) {

}

public void updatePlayer(Location location, Player player) {

}

public void removeUser(Location location, Player player) {

}
- The next three are methods used to return or set values – insideMap will return a boolean for whether a location is inside the bounds of the map which is very simple, remainingGold will search each tile in the map and count the amount of gold left and return this, lastly setMapCellGold will set a certain location on the map with a new tile containing an amount of gold.
public boolean insideMap(Location location) {

  if ((location.getCol() < 0) || (location.getCol() >= getMapWidth()) || (location.getRow() < 0)
      || (location.getRow() >= getMapHeight())) {

    return false;

  }

  return true;

}

public int remainingGold() {

  int goldCount = 0;

  for (final Tile[] tileRow : map) {

    for (final Tile tile : tileRow) {

      if (tile.hasItem()) {

        if (tile.getItem().getClass() == Gold.class) {

          goldCount++; // Should actually get the gold and then return the value and add to it

        }

      }

    }

  }

  return goldCount;

}

public void setMapCellGold(Location location, int gold) {

  map[location.getRow()][location.getCol()] = Tile.fromChar('G', gold);

}
- And we are now finished, you will notice that there is an error in remainingGold. This is the error that we are going to fix in the next lab when we implement all of the game items.
Lab 9: Implementing all the game items
- For this lab what we are going to do is implement all the game items – the first one im going to do is Armour and then the rest follow in the same fashion with only a few changes. All of our classes will extend our superclass GameItem so we need to do this first.
public class Armour extends GameItem {

}
- Next we add our constructor that will set the amount the game item will hold, this is very generic and in this case for Armour is the amount of extra damage you can tak.
private int amount;

public Armour(int value){

  amount = value;

}
- Lastly are the overriding methods, these are generally self explantory except for isRetainable that will just return whether an item is held by the player
@Override

public int getAmount(){

  return amount;

}

@Override

public boolean isRetainable() {

  // is retained

  return true;

}

@Override

public String toString() {

  return "armour";

}

@Override

public char toChar() {

  return 'A';

}
- You will recieve an error on isRetainable – this is because we are trying to override a method that has yet to be created, so to fix this simple click on the error and select “create isRetainable in supertype GameItem”.
- Now do the same for Sword except for toString use the value “sword” and for toChar use the value “S”.
- Now do the same for Lantern except for toString use the value “lantern” and for toChar use the value “L”. For this item we will want to use another method called lookDistanceIncrease that will allow us to increase the distance the player can see in the game, this returns a one instead of the usual 0. You will also need to create the method lookDistanceIncrease in the super type GameItem.
@Override

public int lookDistanceIncrease() {

  // The lantern increases the look distance by one

  return 1;

}
- Now do the same for Health except for toString use the value “health potion” and for toChar use the value “H” and for isRetainable use the return value “false”. For this item we will want to use another method called processPickUp that will allow us to increase the health of the player. You will also need to create the method processPickUp in the super type GameItem, import dod.ClientThread and create the interface GameItemConsumer in dod.game.items. Once this is done create the method incrementHealth in type GameItemConsumer and now there should be no errors.
@Override

public void processPickUp(GameItemConsumer player) {

  player.incrementHealth(1);

}
- Now do the same for Gold except for toString use the value “gold” and for toChar use the value “G” and for isRetainable use the return value “false”. For this item we will want to use another method called processPickUp that will allow us to add gold to the player. you will need to import dod.ClientThread and then create the method addGold in type GameItemConsumer.
@Override

public void processPickUp(GameItemConsumer player) {

  // Give the player gold

  player.addGold(amount);

}
- That is now all the actual game items done, but we still need to do the super class GameItem that will do our generic behaviors – first turn GameItem into an abstract class
public abstract class GameItem {

...

}
- Change toChar, getAmount and isRetainable into abstract methods that means the implementation is down to the child class.
public abstract char toChar();

public abstract int getAmount();

public abstract boolean isRetainable();
- Then add an implementation for processPickUp that by default will be empty and will be implemented only by those items that use it, next lookDistanceIncrease that will by default return 0 but for Lantern will return a one and can only be used by a retainable item, lastly implement fromChar that will create a new item with a specific value from a char.
public void processPickUp(GameItemConsumer player) {

}

public int lookDistanceIncrease() {

  // Only retainable items will be able to affect the distances

  assert isRetainable();

  // Return zero by default

  return 0;

}

public static GameItem fromChar(char ch, int Value) {

  switch (ch) {

  case 'A':

    return new Armour(Value);

  case 'G':

    return new Gold(Value);

  case 'H':

    return new Health(Value);

  case 'L':

    return new Lantern(Value);

  case 'S':

    return new Sword(Value);

  default:

    throw new IllegalArgumentException("Invalid tile type" + ch);

  }

}
- Next we will finish off GameItemConsumer which being an interface will have no body for the methods and is just made to be used by a player to make sure these actions are possible, you should have two methods in there called incrementHealth and addGold but these need to be abstract and we also need two more methods zeroAP and toChar that will be done by the player.
public interface GameItemConsumer {

  public abstract void incrementHealth(int hp);

  public abstract void addGold(int gold);

  public abstract void zeroAP();

  public abstract char toChar();

}
Lab 10: Creating the player
- First create a class in the dod.game called Player and add these variables and any unimplemented methods – There are 4 variables that are not very obvious. tempTile, tempVal and currentTile all relate to working with the player and map through GameLogic and are not used by Player directly. Lastly is lookView which represents a row in the map.
private String name;

// Does the player have a default name

private boolean defaultName = true;

// The player may be "listened to" to interpret updates

private final PlayerListener listener;

private ClientThread thread;

private Map map;

// Location on the map

private Location location;

private Tile tempTile;

private Location tempVal;

private Tile currentTile;

// How much gold they have, initially zero

private int gold = 0;

// Player attribute value things

private int hp = 3;

private int ap = 0;

// Items the player has

private ArrayList<GameItem> items;

// current look reply

private String lookView;

// Constants

// How many APs does a player have by default

private static final int defaultAP = 6;

// How many APs does the player lose per item

private static final int apPenaltyPerItem = 1;

// How far can a player see by default and with a lantern

private static final int defaultLookDistance = 2;
- Create the constructor for a player – a player will have a name, location in the map, a listener, a specific thread for the GUI and will belong in a map.
public Player(String name, Location location, PlayerListener listener, ClientThread thread, Map map) {

  this.name = name;

  this.location = location;

  this.map = map;

  this.thread = thread;

  // By default the player starts with nothing

  this.items = new ArrayList<GameItem>();

  this.listener = listener;

}
- Add a method that will place the player in the map with their location and another method that will update the player in the map with a new location. Also similarly add two methods, one to return the location of the player and another to set the location of the player.
public void placeThePlayer(){

  map.playerPlace(location, thread);

}

public void updateThePlayer(){

  map.updatePlayer(location, thread);

}

public Location getLocation() {

  return location;

}

public void setLocation(Location location) {

  this.location = location;

  updateThePlayer();

}
- Next add a method that will get the players name and also a method that will set the players name – you will need to add the methods getUserNames and setUserNames to GameLogic and the return type of getUserNames will be of type ArrayList<String>.
public String getName() {

  return name;

}

public void setName(String name, GameLogic game) throws CommandException {

  if (!defaultName) {throw new CommandException("player's name already set");}

  if (game.getUserNames().contains(name)){

    throw new CommandException("player's name in use");

  }

  else{

    game.getUserNames().remove(this.name);

    this.name = name;

    game.setUserNames(name);

    defaultName = false;

  }

}
- Add the getters and setter for the amount of gold the player has.
public int getGold() {

return gold;

}

@Override

public void addGold(int gold) {

  this.gold += gold;

  this.listener.treasureChange(gold);

}
- Add two methods that will interrogate or interact with health to see if the player is dead and return the players health. Implement one more method to add too their health.
public boolean isDead() {

  return (hp <= 0);

}

public int getHp() {

  return hp;

}

@Override

public void incrementHealth(int hp) {

  this.hp += hp;

  this.zeroAP();

  this.listener.hpChange(hp);

}
- Now add four methods to return the action points left for the player, lower the action points and reset the action points to what they should be at the start of each turn. Implement 1 method to make the player action points go to zero if they want to skip their turn.
public int remainingAp() {

  return ap;

}

public void decrementAp() {

  ap--;

  assert ap >= 0;

}

public void resetAP() {

  ap = initialAP();

}

private int initialAP() {

  final int initialAP = defaultAP - apPenaltyPerItem * items.size();

  if (initialAP < 0) {

    // Better drop some items

    return 0;

  }

  return initialAP;

}

@Override

  public void zeroAP() {

  ap = 0;

}
- Now we will move onto methods that are focused more around utilizing the player within the game such as maps, chat messages and turns. First we will add a unique method that is used to return the lookdistance the player can see in the game that can be effected by having a lantern.
public int lookDistance() {

  int lookDistance = defaultLookDistance;

  // Some items, e.g. the lantern, may increase the look distance

  for (final GameItem item : items) {

    lookDistance += item.lookDistanceIncrease();

  }

  return lookDistance;

}
- Now add 2 methods, one will check to see if the player has an item and the other will give/use an item for a player.
public boolean hasItem(GameItem item) {

  for (final GameItem itemToCompare : items) {

    if (item.getClass() == itemToCompare.getClass()) {

      return true;

    }

  }

  return false;

}

public void giveItem(GameItem item) {

  if (hasItem(item)) {

    throw new IllegalStateException("the player already has this item.");

  }

  // The item may do something to the player straight away

  item.processPickUp(this);

  // See if the item is retained by the player

  if (item.isRetainable()) {

    items.add(item);

  }

}
- The next two methods control the sending of messages via the chat system – one for a simple message and the other for a HTML message.
public void sendMessage(String message) {

  listener.sendMessage(message);

}

public void sendChatMessage(String Message) {

  // get Time

  Date dNow = new Date();

  SimpleDateFormat ft = new SimpleDateFormat("hh:mm:ss");

  // turn time into a string

  String timeStamp = ft.format(dNow);

  // add the Time Name of player and message into string to be sent as HTML

  String NameAndTime = "<font>" + timeStamp + " " + name + ": " + "</font>";

  thread.sendChatMessage(NameAndTime + Message);

}
- Now add four simple methods – two methods to start and end a players turn, the other two methods are for when a player wins or loses.
public void startTurn() {

  resetAP();

  listener.startTurn();

}

public void endTurn() {

  zeroAP();

  listener.endTurn();

}

public void win() {

  listener.win();

}

public void lose() {

  listener.lose();

}
- Now add one overriding methods – one for toString and implement the other overriding method for toChar
@Override

public String toString() {

  return "Player";

}

@Override

public char toChar() {

  return 'P';

}
- Add a different method that is used to notify the listner of a change – This is mostly used when the map has been updated.
public void change(ClientThread thread) {

  thread.player.listener.change();

}
- The next lot of methods are simply getters and setters for use with the map and one boolean check to see if a player can see a specific tile. For a full implementation please see the code file or the downloadable solution.
public boolean canSeeTile(int rowOffset, int colOffset) {

  final boolean canSeeTile = (Math.abs(rowOffset) + Math.abs(colOffset) <= lookDistance() + 1);

  return canSeeTile;

}

public Tile getTempTile() {

  return tempTile;

}

public void setTempTile(Tile tempTile) {

  this.tempTile = tempTile;

}

public Location getTempVal() {

  return tempVal;

}

public void setTempVal(Location tempVal) {

  this.tempVal = tempVal;

}

public Tile getCurrentTile() {

  return currentTile;

...

public String getLookView() {

...
Lab 11: Creating the GameLogic
- Now comes the real guts of the game – GameLogic is the class that allows everything to work and acts almost like the core of the application. Hence this lab is going to be more in-depth and quite long but hopefully at the end you will be able to understand and we can test the game and then build the GUI that will sit on top of the client and the server.
- First lets add some variables to the class – there are not many luckily as this mainly deal with logic. UserList holds a list of all the player threads that have connected to the game and UserNames holds a list of all the player names. playerThreadMap is a mapping of the clientThread to the Player so that we can access the player object using the clientThread from the server.
public static Map map;

private boolean playerWon = false;

// List of players and a List of Players Names

private ArrayList<ClientThread> userList = new ArrayList<ClientThread>();

private ArrayList<String> userNames = new ArrayList<String>();

private HashMap<ClientThread, Player> playerThreadMap = new HashMap<ClientThread, Player>();

// used to keep a hold of the number of player keeping a unique name for them

privateint playCount = 0;
- Add the constructor for GameLogic that will create the map from the file that is given to it, You could implement a file chooser if you want to make the application slightly better. In the constructor it will check to make sure there is enough gold on the map so that you can still win. If you now receive an error in ServerLogic just add a throws exception for ParseException and then add this to the try catch that is in ServerGUI.
public GameLogic(String mapFile) throws FileNotFoundException, ParseException {

  map = new Map(mapFile);

  // Check if there is enough gold to win

  if (map.remainingGold() < map.getGoal()) {

    throw new IllegalStateException("There isn't enough gold on this map for you to win");

  }

}
- Now we need to be able to add a player – So we create a unique name for that player, create a player object with that unique name and give them a random location in the map as a starting point. We also send in the listener for the player and the thread and give them the map being used by the server. We then increment playCount so as to make sure we always have a unique name for players. We then place the player in the map and add both their name and thread to a list so that the game can keep track of them.
public synchronized void addPlayer(PlayerListener listener, ClientThread thread) {

  // creates the uniques name

  String playername = "Player " + playCount;

  // sets the client thread's player varibale = to the player

  Player player = new Player(playername, generateRandomStartLocation(), listener, thread, map);

  // used for unique name

  playCount++;

  // place the player in the map to be seen

  player.placeThePlayer();

  // add the player to the thread list and names list

  userList.add(thread);

  userNames.add(playername);

  setPlayerThreadMap(thread, player);

}
- Add the getter and setters for the playerThreadMap hashmap.
public Player getPlayerThreadMap(ClientThread thread) {

  return playerThreadMap.get(thread);

}

public void setPlayerThreadMap(ClientThread thread, Player player) {

  playerThreadMap.put(thread, player);

}
- You will now need to make adjustments to Player as follows to placeThePlayer.
public void placeThePlayer() {

  map.playerPlace(location, this);

}

public void updateThePlayer() {

  map.updatePlayer(location, this);

}
- You will now need to go to Map and we will implement these methods that we left out until Player was done. placePlayer will get the value of the location before the player was placed there and insure this tile is kept, then it will make sure it keeps this location. This tile is then changed into a player with having one amount of gold and then the players position is set to this location. updatePlayer works in the same way except it will just move the player and change the tile from which the player just moved to its previous state and will use the players gold amount instead of one as they may have been playing for some time.
public void playerPlace(Location location, Player player) {

  // value before 'P'

  player.setTempTile(map[location.getRow()][location.getCol()]);

  // location before 'P'

  player.setTempVal(location);

  // Value is now 'P'

  map[location.getRow()][location.getCol()] = Tile.fromChar('P', 1);

  // your current positon's tile

  player.setCurrentTile(map[location.getRow()][location.getCol()]);

}

public void updatePlayer(Location location, Player player) {

// set the previous tile to what it was before now the player has moved

  map[player.getTempVal().getRow()][player.getTempVal().getCol()] = player.getTempTile();

// same as above

  player.setTempTile(map[location.getRow()][location.getCol()]);

  player.setTempVal(location);

  map[location.getRow()][location.getCol()] = Tile.fromChar('P', player.getGold());

  player.setCurrentTile(map[location.getRow()][location.getCol()]);

}
- In Map removeUser does what it says on the tin and will set the tile the player is on to what it was originally now the player is leaving.
public void removeUser(Location location, Player player) {

  map[location.getRow()][location.getCol()] = player.getTempTile();

}
- Now to finalise this method we will implement the generateRandomStartLocation private method – this will return a location for the player to be placed. The first thing that is done in the method is to check that there is at least 1 free tile to place a player on, then using a while loop it will randomly select locations to place the player and as long as this is walkable (e.g. not a player or wall) then it will return this location.
private Location generateRandomStartLocation() {

  if (!atLeastOneNonWallLocation()) {

    throw new IllegalStateException("There is no free tile available for the player to be placed");

  }

  while (true) {

    // Generate a random location

    final Random random = new Random();

    final int randomRow = random.nextInt(map.getMapHeight());

    final int randomCol = random.nextInt(map.getMapWidth());

    final Location location = new Location(randomCol, randomRow);

    if (map.getMapCell(location).isWalkable()) {

      // If it's not a wall then we can put them there

      return location;

    }

  }

}
- Creating the private method atLeastOneNonWallLocation used by generateRandomStartLocation that will return a boolean to whether there is a place for the player to be put on the map. This is done by going through every tile until it finds one that is walkable meaning the player can be placed and then returning true otherwise it will return false.
private boolean atLeastOneNonWallLocation() {

  for (int x = 0; x < map.getMapWidth(); x++) {

    for (int y = 0; y < map.getMapHeight(); y++) {

      if (map.getMapCell(new Location(x, y)).isWalkable()) {

        // If it's not a wall then we can put them there

        return true;

      }

    }

  }

  return false;

}
- Now carrying on with the rest of GameLogic, we will implement the clientCHAT method that will go through all of the players and send them a message which is quite self-explanatory.
public void clientCHAT(String Message) {

  // for all user in game, call player chat message

  for (int user = 0; user < userList.size(); user++) {

    userList.get(user).sendChatMessage(Message);

  }

}
- Now to add a method that will deal with a player leaving the game – this will make the action points zero, start a new turn for someone else and then will remove the player from the player list in the game.
public void playerleft(Player player) {

  player.zeroAP();

  checkNewTurn(player);

  userList.remove(player);

}
- Now to implement the checkNewTurn method that decides who is the next player to have a turn in the game out of the player list – It will go through every player and if the player has some remaining action points then there turn is still in progress, if you have 0 action points and you are the current player then choose the next player in the list to start their turn remembering to deal with the fact that you could be at the end of the list.
public void checkNewTurn(Player player) {

  // for all the users

  for (int user = 0; user < userList.size(); user++) {

    // if the user is still going

    if (userList.get(user).remainingAp() > 0) {

      System.out.println("turn in progress");

      break;

    // if you have 0 ap and its your thread

    } else if ((userList.get(user).remainingAp() == 0)

          && (userList.get(user) == player)) {

      // start the first user as it has hit the end of the list

      if (user + 1 == userList.size()) {

        System.out.println("Start first user");

        startTurn(userList.get(0));

        break;

      // Start the next user in the list after you

      } else {

        System.out.println("Start next user");

        startTurn(userList.get(user + 1));

        break;

      }

    }

  }

}
- Now just add a private method that will start that players turn that has been selected called startTurn.
private void startTurn(Player player) {

  player.startTurn();

}
- Now we just need to add this functionality and a little extra to our ClientThread and PlayerGuide – To start lets add a call to add the player from the ClientThread to the GameLogic that happens in the ClientThread constructor and will inistaiate a message that tells the player the goal required to win the game.
try {

  input = new BufferedReader(new InputStreamReader(socket.getInputStream()));

  output = new PrintWriter(new OutputStreamWriter(socket.getOutputStream()), false);

  // adds player to the game and tells them the goal required

  super.addGame(this);

} catch (IOException e) {

....

}

...

@Override

public void run() {

  String command = "";

  try{

    // check to see if the client can do this

    super.checkTurn(this);

    // If there is a command

    while (command  != null){

      ....

}
- Now add these three methods to PlayerGuide – One to check the turn of the player, one to add a player to the game and tell them the goal required to win in the amount of gold and the last that returns the amount of gold required for that map to win.
protected void checkTurn(ClientThread thread){

  ChildCSC.checkNewTurn(game, thread);

}

public void addGame(ClientThread thread) {

  ChildCSC.addGame(this,game,thread);

  outputMessage("GOAL " + getGoal());

}

public int getGoal(){

  return ChildCSC.getGoal(game);

}
- Lastly just add these to the ClientServerController that will just interact with the GameLogic class and for the last method using the hashmap created earlier to get the player associated with this thread.
public void addGame(PlayerGuide playerGuide, GameLogic game, ClientThread thread) {

  game.addPlayer(playerGuide, thread);

}

public int getGoal(GameLogic game){

  return game.getGoal();

}

public void checkNewTurn(GameLogic game, ClientThread thread) {

  Player player = game.getPlayerThreadMap(thread);

  game.checkNewTurn(player);

}
- Now we add a method that will deal with a player dying due to them leaving the game or dying from being attacked by another player – If the player has no gold it will simply remove them, If the player had gold it will drop this where they currently are if possible assuming its not an exit otherwise it will find a random location to drop it on.
public void die(Player player) {

  int goldValue = player.getGold();

  if (goldValue > 0) {

    if (player.getTempTile().toChar() == 'G') {

      map.setMapCellGold(player.getLocation(),

      player.getGold() + player.getTempTile().getValue());

    } else if (player.getTempTile().toChar() == 'E') {

      // find a random empty tile and place gold

      ...

    } else {

      // Just drop player gold on current tile

      map.setMapCellGold(player.getLocation(),player.getGold());

    }

  } else {

    // removes their 'P' from the map

    removePlayerFromMap(player);

  }

  // check to see if this has changed someones map

  checkChange(player);

}
- you will then need to create the private method removePlayerFromMap that just removes a specific player from the current map.
private void removePlayerFromMap(Player player) {

  map.removeUser(player.getLocation(), player);

}
- Now we will add a method that will allow the player to change their name in the game
public void clientHello(String newName, Player player) throws CommandException {

  assertPlayerExists(player);

  // Change the player name and then say hello to them

  player.setName(newName,this);

}
- Create the the method assertPlayerExists – this will make sure the player exists before trying to perform operation upon it.
private void assertPlayerExists(Player player) throws RuntimeException {

  if (player == null) {

    throw new IllegalStateException(": Player has not been added.");

  }

}
- You will now need to refactor ClientServerController to work with the player and not the thread.
public void clientHello(GameLogic game, String name, ClientThread thread) {

  Player player = game.getPlayerThreadMap(thread);

  try {

    game.clientHello(name, player);

  } catch (CommandException e) {

    System.out.println(e.getMessage());

  }

}
- Now for a very important method that allows will allow the GUI to work – clientLook works by going through each row and column in the map and knowing the players location and look distance will return a string of what the player can currently see. The string returned at the end is concatenation of all the rows from the top to the bottom that is in the players view split by a line separator.
public synchronized String clientLook(Player player) {

  assertPlayerExists(player);

  final int distance = player.lookDistance();

  String lookReply = "";

  for (int rowOffset = -distance; rowOffset <= distance; ++rowOffset) {

    String line = "";

    for (int colOffset = -distance; colOffset <= distance; ++colOffset) {

      final Location location = player.getLocation().atOffset(colOffset, rowOffset);

      char content = '?';

      if (!player.canSeeTile(rowOffset, colOffset)) {

        content = 'X';

      } else if (!map.insideMap(location)) {

        content = '#';

      } else {

        if (map.getMapCell(location) == player.getCurrentTile()) {

          System.out.println("Player was found");

          content = player.getTempTile().toChar();

        } else {

          content = map.getMapCell(location).toChar();

        }

      }

    line += content;

    }

  lookReply += line + System.getProperty("line.separator");

  }

  return lookReply;

}
- Remember to add the code to ClientServerController for it to use player instead of thread using the map we created.
public String clientLook(GameLogic game, ClientThread thread) {

  Player player = game.getPlayerThreadMap(thread);

  String reply = game.clientLook(player);

  return reply;

}
- Now again for a very crucial method that will allow the player to move in the game called clientMove – First check the player exists, then check to see if a player has won otherwise this is pointless, then check they have action points to be able to move. If they can move then move them in the set compass direction and decrement their action points.
public synchronized void clientMove(CompassDirection direction, Player player) throws CommandException {

  assertPlayerExists(player);

  ensureNoWinner();

  try {

    assertPlayerAP(player);

  } catch (IllegalStateException e) {

    player.sendMessage("You have 0 ap");

    throw new CommandException(e.getMessage());

  }

  final Location location = player.getLocation().atCompassDirection(direction);

  if (!map.insideMap(location) || !map.getMapCell(location).isWalkable()) {

    player.sendMessage("Cannot move there - Try Again");

    throw new CommandException("Cannot move into Wall"); // can't move into a wall or player

  }

  player.decrementAp();

  player.setLocation(location);

  return;

}
- Create the two methods assertPlayerAP and ensureNoWinner.
private void assertPlayerAP(Player player) throws RuntimeException {

  if (player.remainingAp() == 0) {

    throw new IllegalStateException("Player has 0 ap");

  }

}

private void ensureNoWinner() throws CommandException {

  if (this.playerWon) {

    throw new CommandException("the game is over");

  }

}
- Remember to update ClientServerController.
public void clientMove(CompassDirection direction, GameLogic game, ClientThread thread) {

  Player player = game.getPlayerThreadMap(thread);

  try {

    game.clientMove(direction, player);

  } catch (CommandException e) {

    System.out.println(e.getMessage());

  }

}
- Add in a method to send a message to all the players except themselves called clientShout – remember to update ClientServerController.
public void clientShout(String message, Player player) {

  for (int user = 0; user < userList.size(); user++) {

    // if its not my thread

    if (userList.get(user) != player) {

      // send the message to their threads

      userList.get(user).sendMessage(message);

    }

  }

}
- We will now add a method called clientAttack – This is not implemented but I have wrote instructions on what would need to be done, this will allow you to create some without having clear guidance and test yourself.
public void clientAttack(CompassDirection direction, Player player) throws CommandException {

  assertPlayerExists(player);

  ensureNoWinner();

  try {

    assertPlayerAP(player);

  } catch (IllegalStateException e) {

    throw new CommandException(e.getMessage());

  }

  ... // For you to do

  if (player.remainingAp() == 0) {

    // Force the end of turn

    clientEndTurn(player);

  }

  throw new CommandException("attacking (" + direction.toString() + ") has not been implemented");

}
- Add the clientEndTurn method that will finish a current players turn in the game.
public void clientEndTurn(Player player) {

  // check they exsist

  assertPlayerExists(player);

  // end turn to be sent to output

  player.endTurn();

  // see who goes next

  checkNewTurn(player);

}
- And now for clientPickup – This allows a player to pickup an item, first checking they exist and that no one has won the game and next that they have action points to pickup. It will then check that there is something to pickup, if there is it will get the item and check the player doesn’t already have this; it will then decrement an action point and then give the item to the player. If they player then has 0 ap it will give the next turn to a player.
public synchronized void clientPickup(Player player) throws CommandException {

  assertPlayerExists(player);

  ensureNoWinner();

  try {

    assertPlayerAP(player);

  } catch (IllegalStateException e) {

    throw new CommandException(e.getMessage());

  }

  final Tile playersTile = player.getTempTile();

  // Check that there is something to pick up

  if (!playersTile.hasItem()) {

    throw new CommandException("nothing to pick up");

  }

  // Get the item

  final GameItem item = playersTile.getItem();

  if (player.hasItem(item)) {

    throw new CommandException("already have item");

  }

  // remove one ap for pickup

  player.decrementAp();

  player.giveItem(item);

  playersTile.removeItem();

  // check to see if this has changed someones map

  checkChange(player);

  if (player.remainingAp() == 0) {

    // Force the end of turn

    clientEndTurn(player);

  }

}
- Next we will implement a method that will check to see if someones field of view (GUI) has changed due to an action by another player, If it has we will update it.
public void checkChange(Player player) {

  for (int user = 0; user < userList.size(); user++) {

    // not my thread

    if ((userList.get(user) != player)) {

      // if my view is different from look

      if (userList.get(user).getLookView() != clientLook(userList.get(user))) {

        // tell the user change and get the new look for LOOKView

        System.out.println("change");

        userList.get(user).setLookView(clientLook(userList.get(user)));

        userList.get(user).change();

      }

    }

  }

}
- Now we will add a method that is useful for debugging and testing – It will allow you to set a players position in the game – allowing you to test certain functionality or maybe you could create a teleportation cheat?
public synchronized void setPlayerPosition(int col, int row, Player player) throws CommandException {

  assertPlayerExists(player);

  final Location location = new Location(col, row);

  if (!map.insideMap(location)) {

    throw new CommandException("invalid position");

  }

  if (!map.getMapCell(location).isWalkable()) {

    throw new CommandException("cannot walk on this tile");

  }

  player.setLocation(location);

}
- Next we will add a method that checks to see if a player has won or has more action points left before moving onto the next player.
public synchronized void advanceTurn(Player player) {

  // Check if the player has won

  if ((player.getGold() >= map.getGoal()) && (player.getTempTile().isExit())) {

    // Player should not be able to move if they have won

    assert (!this.playerWon);

    this.playerWon = true;

    player.win();

    for (int user = 0; user > userList.size(); user++) {

      // tell all other threads they have lost

      if (userList.get(user) != player) {

        userList.get(user).lose();

      }

    }

  } else {

    if (player.isDead()) {

      // SEND MESSAGE THEY HAVE DIED

      die(player);

    }

    if (player.remainingAp() == 0) {

      // Force the end of turn

      clientEndTurn(player);

    }

  }

}
- Next we add the last three methods – two of which are just getters and setters for the userNames list, the other method will just remove a player from the map.
public void removeplayerfromMap(Player player) {
map.removeUser(player.getLocation(), player);
}
public ArrayListgetUserNames() {
return userNames;
}
public void setUserNames(String name) {
userNames.add(name);
}
- Make sure to now make any changes to the ClientServerController so that it will use player instead of thread as shown in previous code snippets.
- Put the defaultMap in the top parent folder called DungeonOfDoom with the folders called src, bin and .settings – this will make sure when you start the server it will find this. The map can be downloaded from the link below or it can be downloaded from the solution at the top of the tutorial.
- We are now done with the logic – Everything should be working and you can now test it out. Make sure to start the server first and then add 2 users to test all the multiplayer functionality.
- Start the Server –

- Start both clients –
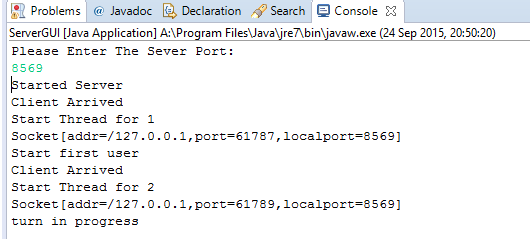
- First client is ready to go as seen by STARTTURN.
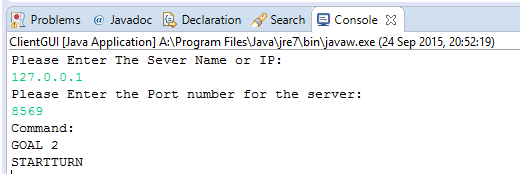
- Give them a test using the commands as defined by the clientGUI–
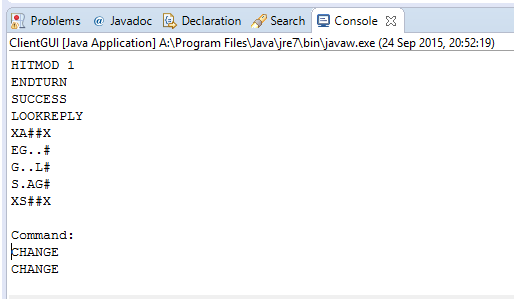
Lab 12: Creating the GUI
- First of all – If you would like to create your own GUI it is very useful to downloads the Netbeans IDE that is good java.swing user interfaces. I would advise if you want to look at creating a more complex UI it would be worth looking at creating a HTML/CSS/JS webpage and connecting this via a REST API.
- You can just copy my code for the UI otherwise but I will go through how to create it using Netbeans so you understand how to edit it.
- First download Netbeans IDE as of making this tutorial I am on 8.0.2. Create a new project and call this DungeonOfDoom, on the java source package right click New -> JFrame and call this whatever you like as we will eventually just copy the code into Eclipse; this will be used for the main GUI that the user will use. Also in the same fashion create a new JPanel, this JPanel will be used to show the map visually to the user.
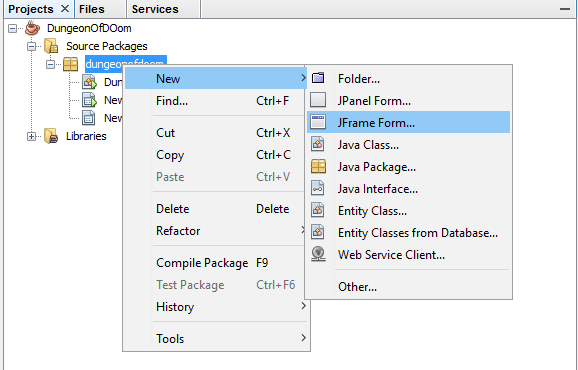
- This is what the class should look like but depends on what you have named it.
public class ClientGUI extends javax.swing.JFrame{

...

}
- For the new JFrame add all the variables below – See the code file or downloadable solution for the full implementation.
private javax.swing.JButton ChangeName  = new javax.swing.JButton();

private javax.swing.JButton Look = new javax.swing.JButton();

private javax.swing.JButton MessageSend = new javax.swing.JButton();

private javax.swing.JTextField MessageShout = new javax.swing.JTextField();

private javax.swing.JButton MoveEast = new javax.swing.JButton();

private javax.swing.JButton MoveNorth = new javax.swing.JButton();

private javax.swing.JButton MoveSouth = new javax.swing.JButton();

...

private javax.swing.JComboBox FontSizeCmb = new javax.swing.JComboBox();

private javax.swing.JComboBox FontStyleCmb = new javax.swing.JComboBox();

private javax.swing.JComboBox TextColoutCmb = new javax.swing.JComboBox();
- Now add two statements that allow the x button in the corner to be pressed and set the layout to be absolute so you can set positions of components using x and y coordinates. Change the constructor to call an initComponents method.
public ClientGUI(){

  initComponents();

}

public void initComponents(){

  setDefaultCloseOperation(javax.swing.WindowConstants.EXIT_ON_CLOSE);

  getContentPane().setLayout(null);

}
- Add the class variables – As for the original ClientGUI we will need a ClientLogic. The new variables being a boolean to see if start has been pressed for error checking and the last a string that will be used to configure HTML output for sending.
private ClientLogic ClientLogic;

private boolean StartPressed = false;

private String OutputText = "";
- Add all the move buttons to the GUI – For each of the buttons there is an action listener to send a button pressed event to be handled by another method. There is then a statement that adds it to the view and then sets the position of the button
// Create and set the Move N button

MoveNorth.setText("MOVE N");

MoveNorth.addActionListener(new java.awt.event.ActionListener() {

  public void actionPerformed(java.awt.event.ActionEvent evt) {

    MoveNorthActionPerformed(evt);

  }

});

getContentPane().add(MoveNorth);

MoveNorth.setBounds(770, 560, 100, 23);

// Create and set the Move E button

MoveEast.setText("MOVE E");

MoveEast.addActionListener(new java.awt.event.ActionListener() {

  public void actionPerformed(java.awt.event.ActionEvent evt) {

    MoveEastActionPerformed(evt);

  }

});

getContentPane().add(MoveEast);

MoveEast.setBounds(880, 580, 100, 23);

// Create and set the Move W button

MoveWest.setText("MOVE W");

MoveWest.addActionListener(new java.awt.event.ActionListener() {

  public void actionPerformed(java.awt.event.ActionEvent evt) {

    MoveWestActionPerformed(evt);

  }

});

getContentPane().add(MoveWest);

MoveWest.setBounds(660, 580, 100, 23);

// Create and set the Move S button

MoveSouth.setText("MOVE S");

MoveSouth.addActionListener(new java.awt.event.ActionListener() {

  public void actionPerformed(java.awt.event.ActionEvent evt) {

    MoveSouthActionPerformed(evt);

  }

});

getContentPane().add(MoveSouth);

MoveSouth.setBounds(770, 600, 100, 23);
- Add the event handler for the button presses in the same fashion by click on the methods, hovering and then selecting create method ….. in type ClientGUI – This is where we determine what happens once the button has been pressed and there should be no errors in the code above afterwards.
protected void MoveSouthActionPerformed(ActionEvent evt) {

  // TODO Auto-generated method stub

}

...

protected void MoveWestActionPerformed(ActionEvent evt) {

  // TODO Auto-generated method stub

}
- Now we can add the start and quit buttons to the page – remember to add the handlers for the event.
// Create and set the Start button

Start.setText("START");

Start.addActionListener(new java.awt.event.ActionListener() {

  public void actionPerformed(java.awt.event.ActionEvent evt) {

    StartActionPerformed(evt);

  }

});

getContentPane().add(Start);

Start.setBounds(930, 640, 80, 40);

// Create and set the Quit button

Quit.setText("QUIT");

Quit.addActionListener(new java.awt.event.ActionListener() {

  public void actionPerformed(java.awt.event.ActionEvent evt) {

    QuitActionPerformed(evt);

  }

});

getContentPane().add(Quit);

Quit.setBounds(930, 690, 80, 40);
- Add the look and pickup buttons in the same fashion as buttons before this.
// Create and set the Pickup button

Pickup.setText("PICKUP");

Pickup.addActionListener(new java.awt.event.ActionListener() {

  public void actionPerformed(java.awt.event.ActionEvent evt) {

    PickupActionPerformed(evt);

  }

});

getContentPane().add(Pickup);

Pickup.setBounds(790, 670, 100, 23);

// Create and set the Look button

Look.setText("LOOK");

Look.addActionListener(new java.awt.event.ActionListener() {

  public void actionPerformed(java.awt.event.ActionEvent evt) {

    LookActionPerformed(evt);

  }

});

getContentPane().add(Look);

Look.setBounds(790, 700, 100, 23);
- Add the last three buttons that we will use in the game – One to send a message, one to allow the user to change their name and a send button to be used for the chat message
// create the message button to allow the user to send messages in game

MessageSend.setText("MESSAGE");

MessageSend.addActionListener(new java.awt.event.ActionListener() {

  public void actionPerformed(java.awt.event.ActionEvent evt) {

    MessageSendActionPerformed(evt);

  }

});

getContentPane().add(MessageSend);

MessageSend.setBounds(680, 700, 100, 23);

// add the button to allow the player to change their name

ChangeName.setText("NEW NAME");

ChangeName.addActionListener(new java.awt.event.ActionListener() {

  public void actionPerformed(java.awt.event.ActionEvent evt) {

    ChangeNameActionPerformed(evt);

  }

});

getContentPane().add(ChangeName);

ChangeName.setBounds(680, 670, 100, 23);

// Adds a new button used to send a chat message

SendButton.setText("SEND");

SendButton.addActionListener(new java.awt.event.ActionListener() {

  public void actionPerformed(java.awt.event.ActionEvent evt) {

    SendButtonActionPerformed(evt);

  }

});

getContentPane().add(SendButton);

SendButton.setBounds(890, 300, 110, 40);
- Lets add a few things and give it a test – First we need to set the bounds of the GUI e.g. the size of the window and then set the main method for it to run from. The main method will create a user interface that uses the nimbus look and feel e.g. a style of swing. It will then display the swing form and you should be able to see it.
initComponents(){

  ...

  setBounds(0, 0, 1034, 778);

}

public static void main(String args[]) {

  try {

    for (javax.swing.UIManager.LookAndFeelInfo info : javax.swing.UIManager.getInstalledLookAndFeels()) {

      if ("Nimbus".equals(info.getName())) {

        javax.swing.UIManager.setLookAndFeel(info.getClassName());

        break;

      }

    }

  } catch (ClassNotFoundException ex) {

    java.util.logging.Logger.getLogger(ClientGUI.class.getName()).log(java.util.logging.Level.SEVERE, null, ex);

  } catch (InstantiationException ex) {

    java.util.logging.Logger.getLogger(ClientGUI.class.getName()).log(java.util.logging.Level.SEVERE, null, ex);

  } catch (IllegalAccessException ex) {

    java.util.logging.Logger.getLogger(ClientGUI.class.getName()).log(java.util.logging.Level.SEVERE, null, ex);

  } catch (javax.swing.UnsupportedLookAndFeelException ex) {

    java.util.logging.Logger.getLogger(ClientGUI.class.getName()).log(java.util.logging.Level.SEVERE, null, ex);

  }

  /* Create and display the form */

  java.awt.EventQueue.invokeLater(new Runnable() {

    public void run() {

      new ClientGUI().setVisible(true);

    }

  });

}
- Just simply run ClientGUI and see what appears – If it is similar to mine it should look something like this.
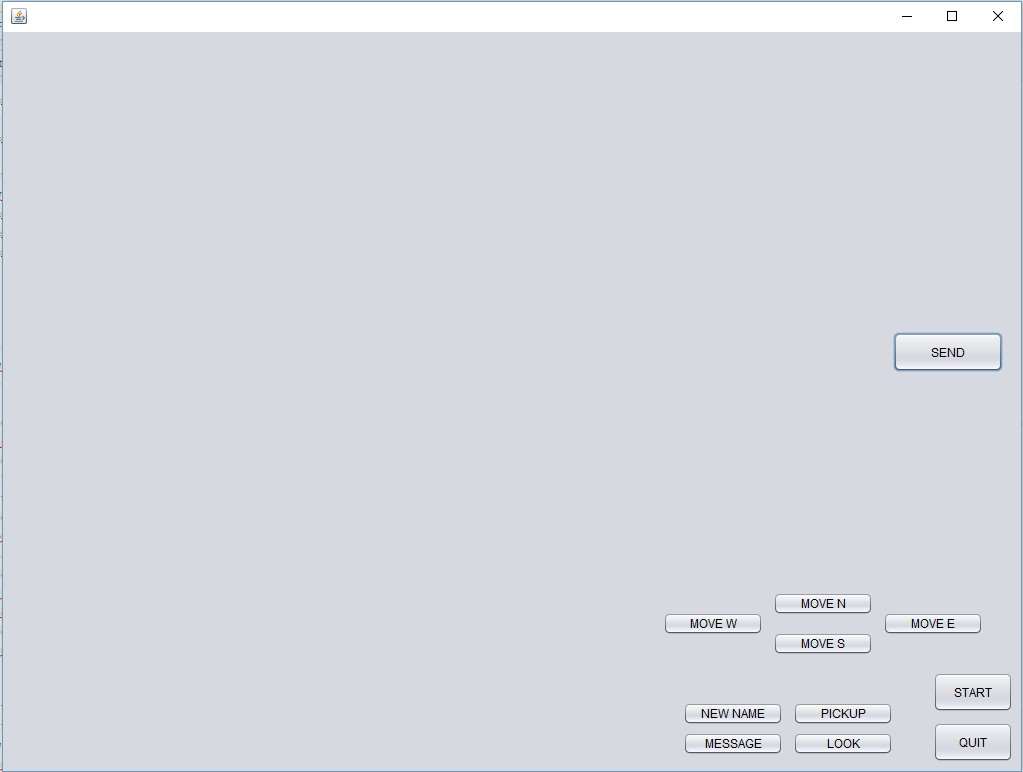
- Now just lets add the text boxes for users to enter information into – We will need them for the port number, server address, player name and to shout a message.
// adds the textbox for the portnumber

getContentPane().add(PortNum);

PortNum.setBounds(170, 690, 140, 30);

// add the textbox for the server address

getContentPane().add(ServerAddress);

ServerAddress.setBounds(10, 690, 140, 30);

// add the player name textbox to the game

getContentPane().add(PlayerName);

PlayerName.setBounds(340, 690, 140, 30);

// add the messageShout textbox to the Game GUI

getContentPane().add(MessageShout);

MessageShout.setBounds(500, 690, 140, 30);
- Now we can add the labels to the form – these will just indicate what the textboxes and some of the components are for – See code file or solution for the full implementation.
// Add the title Label

DODName.setFont(new java.awt.Font("Tahoma", 1, 48));

DODName.setForeground(new java.awt.Color(255, 255, 255));

DODName.setText("DUNGEON OF DOOM");

getContentPane().add(DODName);

DODName.setBounds(270, 10, 500, 40);

// add the label portnumber above the portnumber textbox

PortNumLbl.setFont(new java.awt.Font("Tahoma", 1, 18));

PortNumLbl...

// Game View label

GameView.setFont(new java.awt.Font("Tahoma", 1, 18));

GameView.setForeground(new java.awt.Color(255, 255, 255));

GameView.setText("Game View");

getContentPane()....

// Chat Label

CHatLbl.setFont(new java.awt.Font("Tahoma", 1, 18));

CHatLbl.setForeground(new java.awt.Color(255, 255, 255));

CHatLbl.setText("CHAT");

getContentPane().add(CHatLbl);

CHatLbl.setBounds(440, 90, 140, 22);
- Add in the scroll panes and the chat areas –
// set the inside of the scrollpane to the textpane output

OutputScrollPane.setViewportView(OutPut);

// adds the scrollpane to the window

getContentPane().add(OutputScrollPane);

OutputScrollPane.setBounds(10, 490, 563, 170);

// set the inside of the scrollpane to the textpane output

Chat.setContentType("text/html");

ChatScrollPane.setViewportView(Chat);

// adds the scrollpane to the window

getContentPane().add(ChatScrollPane);

ChatScrollPane.setBounds(440, 120, 560, 170);

// add the scrollpane to the main screen

getContentPane().add(SCROLLGAME);

SCROLLGAME.setBounds(110, 120, 300, 300);

// creates the chat area for user input

ChatArea.setColumns(20);

ChatArea.setRows(5);

ChateScroll.setViewportView(ChatArea);

getContentPane().add(ChateScroll);

ChateScroll.setBounds(440, 300, 430, 96);
- Lastly just add the code to create the combo boxes for users to customize the messages they send between each other.
// Combo Box for Text Colour

TextColoutCmb.setModel(

  new javax.swing.DefaultComboBoxModel(new String[] { "Red", "Blue", "Yellow", "Black", "Green" }));

getContentPane().add(TextColoutCmb);

TextColoutCmb.setBounds(530, 400, 130, 20);

// Combo box for Text Size

FontSizeCmb.setModel(

  new javax.swing.DefaultComboBoxModel(new String[] { "1", "2", "3", "4", "5", "6", "7" }));

getContentPane().add(FontSizeCmb);

FontSizeCmb.setBounds(450, 400, 70, 20);

// Font Style for Text combo Box

FontStyleCmb.setModel(

  new javax.swing.DefaultComboBoxModel(new String[] { "Arial", "verdana", "Impact", "Helvetica" }));

getContentPane().add(FontStyleCmb);

FontStyleCmb.setBounds(670, 400, 130, 20);

// allows the background image to be set

BackGroundlbl.setIcon(new javax.swing.ImageIcon(getClass().getResource("/BackDoom.png"))); // NOI18N

BackGroundlbl.setText("BackGroundlbl");

getContentPane().add(BackGroundlbl);

BackGroundlbl.setBounds(0, 0, 1020, 740);
- Add the wallpaper that can be downloaded here or found in the solution download to the folder bin in the project and make sure it is called BackDoom.png – this is the wallpaper for the background.
- Run and test to see what our new GUI looks like –
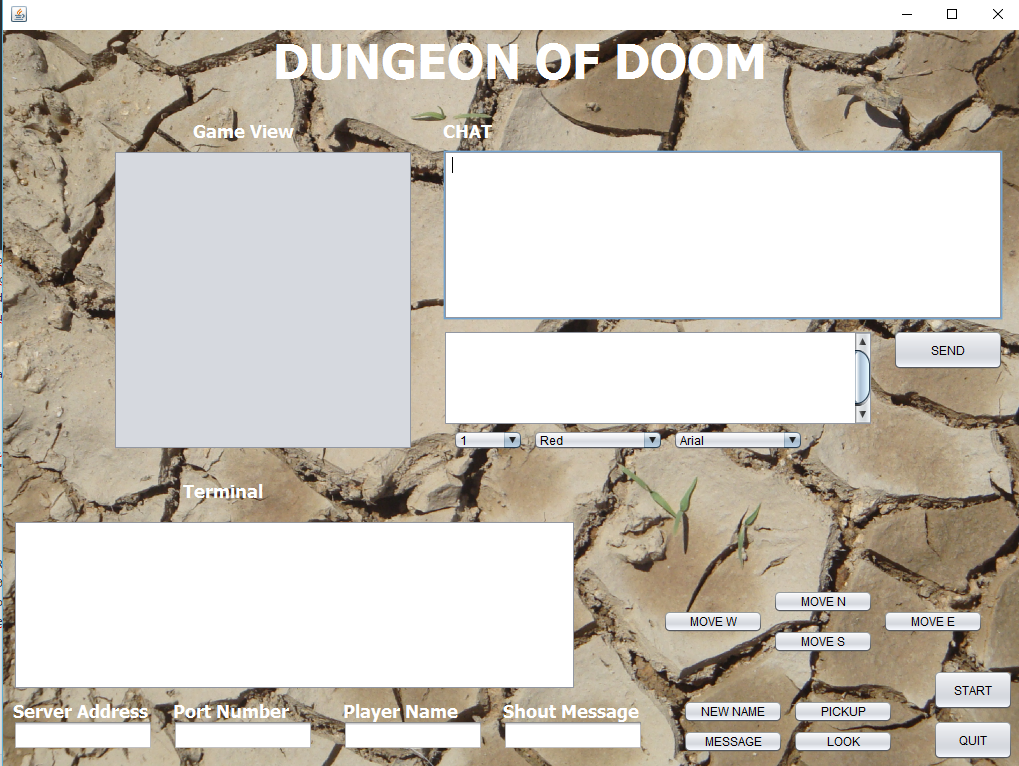
- Now all that is left to do is to implement the methods and see what happens when a button is pressed.
- First we will just add the move methods that just make sure the game has started first and if it has then allow for the action to proceed.
private void MoveNorthActionPerformed(java.awt.event.ActionEvent evt) {

  if (StartPressed)

    ClientLogic.MOVEN();

  else

    OutPut.setText(OutPut.getText() + "User must start the game first" + "\n");

}

private void MoveEastActionPerformed(java.awt.event.ActionEvent evt) {

  if (StartPressed)

    ClientLogic.MOVEE();

  else

    OutPut.setText(OutPut.getText() + "User must start the game first" + "\n");

}

private void MoveSouthActionPerformed(java.awt.event.ActionEvent evt) {

  if (StartPressed)

    ClientLogic.MOVES();

  else

    OutPut.setText(OutPut.getText() + "User must start the game first" + "\n");

}

private void MoveWestActionPerformed(java.awt.event.ActionEvent evt) {

  if (StartPressed)

    ClientLogic.MOVEW();

  else

    OutPut.setText(OutPut.getText() + "User must start the game first" + "\n");

}
- Now we will add the action for pickup and look that follow the same idea as above.
private void PickupActionPerformed(java.awt.event.ActionEvent evt) {

  if (StartPressed == true)

    ClientLogic.PICKUP();

  else

    OutPut.setText(OutPut.getText() + "User must start the game first" + "\n");

}

private void LookActionPerformed(java.awt.event.ActionEvent evt) {

  if (StartPressed)

    ClientLogic.LOOK();

  else

    OutPut.setText(OutPut.getText() + "User must start the game first" + "\n");

}
- Now just implement the two methods for shout and change name that take parameters – these will be validated by ClientLogic
private void ChangeNameActionPerformed(java.awt.event.ActionEvent evt) {

  if (StartPressed)

    ClientLogic.HELLO(PlayerName.getText());

  else

    OutPut.setText(OutPut.getText() + "User must start the game first" + "\n");

}

private void MessageSendActionPerformed(java.awt.event.ActionEvent evt) {

  if (StartPressed)

    ClientLogic.SHOUT(MessageShout.getText());

  else

    OutPut.setText(OutPut.getText() + "User must start the game first" + "\n");

}
- Add the quit action method which is very simple before we move onto the harder two methods.
private void QuitActionPerformed(java.awt.event.ActionEvent evt) {

  System.exit(0);

}
- Now to add what can be considered a harder method – The start method, this will do effectively what we had defined before in the constructor for the GUI – create a new method called paneCreate that we will implement later.
private void StartActionPerformed(java.awt.event.ActionEvent evt) {

  try { // Get Server Name and Port Number and create Socket

    String name = ServerAddress.getText();

    String portNumber = PortNum.getText();

    int port = Integer.parseInt(portNumber);

    StartPressed = true;

    // Create a new GUILogic and then start the graphical pane

    ClientLogic = new ClientLogic(name, port, this);

    paneCreate();

  } catch (NumberFormatException e) {

    // could'nt parse the integer

    OutPut.setText(OutPut.getText() + "You need to enter a valid PortNumber and ServerName" + "\n");

  } catch (IOException e) {

    // Inform User of fail and start again

    OutPut.setText(OutPut.getText() + "Client Not created" + "\n");

    OutPut.setText(OutPut.getText() + "Try Again" + "\n");

  }

}
- Now create the send message method that will send a html message to all the players.
private void SendButtonActionPerformed(java.awt.event.ActionEvent evt) {

  if (StartPressed == true) {

    String FSize = (String) FontSizeCmb.getSelectedItem();

    String FColour = (String) TextColoutCmb.getSelectedItem();

    String FStyle = (String) FontStyleCmb.getSelectedItem();

    String Hay = null;

    if (FColour.equals("Red")) {

      Hay = "<font color=#FF0000 size='" + FSize + "' face='" + FStyle + "'>" + ChatArea.getText()

          + "
";

    } else if (FColour.equals("Blue")) {

      Hay = "<font color=#0000FF size='" + FSize + "' face='" + FStyle + "'>" + ChatArea.getText()

          + "
";

    } else if (FColour.equals("Yellow")) {

      Hay = "<font color=#E4FF48 size='" + FSize + "' face='" + FStyle + "'>" + ChatArea.getText()

          + "
";

    } else if (FColour.equals("Black")) {

      Hay = "<font color=#000000 size='" + FSize + "' face='" + FStyle + "'>" + ChatArea.getText()

          + "
";

    } else if (FColour.equals("Green")) {

      Hay = "<font color=#00FF00 size='" + FSize + "' face='" + FStyle + "'>" + ChatArea.getText()

          + "</font><br />";

    }

    if (ChatArea.getText().equals("") | ChatArea.getText() == null | ChatArea.getText().equals(" ")) {

      // Do Nothing

    } else {

      ClientLogic.SENDCHAT(Hay);

      ChatArea.setText("");

    }

  } else {

    OutPut.setText(OutPut.getText() + "User must start the game first" + "\n");

  }

}
- We then need to make sure we have the two output methods for taking input and displaying it to the user such as the terminal and the chat.
public void OutputSent(String FromLogic) {

  OutPut.setText(OutPut.getText() + FromLogic + "\n");

}

public void OutputSentCHAT(String FromLogic) {

  OutputText = OutputText + FromLogic;

  Chat.setText(OutputText);

}
- Now you can run and use the GUI – Which just leaves us with building the graphical view of the game to be displayed.
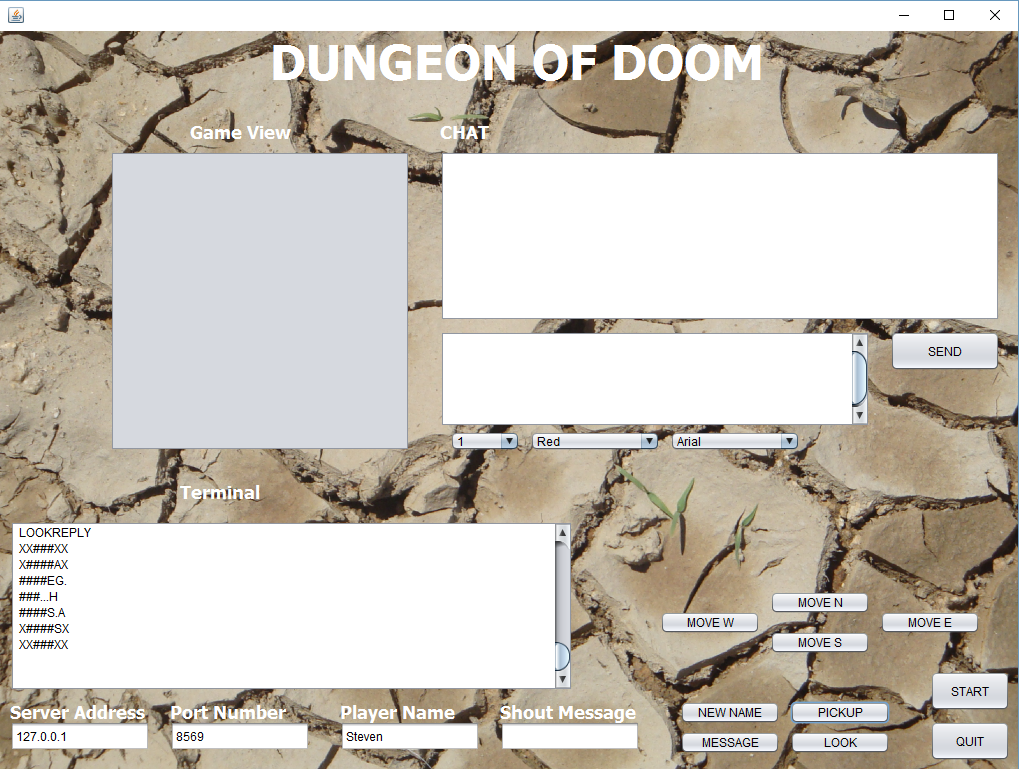
- To start we will implement the method paneCreate – This will create the pane and set it in the view and will then start the pane. You will need to create both of these in the ClientLogic.
public void paneCreate() {

  try {

    SCROLLGAME.setViewportView(GUILogic.createPane());

    GUILogic.startPane();

  } catch (InterruptedException ex) {

    ex.printStackTrace();

  } catch (IOException ex) {

    ex.printStackTrace();

  }

}
- createPane will return a JPanel, this is the one we create at the start, whereas startPane will be of the return type void and will work the graphics of the panel.
public void startPane() {

}

public JPanel createPane() {

  return null;

}
- First we need to refactor ClientLogic slightly so it knows when the user has a lantern – this is done through the use of a boolean and an addition of some logic to the pickup method.
public void PICKUP() {

  // if beneath you is an L then set lantern to true

  if (getCentralSquare() == 'L'){

    hasLantern = true;

    // CREATE A NEW PANE WINDOW with lantern sizes

    GamePanel = new GamePanel(7, 7);

    // set the GUI to this Panel

    clientGUI.SCROLLGAME.setViewportView(GamePanel);

  }

  sendToServer("PICKUP");

  try {

    Thread.sleep(500);

  } catch (InterruptedException e1) {

    System.out.println("Thread Interrupted");

  }

  LOOK();

  GamePanel.update(currentLookReply);

  LanternChange();

}
- Create the method getCentralSquare() that just works out if the player is on a lantern when they go to pick it up.
 private char getCentralSquare() {

  // Return the square with 0 offset

  return getSquareWithOffset(0, 0);

}

private char getSquareWithOffset(int xOffset, int yOffset) {

  final int lookReplySize = this.currentLookReply.length;

  final int lookReplyCentreIndex = lookReplySize / 2; // We rely on truncation

  return this.currentLookReply[lookReplyCentreIndex + yOffset][lookReplyCentreIndex

            + xOffset];

}
- Add in the startPane and LanternChange methods – these just run the graphical part the GUI and make sure it is being updated on regular intervals.
public void startpane() { // Start the Game and adds the graphic to the GamePanel

  try {

    Thread.sleep(50); // Lets the server send GOAL "number" and StartTurn before calling look

  } catch (InterruptedException e) {

    e.printStackTrace();

  }

  LOOK(); // get lookreply and update graphic

  GamePanel.run(currentLookReply, 2000, 2000);

  GamePanel.draw();

}

public void LanternChange() { // redraws the graphic if a lantern is used

  GamePanel.run(currentLookReply, 2000, 2000);

  GamePanel.draw();

}
- You may or may not still see errors, I am using the name GamePanel for the JPanel class we made earlier. Assuming the names are correct you will need to just add all the methods that are currently throwing errors and we will then implement these. Also add the variables to the ClientLogic for the GamePanel.
- Add the variables to the GamePanel Class – One of these will be a service that will make sure the GUI is updated on a regular basis, an image, a 2 dimensional graphic, the array to hold the map and a tilemap to indicate how to make the images.
public class GamePanel extends JPanel {

  // Initialise all variables and a service executor to draw the image constantly

  private final ScheduledExecutorService service = Executors.newSingleThreadScheduledExecutor();

  private BufferedImage image;

  private Graphics2D g;

  private char multi[][];

  private TileMap tileMap;
- Create the constructor – Simply enough it will initalise a JPanel, set its dimensions, allow it to be seen and will create a TileMap with a specifed size based off whether the user has a lantern or not. TileMap will be explained soon enough as this is very specific to what the user will see as the game.
public GamePanel(int heightval, int widthval) {

  super();

  setPreferredSize(new Dimension(300, 300));

  setFocusable(true);

  // 40 tile size , with height and width of 5x5 or 7x7 depending on lantern

  tileMap = new TileMap(40, heightval, widthval);

}
- This is the method that will allow us to create the image – Done by creating a buffered image, using this image to create a 2D graphic, then using this graphic, draw onto it using the map we have from the user.
public void run(char[][]  multi, int WIDTHVal, int HEIGHTVal){

  // creates an image that can be changed and calls this 2D image g

  image = new BufferedImage(WIDTHVal, HEIGHTVal, BufferedImage.TYPE_INT_RGB);

  g = (Graphics2D) image.getGraphics();

  // tell the tile map to create image g using the map multi

  tileMap.draw(g, multi);

  this.multi = multi;

}
- This will update the map so that it can be changed easily.
public void update(char[][]  multi){

  this.multi= multi;

}
- The draw method will update the map on a constant basis for when the user is watching other players complete their turns.
public void draw(){

  service.scheduleWithFixedDelay(new Runnable(){ // new runnable executor service

    @Override

    public void run(){ // starts the loop

      tileMap.draw(g, multi); // create image

      Graphics g2 = getGraphics(); // renders the image

      g2.drawImage(image, 0, 0, null); // draw image starting in pane at 0,0 (X,Y)

      g2.dispose(); // once drawn get rid of it

    }

  }, 0, 100, TimeUnit.MILLISECONDS); // does this every 1/10th of a second

}
- Now create the TileMap class that is in essence going to be just one large if statement. The variables x and y will be used to position where the images for each tile are placed, tileSize is used to set the size for each tile which we will be using a 40px X 40px tile.
public class TileMap {

  // Initialise all variables

  private int x;

  private int y;

  private int tileSize;

  private int mapWidth;

  private int mapHeight;

  private boolean colour = false;

  private BufferedImage img = null;

  ...

}
- Create the constructor – This will just set the variables.
public TileMap(int tileSize, int heightv, int widthv){

  this.tileSize = tileSize;

  mapWidth = widthv; // get the map width

  mapHeight = heightv; // get the map height

}
- Now we will create the draw method that will go through the map and for each value map it to an image – e.g. if it finds a ‘#’ it will use the wall image of 40px and an ‘A’will use the armor image etc…. At the end if color was true it will draw the rectangle with that color. It works by moving along the map using x and y as co-ordinates and placing images there. See code file for the full implementation or downloadable solution; Also add the images that can be downloaded here to the root directory, this is where defaultMap is placed.
public void draw(Graphics2D g, char[][] multi) {

  // for the whole map

  for (int row =0; row < mapHeight; row++){

    for (int col =0; col < mapWidth; col++){

      char rc = multi[row][col]; // get value

      colour = false;

      if (rc == '#'){ // wall{

        try {

          img = ImageIO.read(new File("WALL40.png")); // try and use this image

        } catch (IOException e) { // could'nt find image}

      }

      if (rc == '?' | rc == 'X'){ // Unknown or corners of wall

        g.setColor(Color.BLACK);

        colour = true;

      }

      if (rc == 'A'){ // Armour

        try {

          img = ImageIO.read(new File("Shield40.png"));

        } catch (IOException e) {// could'nt find image}

      }

      ....

      if (rc == 'P' | rc == 'B' | rc =='p'){ // Another Player

        try {

          img = ImageIO.read(new File("PLAYER40.png"));

        } catch (IOException e) {// could'nt find image}

      }

      if (colour == true){ // If it was a unknown or corner tile

        g.fillRect(x + col * tileSize, y + row * tileSize, tileSize, tileSize); // Fill a 40x40 square with colour

      }

      else{

        g.drawImage(img, x + col * tileSize, y + row * tileSize, null); // add image at X,Y worked out by tile size

      }

    }

  }

}
- Now we just need to update the clientLogic for waitForServer and create a few extra methods – We will deal with the first case with the player losing. In the case of losing this will be explained to the user and then the game will exit.
private void waitforserver() throws IOException {

  while(true){

    // someone has won the game so you need to finish

    String ServerReply = input.readLine();

    System.out.println(ServerReply);

    if (ServerReply.equals("LOSE")){

      CSC.ClientToClientMessage(clientGUI, "You Have lost, game is now disconnecting");

      System.exit(0);

    }

    .....
- Now dealing with the case that a change has occurred in the game, we will tell the user, look at the map and then with the information brought back from the map update the display – there are 2 scenarios to deal with depending on if the user just joined the game or not and inside these if they have a lantern or not what information to use from the look command. The main idea is that one string is created with all of the rows of the map in it separated by commas.
// some has changed something within side your look reply

else if (ServerReply.equals("CHANGE")){

  CSC.ClientToClientMessage(clientGUI, ServerReply);

  LOOK();

  String temp = "";

  if (hasLantern == true) { // used has lantern

    int ForVal =8;

    int ForValMajor = 8;

    for (int line = 0; line < ForValMajor ; line++) {

      String Value = input.readLine();

      if (Value.equals("STARTTURN")){ // if it happend to be your turn when a change occurs

        ForVal = 7; // set it to print 1 less line

        ForValMajor = 9; // for for 1 more line in main loop body

      }

      else{

        temp = temp + Value + ","; // value from look

      }

    }

    // output to terminal

    String Lines[] = temp.split(",");

    for (int line = 0; line < ForVal; line++) {

      CSC.ClientToClientMessage(clientGUI, Lines[line]);

    }

    handleLookReply(temp.split(",")); // send to char[][]

  } else {

    int ForVal =6;

    int ForValMajor = 6;

    for (int line = 0; line < ForValMajor; line++) {

      String Value = input.readLine();

      if (Value.equals("STARTTURN")){

        ForVal =5;

        ForValMajor = 7;

      }

      else{

        temp = temp + Value + ",";

      }

    }

    //output to terminal

    String Lines[] = temp.split(",");

    for (int line = 0; line < ForVal; line++) {

      CSC.ClientToClientMessage(clientGUI, Lines[line]);

    }

    handleLookReplyNorm(temp.split(","));

  }

  GamePanel.update(currentLookReply);

}
- For when the user has not just joined it will give a normal lookreply and will do the same method as above.
else if (ServerReply.equals("LOOKREPLY")){

  String temp = "";

  if (hasLantern == true) {

    for (int line = 0; line < 7; line++) {

      temp = temp + input.readLine() + ",";

    }

    // output to terminal

    String Lines[] = temp.split(",");

    for (int line = 0; line < 7; line++) {

      CSC.ClientToClientMessage(clientGUI, Lines[line]);

    }

    handleLookReply(temp.split(","));

  } else {

    for (int line = 0; line < 5; line++) {

      temp = temp + input.readLine() + ",";

    }

    //output to terminal

    String Lines[] = temp.split(",");

    for (int line = 0; line < 5; line++) {

      CSC.ClientToClientMessage(clientGUI, Lines[line]);

    }

  handleLookReply(temp.split(","));

  }

}
- And now just handle a chat message and if its neither of the above or this it should just output it to the user.
else if (ServerReply.equals("CHAT")){

  String temp = input.readLine();

  CSC.ClientToClientMessageChat(clientGUI, temp);

}

// just print what was sent by the server

else{

  CSC.ClientToClientMessage(clientGUI, ServerReply);

}
- Create the new method in CSC as above that sends a chat message
public void ClientToClientMessageChat(ClientGUI clientGUI, String Message) {

  clientGUI.OutputSentCHAT(Message);

}
- Add the code for the methods handleLookReplyNorm and handlelookReply – This will just keep hold of what the players current view is and updates it with the reply that is sent by the server.
private void handleLookReply(String[] lines){

  // Get look reply and create map, Used for a modified look reply without first string

  final int lookReplySize = lines[1].length();

  if (lines.length != lookReplySize) {

    throw new RuntimeException("FAIL: Invalid LOOKREPLY dimensions");

  }

  this.currentLookReply = new char[lookReplySize][lookReplySize];

  for (int row = 0; row < lookReplySize; row++) {

    for (int col = 0; col < lookReplySize; col++) {

      this.currentLookReply[row][col] = lines[row].charAt(col);

    }

  }

}

private void handleLookReplyNorm(String[] lines){

  // Work out what the reply is - used when "LOOKREPLY" is included

  final int lookReplySize = lines[1].length();

  if (lines.length != lookReplySize + 1) {

    throw new RuntimeException("FAIL: Invalid LOOKREPLY dimensions");

  }

  this.currentLookReply = new char[lookReplySize][lookReplySize];

  for (int row = 0; row < lookReplySize; row++) {

    for (int col = 0; col < lookReplySize; col++) {

      this.currentLookReply[row][col] = lines[row +1].charAt(col);

    }

  }

}
- Lastly we just need to tell move to update the game panel and everything should work and you can test it.
public void MOVEN() {

  sendToServer("MOVE N");

  LOOK();

  GamePanel.update(currentLookReply);

}

etc...
- Deal with a client leaving by editing ClientThread.
if (command == null || command.equalsIgnoreCase("STOP")){

  System.out.println("Client " + clientno + " left");

  lostconnection(); // DEAL WITH LEAVING LATER

...

catch (IOException e){

  // Client has left - kill the Client Thread

  System.out.println("Client " + clientno + " left");

  lostconnection(); // DEAL WITH LEAVING LATER

...

private void lostconnection(){

  super.UserConnectionGone(this);

  try {

    socket.close();

  } catch (IOException e) {

    e.printStackTrace();

  }

}
- In PlayeGuide add the method UserConnectionGone that will call the die method in game and the playerleft method through CSC.
public void UserConnectionGone(ClientThread thread){

  // kill the player in the game

  ChildCSC.die(game, thread);

  // remove them from the turns list

  ChildCSC.playerleft(game, thread);

}

// IN CSC

public void die(GameLogic game, ClientThread thread) {

  Player player = game.getPlayerThreadMap(thread);

  game.die(player);

}

public void playerleft(GameLogic game, ClientThread thread) {

  Player player = game.getPlayerThreadMap(thread);

  game.playerleft(player);

}
- ITS FINISHED – Looks at it in all its glory for what you have just made and pat yourself on the back!
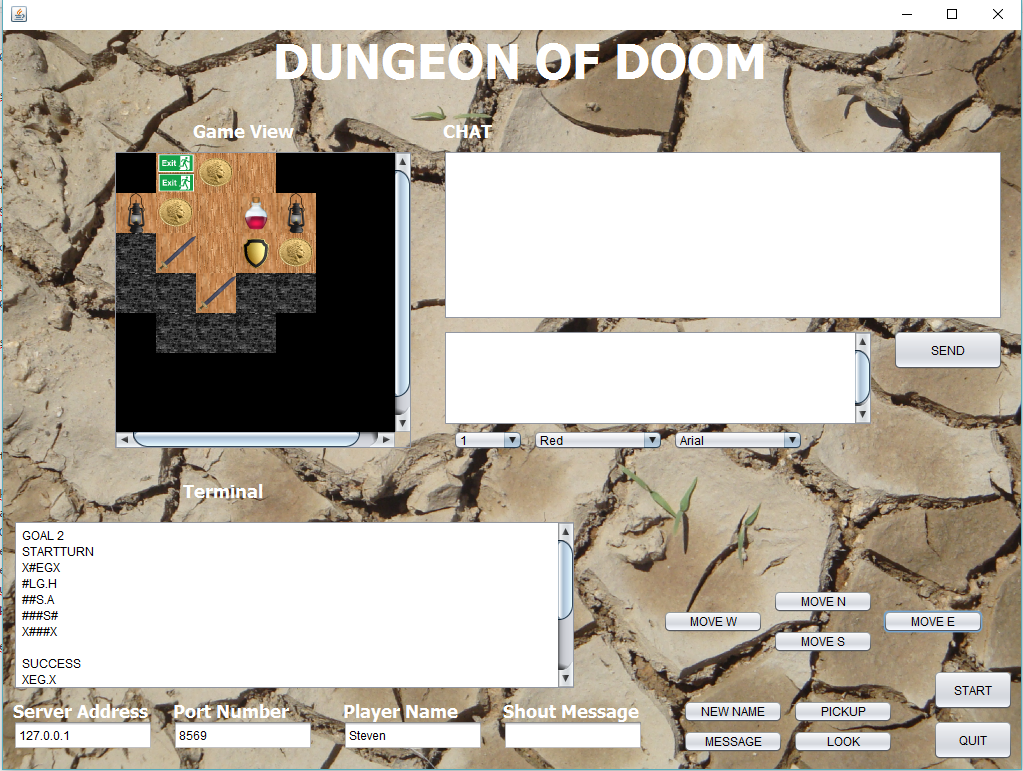
- I can say there may be errors in the code but I have not found them – this is something that you can fix. You could implement attacking, a bot and many more features.
Copyright © 2015 TalkIT®


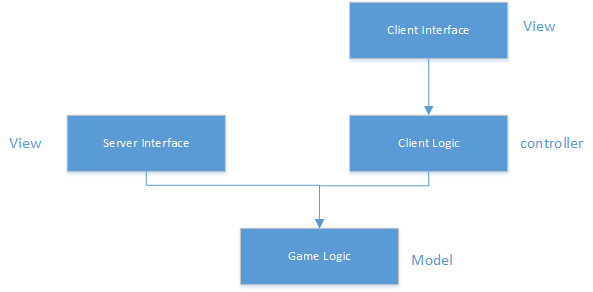

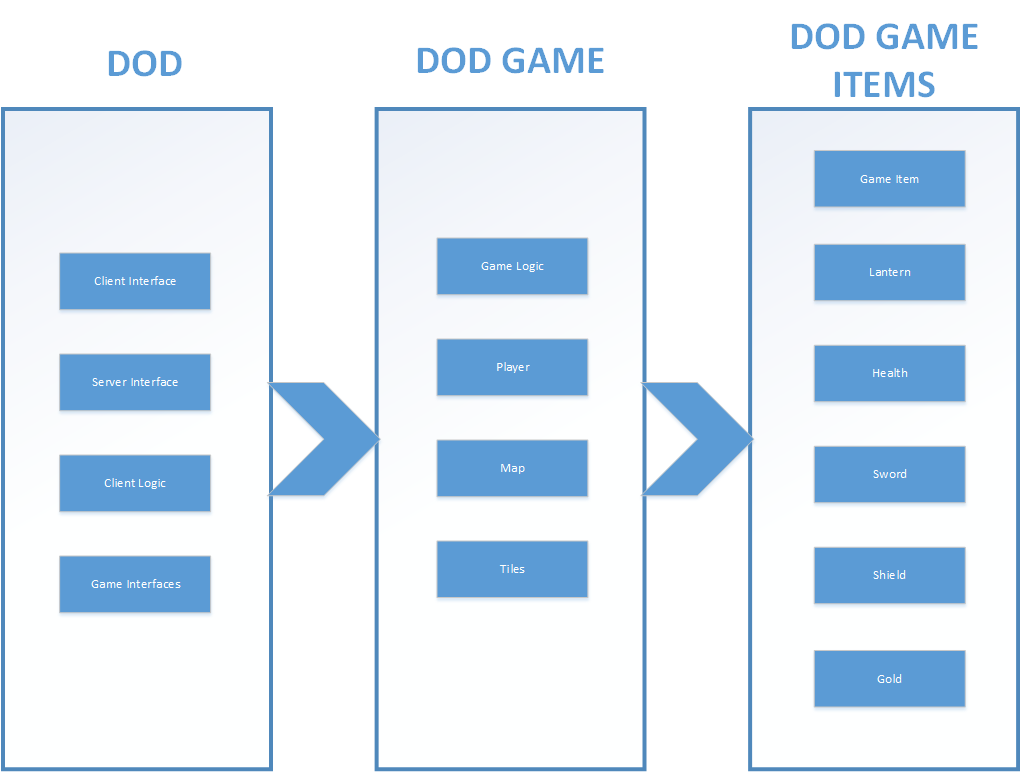




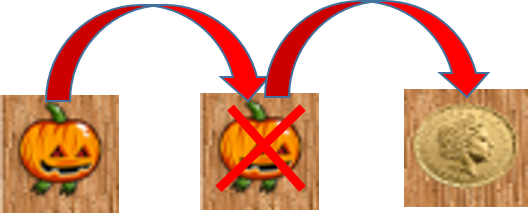
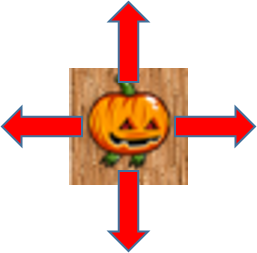
If you would like to see more content like this in the future, please fill-in our quick survey.