About this Tutorial –
Objectives –
Delegates will learn to develop web applications using C# 4.0. After completing this course, delegates will be able to:
- Use Visual Studio 2010 effectively
- Data Access with C# using Visual Studio 2010
Audience
This course has been designed primarily for programmers new to the .Net development platform. Delegates experience solely in Windows application development or earlier versions of ASP.Net will also find the content beneficial.
Prerequisites
Before attending this workshop, students must:
- Be able to manage a solution environment using the Visual Studio 2010 IDE and tools
- Be able to program an application using a .NET Framework 4.0 compliant language
Contents
Copyright 20/12/12 – David Ringsell
Quick Access
Exercise 1 – Retieving data with a Data Reader
Exercise 2 – Updating the Database from a Data Set
Exercise 3 – Display data in a Gridview control
Exercise 4 – Calling a Stored Procedure
Exercise 1 – Display data using a LINQ to SQL Query
Exercise 2 – Display customer details when a row is selected
Want to know more?
TalkIT provides ADO.Net training in Bath, Bristol and around the U.K.
Lab 1 Data Access
Exercise 1
Retrieving data with a Data Reader
In this exercise, you will create a web application to display a list of employees. You will use connection, command, and data reader objects to retrieve data from the Northwind database.
- Create a new empty web application project called DataReader:
- Start Visual Studio 2010.
- Select the File menu, then New, then Project.
- Make sure (if you are using the Professional Version) that Visual C# and then Web is selected at the left of the screen under Installed Templates.
- Name the project and the solution: DataReader.
- Browse to the place on your computer where you wish Visual Studio to create the directory for your solution (keeping the tick box selected).
- Select ASP.NET Web Application.
- You will need to create a connection to the Northwind Database:
- Select Server Explorer (accessed via the View menu).
- Right-click on ‘Data Connections’ and select ‘Add Connection’.
- For ‘Data source’ select Microsoft SQL Server (SqlClient).
- Type in a full stop for the Server name (it will then select the Server Name of the local machine, treating it as the default one).
- For authentication choose ‘Windows Authentication’.
- Under ‘Connect to a database’ choose the ‘Select or enter a database name’ option. The Northwind database will then appear in the drop-down list.
- Finish by clicking ‘Test Connection’ at the bottom to confirm that Visual Studio has successfully connected to the Northwind Database (which is stored within SQL Server 2008).
- Add a ListBox control to the default form.
- Import the SQLClient namespace in to the class:
using System.Data.SqlClient; - In the Page Load event, add code to create and open a new SqlConnection. Put a dot in the connection string for Data Source:
protected void Page_Load(object sender, EventArgs e)

{

SqlConnection conn = new SqlConnection(@"Data Source=.;

Initial Catalog=Northwind;Integrated Security=True");

conn.Open();
- Create a string to get rows from the Employees table. Use a SQL SELECT statement.
string queryString = "SELECT FirstName, LastName FROM dbo.Employees"; - Create a commandobject using the connection and the query string:
Dim com As SqlCommand = New SqlCommand(queryString, conn) - Call the command’s ExecuteReadermethod and assign the result to a datareader object:
SqlDataReader dr = com.ExecuteReader(); - Iterate through the datareader to add the employee names to the list box. Use a while loop:
wwhile (dr.Read())

{

listBox1.Items.Add

(dr["FirstName"].ToString() + " " + dr["LastName"].ToString());

}
- Run the application to test if employee data is displayed.
- View code file.
Exercise 2
Updating the Database from a Data Set
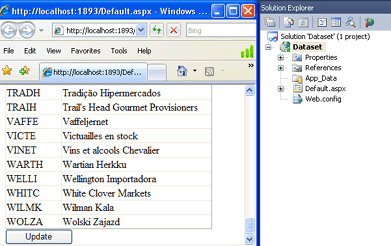
In this exercise, you will create an application that shows and edits customer data. You will add an update button that writes any changes made to the data back to the database.
- Create a new empty web application project called Dataset.
- Add a GridView control to the default form.
- Import the SQLClient namespacein to the class:
using System.Data.SqlClient; - Declare at class level these ADO.Net objects:
private SqlConnection conn;

private SqlDataAdapter da;

private DataSet ds; - In the Page Load eventadd code to create a new connection using this connection string:
"Data Source=.;Initial Catalog=Northwind;Integrated Security=True" - Instantiate the SqlDataAdapterusing the connection and this SQL statement:
"SELECT CustomerID, CompanyName FROM dbo.Customers" - Instantiate the data set. Fill the data set using the data adapter with this statement:
da.Fill(ds, "Customers"); - Bind the GridView control to the data set.
- Run the application to test if customer data is displayed.
- Add a button control to the form and change its text property to Update.
- Declare at class level a command builderobject:
private SqlCommandBuilder cb; - In the button’s click event add code to instantiate the command builder object using data adapter.
- Create an update commandand assign it to the data adapter’s update command property:
da.UpdateCommand = cb.GetUpdateCommand(); - Update the database using the data adapter’s Update method:
da.Update(ds.Tables["Customers"]); - Run the application to test if customer data is updated.
- View code file.
Exercise 3
Display data from the Customers table in a Gridview control
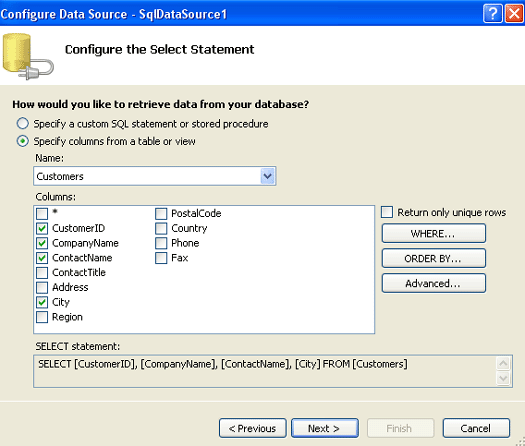
In this exercise, you will drag a gridview control on to a web form. You will then configure a datasource control to display rows from the customer table in the gridview.
- Create a new empty web application project called GridView.
- Add a GridView control to the default form.
- Use GridView’s SmartTag to create a new datasource control
- Configure the datasource to connect to the Northwind database
- Select the Customers table from the database.
- Run the application to test if customer data is shown.
Exercise 4
Calling a Stored Procedure
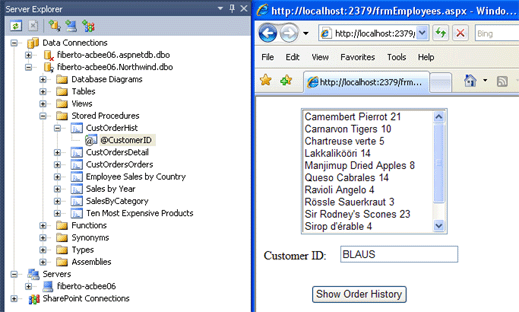
In this exercise, you will create a web application to display a customer’s order history. You will use connection, command, parameter and data reader objects to retrieve data from the Northwind database. The command will call a stored procedure using the customer’s ID as a parameter.
- Create a new empty web application project called CustomerOrders.
- Add a Web Form called frmEmployees.
- Add a ListBox, Label, TextBox and a button control to the form.
- Import the SQLClient namespacein to the class:
using System.Data.SqlClient; - In the button’s click event, add code to create and open a new connection, using this connection string:
"Data Source=.;Initial Catalog=Northwind;Integrated Security =True" - Create the command objectand set its properties:
SqlCommand com = new SqlCommand();

com.Connection = conn;

com.CommandText = "CustOrderHist";

com.CommandType = CommandType.StoredProcedure; - Create the parameter objectand add it to the command’s parameter collection:
SqlParameter param = new SqlParameter("@CustomerID",SqlDbType.NVarChar, 5);

param.Value = txtID.Text;

com.Parameters.Add(param); - Call the command’s ExecuteReader method and assign the result to a data readerobject:
SqlDataReader dr = com.ExecuteReader(); - Iterate through the data reader to add the product names & totals to the list box. Use a while loop:
while (dr.Read())

{

ListBox1.Items.Add(dr["ProductName"] + " " + dr["Total"].ToString());

} - Run the application to test if customer data is displayed; type ‘arout’ into the Customer ID box and click ‘Show Order History’ in order to display the data for that specific customer.
- View code file.
Lab 2. Using LINQ to SQL
Exercise 1
Display the Customers table from the Northwind database using a LINQ to SQL Query
- Create a new empty web application project called LINQ to SQL.
- Add an App_Code folder to the project.
- Add a new LINQ to SQL Classes file to the App_Code folder, call this NWind.dbml.
- Open Server Explorer, then drag the Customers table to the LINQ to SQL Classes design surface. This will create an object that you can query.
- Add a new web form to the project and call this Customers.aspx. Make this the start page.
- Add a GridView control to the Customers.aspx designer and call this gvCustomers.
- Add code similar to this to create a NWindDataContextand display customers (you may have to adjust the connection string):
//Get customers' collection from DataContext

NWindDataContext context = new NWindDataContext("Data Source=.;Initial Catalog=Northwind;Integrated Security=True");

//Select customer's from USA with LINQ query

var custs = from p in context.Customers

where p.Country == "USA"

select new { p.CustomerID, p.ContactName,p.CompanyName, p.Country };

//Bind filtered collection to gridview

this.gvCustomers.DataSource = custs;

this.gvCustomers.DataBind();
Exercise 2
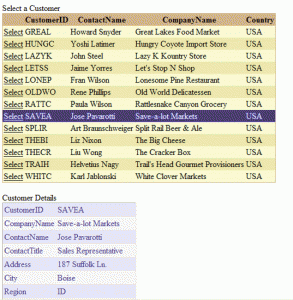
Display a customer’s details when a customer row is selected
- Add a DetailsView control to the Customers.aspx designer and call this dvCustomers.
- Set the Data Key Name property of the gridview to CustomerID.
- Include a select column in the gridview, by selecting Edit Columns after clicking the gridviews smart tag.
- Add code similar to this to display a customer’s details (you may have to adjust the connection string:
protected void gvCustomers_SelectedIndexChanged(object sender, EventArgs e)

{

//Get customer object from selected row

var cust = context.Customers.Where(p =>

p.CustomerID == gvCustomers.SelectedValue.ToString());

//Bind filtered collection to detailview

dvCustomers.DataSource = cust;

dvCustomers.DataBind();

} - View code file.


If you would like to see more content like this in the future, please fill-in our quick survey.