About this Tutorial –
Objectives –
Delegates will learn to develop applications using C #4.0 After completing this course, delegates will be able to:
- Use Visual Studio 2010 effectively
- Creating a WCF 4.0 Service
Audience
This course has been designed primarily for programmers new to the .Net development platform. Delegates experience solely in Windows application development or earlier versions of ASP.Net will also find the content beneficial.
Prerequisites
Before attending this workshop, students must:
- Be able to manage a solution environment using the Visual Studio 2010 IDE and tools
- Be able to program an application using a .NET Framework 4.0 compliant language
Contents
Copyright 20/12/12 – David Ringsell
Overview
In this lab you will create a WCF temperature converter service.
You will host the service in WAS and then IIS, and write a simple console application to consume it.
Exercise 1: Creating a WCF Service Library
A WCF Service contains the relevant application logic in its methods.
It can be hosted at a remote location, and then called by a client using a choice of communication protocols.
- Open Visual Studio and create an empty solution as follows:
- Template: Other Project Types | Visual Studio Solutions
- Solution type: Blank Solution
- Name: TempConverter
- Location: Select location on your computer
- Create a new WCF Service Library project in your solution.
- Choose a meaningful name for the project, such as TempConverterServiceLibrary.
- Rename IService.cs (plus the interface inside it) to something more meaningful, such as ITempConverter.
- Then define a service contract with 2 operations:
- CtoF(), Converts a temperature in Centigrade to a temperature in Fahrenheit.
- FtoC(), Converts a temperature in Fahrenheit to a temperature in Centigrade.
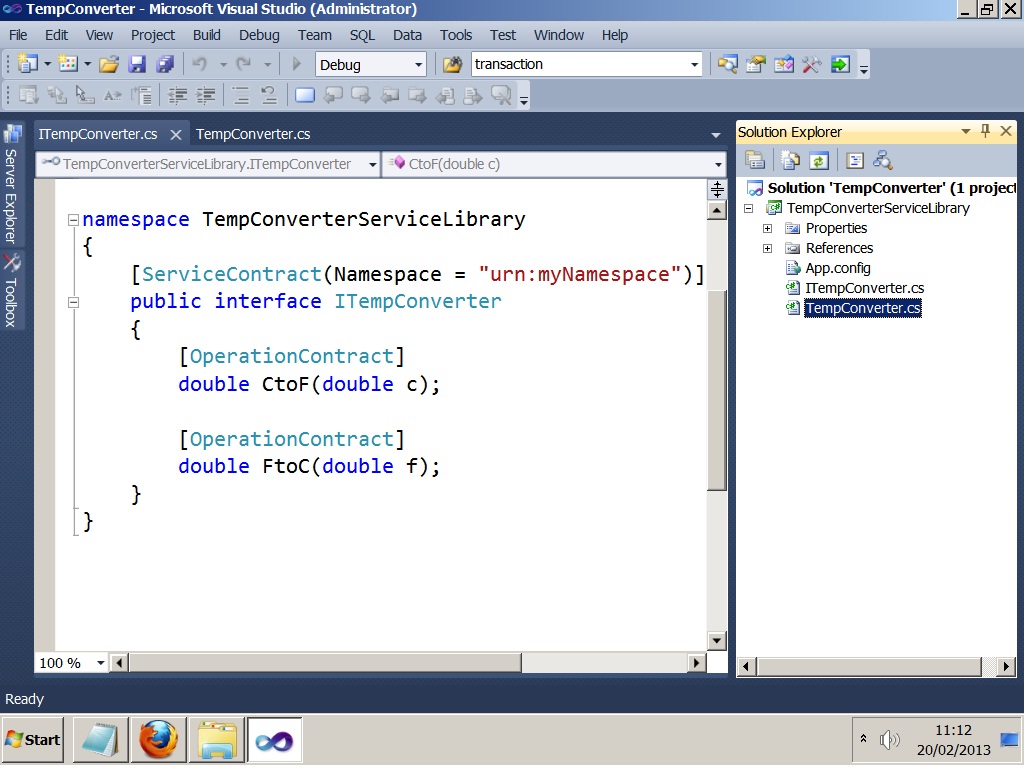
[ServiceContract(Namespace = "urn:myNamespace")]

    public interface ITempConverter

    {

        [OperationContract]

        double CtoF(double c);

        [OperationContract]

        double FtoC(double f);

    }
- View code file.
- Rename Service1.cs (plus the class inside it) to something more meaningful, such as TempConverter.cs.
- Then modify the source code so that it implements your service contract.
    public class TempConverter : ITempConverter

    {

       public double CtoF(double c)

        { return (c * 9.0 / 5.0) + 32; }

        public double FtoC(double f)

        { return (f - 32) * 5.0 / 9.0; }

    }
- View code file.
Exercise 2: Testing the service
The service can be tested independently, that is, without creating a client to consume the service.
The WCF Test Client is used to invoke the service methods.
- Build your solution to verify that it’s OK, and to generate the .DLL assembly file.
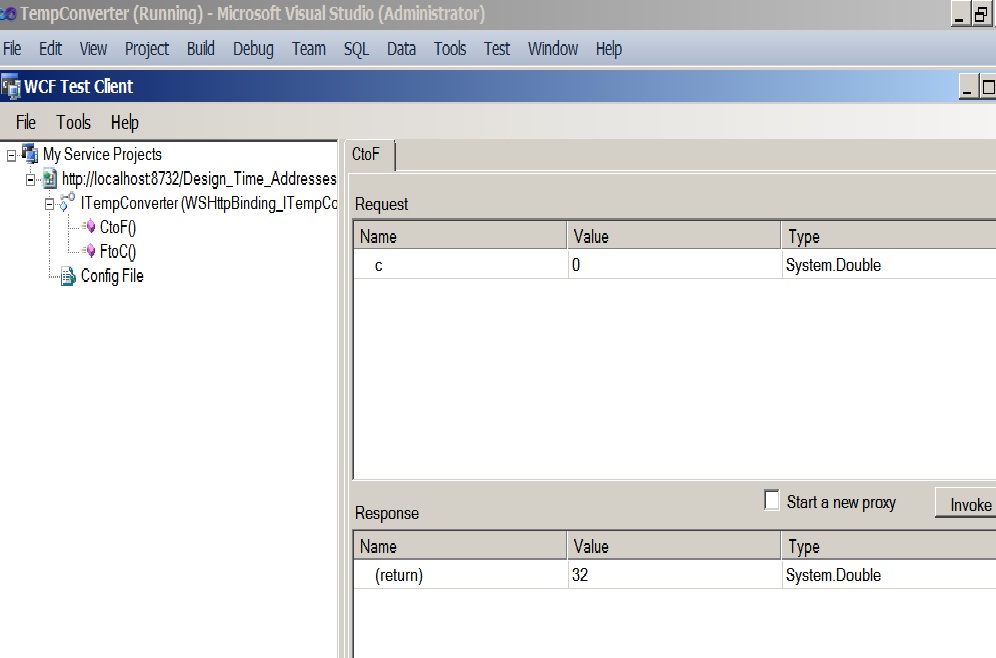
- Run the solution (Ctrl+F5). The WCF Test Client should open as follows:
- Double-click CtoF() to display the test UI for this method:
- In the right-hand side of the window, click Invoke to invoke this operation.
- This will cause the service to convert the temperature.
- In the left-hand-side of the window, double-click FtoC() to display the test UI for this method.
- That completes your exhaustive testing of the service, so close the WCF Test Client window.
Exercise 3: Creating a WCF Service Application
It’s now time to host the service in a real .NET application.
A host listens for calls to the service from client.
It then creates instances of the service class as to respond to those calls.
- In your solution, add a new WCF Service Application project named MyHost.
- Open the Properties window for your new project. In the Properties window, on the Web tab, locate the Servers section. Click Specific port, and in the corresponding box, type 800 Save your changes.
- Add a reference to your WCF service assembly.
- Remove the following files from the host project
(you don’t need any of these, because the service is already defined in the WCF service assembly): - The IService.cs interface file.
- The Service.cs implementation file.
- The App_Data folder
- Rename Service.svc to something more meaningful e.g.TempConverterService.svc.
- In the .svc file, modify the <%@ Service> directive so that it refers to your service:
- Change the Service attribute to your service implementation class.
- Remove the CodeBehind attribute and value.
- The directive in the .svc file will look like this:
<%@ ServiceHost Language=”C#” Debug=”true” Service=”TempConverterServiceLibrary.TempConverter” %>
- Open Web.config and notice there’s no reference to your service. This illustrates that your application is making use of default WCF configuration instead.
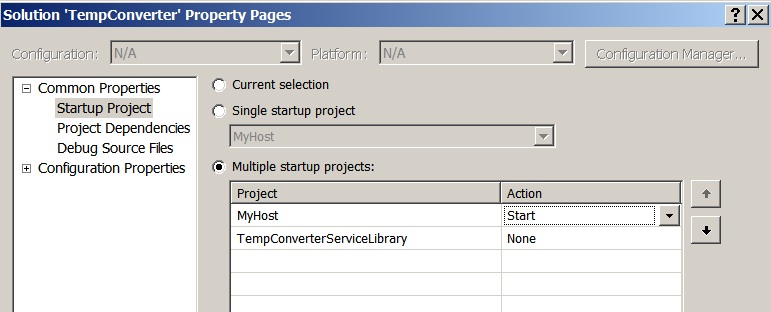
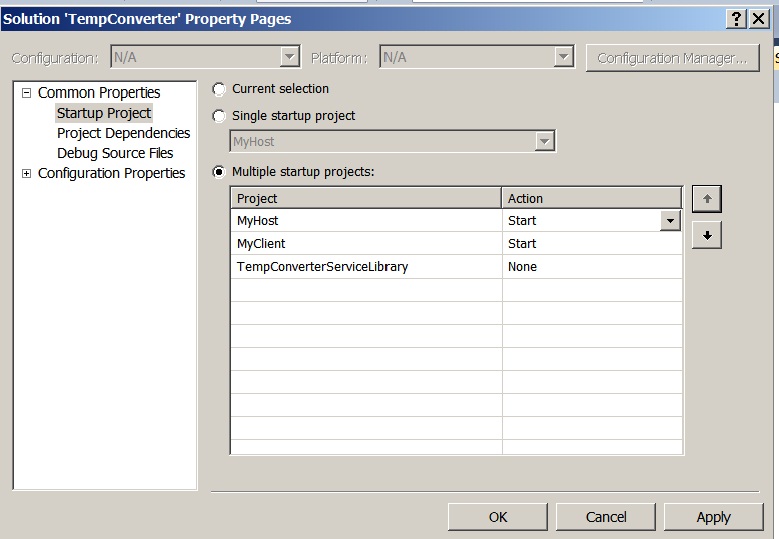
- Set the sartup order of projects in your solution:
- Right-Click the Solution Filein Solution Explorer
- Select Properties from the Context Menu
- Select Muliple start-up projects, set the projects order and action:
- Build your host project and run it. View the WSDL for the service.
- View code file.
Exercise 4: Creating a Client Application
A client application can call the methods of a WCF service. It does this by creating a local proxy class that represents the remote service class.
- In your solution, add a new Console project. Choose a suitable name (e.g. MyClient).
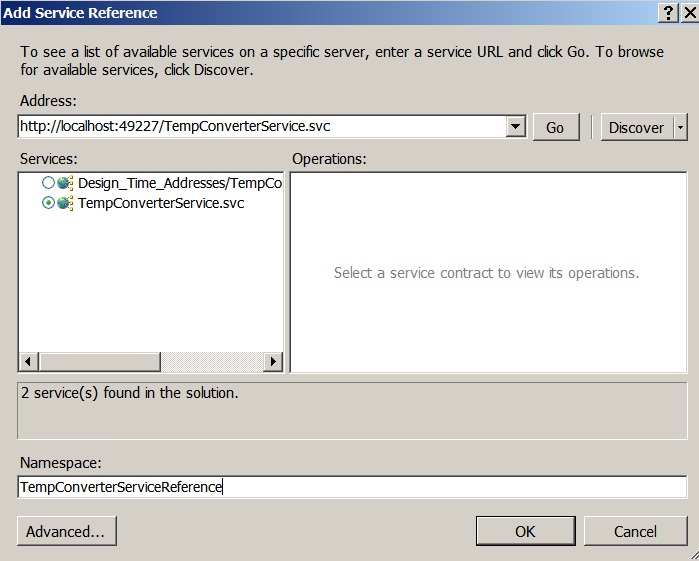
- Add a Service Reference to your project, to reference the WCF service you created earlier (in the Add Service Reference dialog box, you’ll have to enter an address such as http://localhost:8001/YourServiceName.svc?wsdl). View the generated code for the proxy class, if you’re curious.
- Modify your client program so that it invokes methods on the WCF service, as follows:
- Create a proxy object.
- Invoke both methods on the proxy object to convert temperatures
- Close the proxy object when you’re finished.
using (TempConverterClient proxy = new TempConverterClient())

            {

                double f = proxy.CtoF(100);

                Console.WriteLine("100C = {0}F", f);

                Console.ReadLine();

            }
- Set the sartup order of projects in your solution:
- Right-Click the Solution Filein Solution Explorer
- Select Properties from the Context Menu
- Select Muliple start-up projects, set the projects order and action:
- Run the client application. Verify that it can access the WCF service successfully.
- View code file.
Exercise 5: Deploying the service to IIS
The service will be deployed to the IIS web server. This is a common and straightforward way of publishing services.
- In Windows Explorer, create a new folder named C:\MyWebFolder.
- Open the IIS Manager window, by running inetmgr from the Windows Start menu.
- In IIS Manager, locate the Default Web Site.
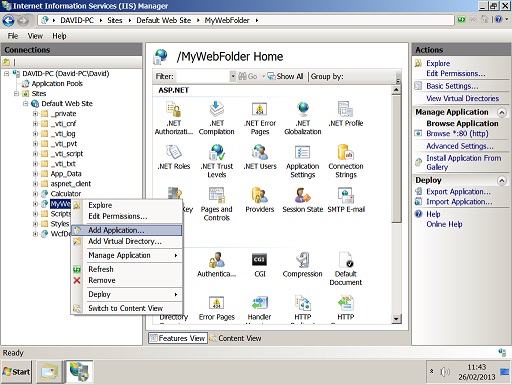
- Right-click the Default Web Site, and click Add Application. Specify the following details:
- Alias: Specify a name such as MyWebFolder.
- Physical Path: Specify the folder you created in Step 1, C:\MyWebFolder.
- Deploy your service to the IIS application folder, as follows:
- Copy your host project .svc file and Web.config files to C:\MyWebFolder.
- Copy your host project .dll file to C:\MyWebFolder\bin.
- Copy your Web service .dll file to C:\MyWebFolder\bin.
- In a browser, enter an address such as the following, to verify your service is accessible:
http://localhost/MyWebFolder/YourServiceName.svc?wsdl
Note: If you get a “403” error in the browser window, it might be because IIS hasn’t been configured to recognize the .svc file extension.
- If this happens, you can fix it easily as follows (this installs the WCF Service Model Runtime engine into IIS):
- Open a Visual Studio 2010 Command Prompt window.
- Change directory to C:\Windows\Microsoft.NET\Framework\v0.xxxxx (specify the correct number rather than xxxxx).
- Run ServiceModelReg.exe -ia
- In Visual Studio, in your client project, add a Service Reference to the IIS-hosted WCF service.
- Write code in the client program to invoke methods on the IIS-hosted WCF service.



If you would like to see more content like this in the future, please fill-in our quick survey.