In this tutorial you will learn the basics of ASP.NET and how to create a mobile UI. This will allow you to write a simple ASP.NET site that you will then run. The program will be a visual studio application
About this Tutorial
Objectives
Delegates will learn to develop web applications using C# 4.0. After completing this course, delegates will be able to:
- Use Visual Studio 2012 effectively
- Create commercial ASP.NET Web Applications
- Develop user interfaces using Master Pages, Site Navigation and Themes
Audience
This course has been designed primarily for programmers new to the .Net development platform. Delegates experience solely in Windows application development or earlier versions of ASP.Net will also find the content beneficial.
Prerequisites
No previous experience in ASP.NET programming is required. But any experience you do have in programming will help. Also no experience in visual studio is required. But again any experience you do have with programming development environments will be a valuable.
Experience using a contemporary OO language such as C++ or C# would be useful but is not required.
Quick Access
Overview
Estimated Time – 2 hours
Not what you are looking? Try the next tutorial – ASP.NET RESTful Web APIs
jQuery Mobile is very easy to use!
-
The MVC 4 Mobile Application project template automatically includes all the Jquery Mobile style sheets and
scripts.
- For other project templates, you can install the NuGet jQuery Mobile library package.
Lab 1: Creating the Application
-
To help learn jQuery Mobile Web applications, we are going to dissect a sample jQuery app. This is located in the solution folder to download at the start of the tutorial. All the HTML is in Index.cshtml.

- To start open Visual Studio 2012>New Project>C#>ASP.NET MVC4, when the dialog is displayed choose Mobile Application and name this jQueryMobileDemo.
-
Once the application has been made, navigate to the Views>Home and delete this. Also in Views choose the Shared folder and open _Layout.cshtml and delete this code
                    <div data-role="page" data-theme="b">

                     <div data-role="header">

                     @if (IsSectionDefined("Header")) {

                      @RenderSection("Header")

                     } else {

                      <h1>@ViewBag.Title</h1>

                      @Html.Partial("_LoginPartial")

                     }

                     </div>

                     <div data-role="content">

                      @RenderBody()

                     </div>

                    </div>
and then replace with this code –
                    <div data-theme="b">

                     @RenderBody()

                    </div>
Lab 2: Creating a Mobile User Interface
@Styles.Render("~/Content/mobileCss", "~/Content/css")
@Scripts.Render("~/bundles/jquery", "~/bundles/jquerymobile")
- Set the data-theme attribute of the body element.
-
This is inherited by child elements, by default.
                        <body data-theme="b">

                         ...

                        </body>
-
For example, consider the following UI element:
<a href="#" data-role="button" data-icon="star" data-theme="a">data-theme="a"</a>
-
This is how it would look
using data-theme values
“a”, “b”, “c”, “d”, “e”.

- Designate each one as a <div> with a distinct id.
- Set the data-role attribute to “page” or “dialog”.
-
For example:
                        <div id="homePanel" data-role="page">

                         ...

                        </div>
                        <div id="itemPanel" data-role="page">

                         ...

                        </div>
                        <div id="newCoursePanel" data-role="dialog" data-theme="e">

                         ...

                        </div>
- data-role=”header“.
- data-role=”content“.
- data-role=”footer“.
-
For example:
                        <div id="homePanel" data-role="page">

                        <div data-role="header"> ... </div>

                        <div data-role="content"> ...</div>

                        <div data-role="footer"> ...</div>

                        </div>
- View code file.
- data-role=”listview“.
- data-role=”slider“.
- data-role=”fieldcontain”.
- data-role=”collapsible”.
- data-role=”collapsible-set”.
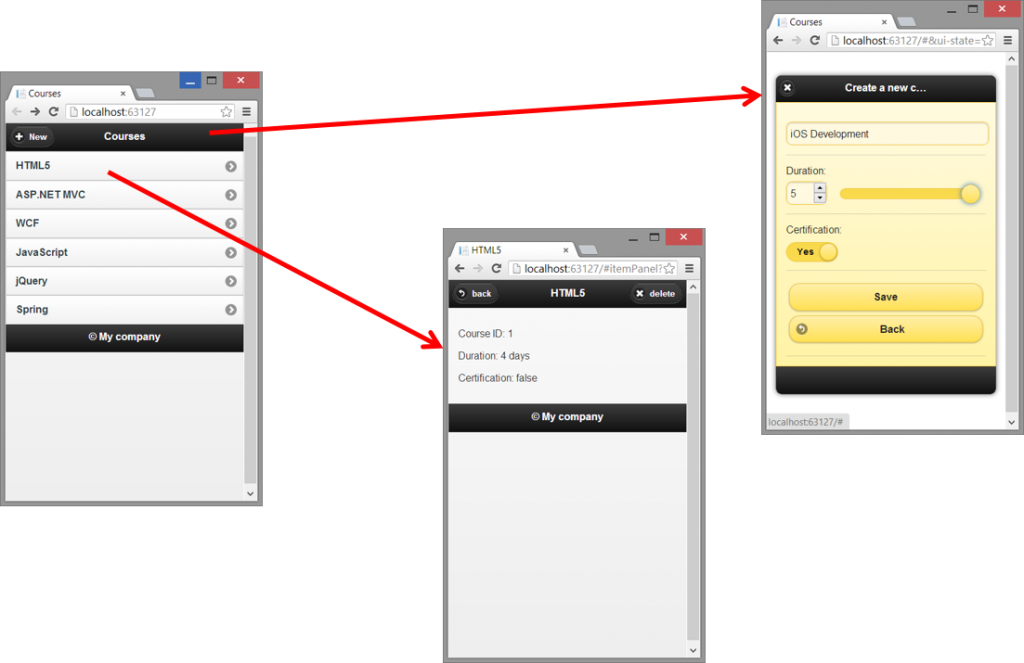
- The main view where all courses will be displayed.
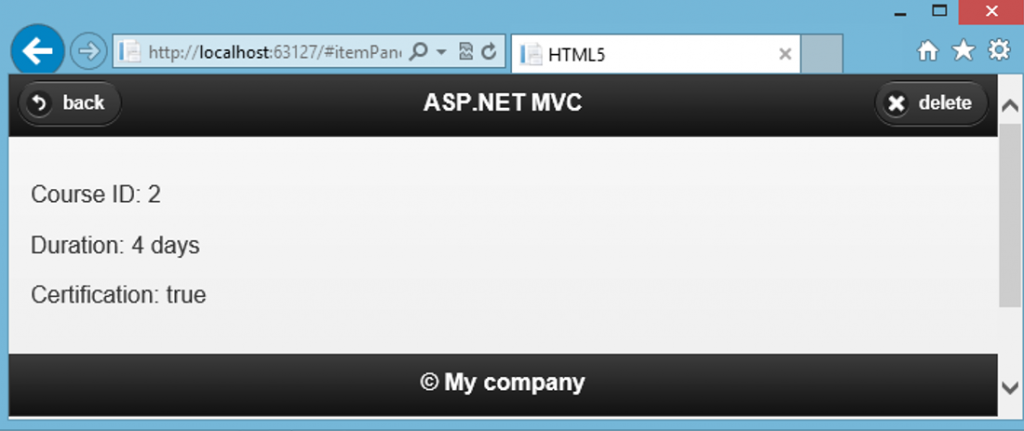
- A details page about particular courses.
- An add new course page.
                <div id="homePanel" data-role="page">

                 <!-- Header, includes a "+ New" link -->

                 <div data-role="header">

                  <h1>Courses</h1>

                  <a href="#newCoursePanel" data-icon="plus">New</a>

                 </div>

                 <!-- Main content, i.e. a listview of courses -->

                 <div data-role="content">

                  <ul data-role="listview">

                   <!-- Will contain <li> elements, each with a hyperlink such as <a href="#itemPanel?course=1">HTML5</a> -->

                   </ul>

                 </div>

                 <!-- Footer, displays a copyright message -->

                 <div data-role="footer">

                  <h2>© My company</h2>

                 </div>

                </div>
                <div id="itemPanel" data-role="page">

                 <!-- Header, includes a "back" icon, the name of the course, and a "delete" icon -->

                 <div data-role="header">

                  <a href="#" data-rel="back" data-icon="back">back</a>

                  <h1 id="headerField">Name of the course</h1>

                  <a href="#" id="deleteButton" data-icon="delete">delete</a>

                 </div>

                 <!-- Main content, i.e. details for a course -->

                 <div data-role="content">

                  <p id="idField">Course ID will appear here</p>

                  <p id="durationField">Duration will appear here</p>

                  <p id="certificationField">Certification will appear here</p>

                 </div>

                 <!-- Footer, displays a copyright message -->

                 <div data-role="footer">

                  <h2>© My company</h2>

                 </div>

                </div>
                <div id="newCoursePanel" data-role="dialog" data-theme="e">

                 <!-- Simple header -->

                 <div data-role="header">

                  <h1>Create a new course</h1>

                 </div>

                 <!-- Main content, i.e. mobile input controls -->

                 <div data-role="content">

                  <form id="newCourseForm" action="#" method="post" data-ajax="false">

                   <!-- Text box, for course name -->

                   <div data-role="fieldcontain">

                    <label for="newNameField" class="ui-hidden-accessible">Course name:</label>

                    <input type="text" id="newNameField" value="" placeholder="Name of the course"/>

                   </div>

                   <!-- Range, for course duration -->

                   <div data-role="fieldcontain">

                    <label for="newDurationField" data-mini="true">Duration:</label>

                    <input type="range" id="newDurationField" min="1" max="5" value="3" />

                   </div>

                   <!-- Select list box, displayed as a slider, to indicate if the course leads to certification -->

                   <div data-role="fieldcontain">

                    <label for="newCertificationField">Certification:</label>

                    <select id="newCertificationField" data-role="slider" data-mini="true">

                      <option>No</option>

                      <option>Yes</option>

                     </select>

                    </div>

                   <!-- Submit and Back buttons -->

                   <div data-role="fieldcontain">

                    <input type="submit" value="Save" />

                    <input type="button" id="backButton" value="Back" data-rel="back" data-icon="back" />

                   </div>

                  </form>

                 </div>

                 <!-- Simple footer, no text content, just to look tidy -->

                 <div data-role="footer">

                  <h2> </h2>

                 </div>

                </div>
Lab 3: Managing Data
- Mobile applications have unpredictable connectivity, hence HTML5 local storage is ideal for mobile applications. In our application, all data-related code resides in course-data.js.
-
Our application defines a “starter” array of course objects; navigate to Scripts in the solution and right click>Add>New Item and choose Javascript file and name this course-data.js and add the code below to have a hard-coded array of courses.
                var courses = [

                { id: 1, name: "HTML5", duration: 4, certification: false },

                { id: 2, name: "ASP.NET MVC", duration: 4, certification: true },

                { id: 3, name: "WCF", duration: 5, certification: true },

                { id: 4, name: "JavaScript", duration: 4, certification: true },

                { id: 6, name: "jQuery", duration: 3, certification: false },

                { id: 5, name: "Spring", duration: 5, certification: true }

                ];
- View code file.
-
On start-up, our app performs the following tasks:
- Attempt to retrieve courses data from local storage (as a string).
-
If unavailable, store the courses into local storage (as a string). Add this code into course-data.js which is called on page load, to synchronize local storage with the global “courses” array.
                        $(document).ready(function() {

                         if (window.localStorage) {

                          var fromDb = localStorage.getItem("courses");

                         if (fromDb) {

                          // Read the courses from local storage, into the global "courses" array.

                          courses = JSON.parse(fromDb);

                         }

                         else {

                          // Store the global "courses" array into local storage.

                          storeCourses();

                         }

                        }

                        });

                        // Stores the global "courses" array into local storage.

                        function storeCourses() {

                         if (window.localStorage) {

                          localStorage.setItem("courses", JSON.stringify(courses));

                         }

                        }
- View code file.
-
The following code is a function that allows the user to add a new course, add this to course-data.js; the code creates a new “course” object, adds it to the global “courses” array, and then saves to local storage:
                function addCourse(courseName, duration, certification) {

                 // Call a helper function to generate a unique course id (see code for details).

                 var newId = getNewCourseId();

                 // Create a new course object.

                 var newCourse = {

                  id: newId,

                  name: courseName,

                  duration: duration,

                  certification: certification

                 };

                 // Store the courses in the in-memory array.

                 courses.push(newCourse);

                 // Also store the courses to local storage.

                 storeCourses();

                 // Return the id of the new course (so it can be displayed in the GUI).

                 return newId;

                }
- View code file.
-
This function allows the user to remove a course, add this code to course-data.js to remove an existing “course” object from the global “courses” array, and then save to local storage:
                function removeCourse(id) {

                 // Call a helper function, to find the array index for the specified course id.

                 var index = getIndexForId(id);

                 // If the id was located...

                 if (index >= 0) {

                  // Remove the course object from the array.

                  courses.splice(index,1);

                  // Store the courses back into local storage.

                  storeCourses();

                 }

                }
- View code file.
-
Now to add the helper functions that allow these functions to operate-
-
Add to course-data.js getNewCourseId() which gets the next ID to use for a new course
                        function getNewCourseId() {

                         var max = 0;

                         for (var c = 0; c < courses.length; c++) {

                          if (courses[c].id > max)

                           max = courses[c].id;

                         }

                         return max + 1;

                        }
-
Add to course-data.js getIndexForId() which gets the index (i.e. array position) for a course with a specific ID
                        function getIndexForId(id) {

                         var index = -1;

                         for (var c in courses) {

                          if (courses[c].id == id) {

                           index = c;

                           break;

                          }

                         }

                         return index;

                        }
-
Add to course-data.js the helper function getCourseById() which gets the “course” object with a specific ID.
                        function getCourseById(id) {

                         var index = getIndexForId(id);

                         if (index < 0)

                          return null

                         else

                          return courses[index];

                        }
-
Add to course-data.js getNewCourseId() which gets the next ID to use for a new course
Lab 4: Implementing UI Behaviour
-
We need to implement the following UI behaviour in our mobile application. This resides in JavaScript file course-ui-behaviour.js:
- Populate the “main” page with a list of courses initially.
- Pre-populate the “detail” page with details for a course.
- Handle the “new course” page, to add a new course.
-
We perform the following tasks during page initialization, add this to course-ui-behaviour.js so that when called on page load, it loads the data and sets up event-handlers:
                $(document).ready(function() {

                 loadCoursesFromData();

                 $("#newCourseForm").submit(createNewCourse);

                 $("#deleteButton").click(removeSelectedCourse);

                 $("#backButton").click(closeDialog);

                });
- View code file.
-
Add this function to course-ui-behaviour.js to displays courses in an unordered list or <ul> on main page. This creates a list item or a <li> for each course:
                function loadCoursesFromData() {

                 // Get the list of courses and empty it.

                 var list = $("ul");

                 list.empty();

                 // Create <li> elements, e.g. <li><a  href='#itemPanel?course=1'>HTML5</a></li>.

                 var template ="<li><a href='#itemPanel?course=id'>courseName</a></li>";

                 var listItems = "";

                 for (var c = 0; c < courses.length; c++) {

                  listItems = listItems + template.replace(/id/g, courses[c].id)

                  .replace(/courseName/g, courses[c].name);

                 }

                 // Assign the <li> elements to the list, and refresh its UI.

                 list.html(listItems);

                 list.listview("refresh");

                 // Programmatically change to the #homePanel URL, to display the main page.

                 $.mobile.changePage("#homePanel", {});

                }
- View code file.
-
jQuery Mobile allows you to intercept page changes, via the pagebeforechange event and this allows you to pre-populate the page before it becomes visible. The following code intercepts transitions to the #itempanel page. Add this to course-ui-behaviour.js so we have an opportunity to pre-populate the fields in the #itempanel.
                $(document).bind("pagebeforechange", function(e, data) {

                 if (typeof data.toPage === "string") {

                  // Get the URL that we're navigating to.

                  var url = $.mobile.path.parseUrl(data.toPage);

                  // Compare the # part of the URL to see if it's the "#itemPanel" page.

                  if (url.hash.search(/^#itemPanel/) !== -1) {

                   // Populate the #itemPanel with data for the selected course.

                   showCourse(url, data.options);

                   e.preventDefault();

                  }

                 }

                });
- View code file.
-
The following code populates the #itemPanel page, add this to course-ui-behaviour.js to show the details for a course. The url parameter will be something like “#itemPanel?course=1”:
                function showCourse(urlObj, options) {

                 // Get the course id (after the "#itemPanel?course=" part of the URL).

                 var courseId = urlObj.hash.replace(/.*course=/, "");

                 if (courseId) {

                  selectedCourseId = courseId;

                  var course = getCourseById(selectedCourseId);

                  $("#headerField").html(course.name);

                  $("#idField").html("Course ID: " + course.id);

                  $("#durationField").html("Duration: " + course.duration + " days");

                  $("#certificationField").html("Certification: " + course.certification);

                  // Get the page to display (via everything up to the ? in the URL).

                  var pageSelector = urlObj.hash.replace(/\?.*$/, "");

                  var thePage = $(pageSelector);

                  // Call jQuery Mobile page() function, to convert HTML into nice mobile format.

                  thePage.page();

                  // Now do the page change.

                  options.dataUrl = urlObj.href;

                  $.mobile.changePage(thePage, options);

                 }

                }
- View code file.
-
This function adds a course, add this to course-ui-behaviour.js to create a new course object from user’s input:
                function createNewCourse(e) {

                 e.preventDefault();

                 var name = document.getElementById("newNameField").value;

                 var duration = document.getElementById("newDurationField").value;

                 var certification = document.getElementById("newCertificationField").value;

                 addCourse(name, duration, certification);

                 loadCoursesFromData();

                 document.getElementById("newNameField").value = "";

                }
- View code file.
-
This function removes a course, add this to course-ui-behaviour.js to enbale this functionality:
                function removeSelectedCourse() {

                 removeCourse(selectedCourseId);

                 loadCoursesFromData();

                }
- View code file.
-
This function dismisses dialog boxes if the user clicks the “Back” button, add this to course-ui-behaviour.js to enbale this functionality.
                function closeDialog() {

                 $(".ui-dialog").dialog("close");

                }
- View code file.
- Run the application and test its behaviour.
Well done. You have completed the tutorial in the MVC4 course. The next tutorial is
9. ASP.NET RESTful Web API
Copyright © 2016 TalkIT®


If you would like to see more content like this in the future, please fill-in our quick survey.