7. ASP.NET MVC4 Using Ajax and jQuery

About this Tutorial

Objectives

Delegates will learn to develop web applications using C# 4.0. After completing this course, delegates will be able to:

  • Use Visual Studio 2012 effectively
  • Create commercial ASP.NET Web Applications
  • Develop user interfaces using Master Pages, Site Navigation and Themes

Audience

This course has been designed primarily for programmers new to the .Net development platform. Delegates experience solely in Windows application development or earlier versions of ASP.Net will also find the content beneficial.

Prerequisites

No previous experience in ASP.NET programming is required. But any experience you do have in programming will help. Also no experience in visual studio is required. But again any experience you do have with programming development environments will be a valuable.

Download Solutions

HTML tutorial


Overview

Estimated Time – 1 Hour and 30 minutes

Not what you are looking? Try the next tutorial – ASP.NET MVC4 Using jQuery Mobile

ASP.NET MVC is a server-side technology.

  1. Handles HTTP requests at the server.
  2. Sends HTML responses back to the browser.
  3. At the current time we have only used static HTML – No client side intelligence.
  4. So the HTML is only updated when the browser loads a new page.

Ajax = “Asynchronous JavaScript with XML“.

  1. Supports partial updates to Web page.
  2. So only part of the page needs to be sent back to the browser.
  3. Asynchronous post-backs to server.
  4. So the update happens in the background and client can still interact with the page.
  5. Ajax is a collection of technologies…

    • HTML and Cascading Style Sheets (CSS).
    • Document Object Model (DOM) and JavaScript – Client-side dynamic behaviour.
    • XML and XSLT – Data exchange, transformation, and manipulation.
    • XMLHttpRequest – A JavaScript object that performs asynchronous data retrieval.

MVC comes with some HTML helpers to support AJAX. HTML helpers methods make it easy write raw HTML. They are covered in the “View Techniques” lab. This all means that :

  1. AJAX. HTML helpers make it very easy to perform asynchronous partial-page updates.
  2. And they wrap the functionality of the Microsoft ASP.NET AJAX library, so it works well on most modern browsers.
  3. For example, Ajax.ActionLink() – Renders a link; asynchronous equivalent of Html.ActionLink().
  4. Also, Ajax.BeginForm() – Renders an HTML form; Asynchronous equivalent of Html.BeginForm(), On submit, fetches and injects new content into existing HTML page.

To use the Ajax Helpers you need to reference their scripts to your view page-

<script src="@Url.Content("~/Scripts/jquery-1.7.1.min.js")"
type="text/javascript"></script>
<script src="@Url.Content("~/Scripts/jquery.unobtrusive-ajax.min.js")"
type="text/javascript"></script>

These script files support “unobtrusive Ajax” which means the site is usable without JavaScript and all code is contained in external .js files.

The role of jQuery:

  1. Jquery is a free, open-source JavaScript library.

    • Dramatically simplifies the task of writing client-side JavaScript code in your web pages.
    • Hides browser-specific nuances, which is a great help!
  2. The success story of jQuery.

    • First released in 2006.
    • Widely adopted by major Web platforms, including Microsoft IE6+, Chrome, Firefox 2+, Safari3+, Opera 9+.

Lab 1: Using Ajax Action links

Lab 1: Using Ajax Action links

Application

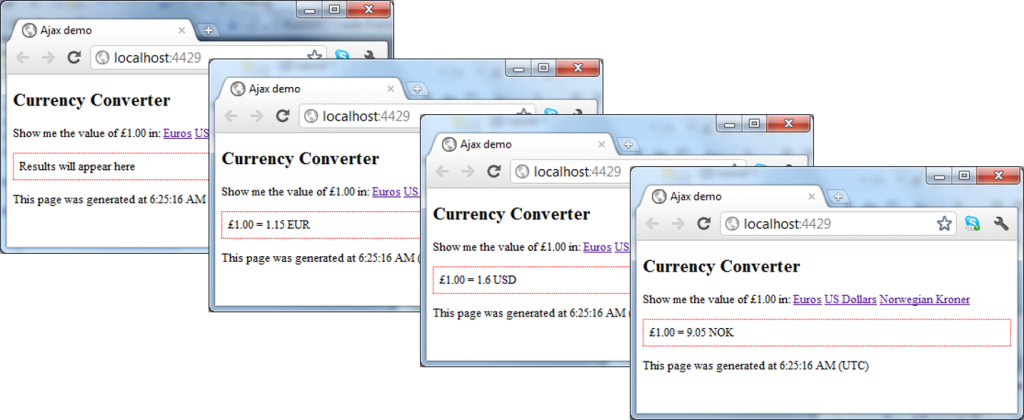
  1. This appliaction converts sterling to a foreign currency. It does this by calling a function using AJAX to update only part of the page. This is how we add the link to a view with Ajax.ActionLink():

    Ajax.ActionLink(link-label,
    name-of-server-side-action,
    route-values,
    AjaxOptions-object)

    • link-label -The label displayed on the page.
    • name-of-server-side-action – Name of action on your MVC controller.
    • route-values – Parameters to pass into action method.
    • AjaxOptions-objectHTML element to update.
  2.  

  3. To start open Visual Studio 2012>Open project>C#>ASP.NET MVC4 and in the dialog choose Basic and use the Razor engine, name this AjaxJQueryDemo.
  4. Add an empty Controller called HomeController to the Controllers folder by right clicking>Add>Controller. In this Controller add the following code that creates a dictionary that allows us to reference a currency and get its value compared to one pound.

    private Dictionary<string, double> conversionRates = new Dictionary<string, double>
    {
     //Dictionary of conversion rates
     { "eur", 1.15 }, { "usd", 1.60 }, { "nok", 9.05 }
    };
  5. Next we need to create our View when the user opens the site, to do this right click on the action result Index() and select Add View. The name of the view should be Index and use the razor engine. In Index add the following HTML:

    @{
     Layout = null;
    }
    <!DOCTYPE html>
    <html>
    <head>
     <meta name="viewport" content="width=device-width" />
     <title>Ajax demo</title>
     <script src="@Url.Content("~/Scripts/jquery-1.7.1.min.js")" type="text/javascript"></script>
     <script src="@Url.Content("~/Scripts/jquery.unobtrusive-ajax.min.js")" type="text/javascript"></script>
    </head>
    <body>
    <h2>Currency Converter</h2>
    <p>Show me the value of £1.00 in:
    @*// Make AJAX async calls to Action Method*@
    @Ajax.ActionLink("Euros",
        "GetValue",
        new { currencyCode = "eur" },
        new AjaxOptions { UpdateTargetId = "myResults" })
    @Ajax.ActionLink("US Dollars",
        "GetValue",
        new { currencyCode = "usd" },
        new AjaxOptions { UpdateTargetId = "myResults" })
    @Ajax.ActionLink("Norwegian Kroner",
        "GetValue",
        new { currencyCode = "nok" },
        new AjaxOptions { UpdateTargetId = "myResults" })
    </p>
    <div id="myResults" style="border: 2px dotted red; padding: .5em;">
     Results will appear here
    </div>
    <p>
     This page was generated at @DateTime.UtcNow.ToString("h:mm:ss tt") (UTC)
    </p>
     <a href="/JQueryDemo">Go to JQuery demo</a>
    </body>
    </html>
  6. View code file.
  7. As you can see above we are including our JQuery libraries to enable us to use Ajax. The can be seen easily in one of the Ajax.ActionLink() – The first part is what the user sees e.g. the link, the second part is our method in the controller, the third is the information being parsed and the fourth is the <div> to be updated.
  8. Before we can run this we need to create the method in the controller we are calling called GetValue, this will allow us to see the change without the need to refresh the page. The code below receives the currency wanted and if it is in the dictionary will using string formatting output the new value in that currency and a 3 letter acronym for that currency in upper-case.

    public string GetValue(string currencyCode)
    {
     if (!conversionRates.ContainsKey(currencyCode))
     {//Unrecognized currency code
      return string.Format("<div>Unrecognized currency code: {0}</div>", currencyCode);
     }
     else
     {//Show converted currency
      return string.Format("<div>£1.00 = {0} {1}</div>", conversionRates[currencyCode], currencyCode.ToUpper());
    }

Lab 2: jQuery Techniques

Lab 2: jQuery Techniques
  1. Jquery uses CSS3-style selector syntax to intelligently locate HTML elements, atributes etc. in your page – based on nesting, ID’s, tag names etc..
  2. Consider the following hard-coded HTML table:

    <table id="employeesTable">
     <tr>
      <td>Ben</td><td>Davies</td><td>100000</td>
     </tr>
     <tr>
      <td>Pablo</td><td>Hernandez</td><td>120000</td>
     </tr>
     ...
    </table>
  3. table

  4. This jQuery sets alternating rows to the even CSS class.

    <script type="text/javascript">
     $(document).ready(function () {
      $("table#employeesTable tr:nth-child(even)").addClass("even");
     });
    </script>
  5. View code file.
  6. $() – Short-hand for jQuery(), a powerful function for DOM queries.
  7. $(document) – Returns the document object on the page.
  8. $(document).ready – Binds a function when the DOM is ready to be manipulated.
  9. $(“table#employeesTable tr:nth-child(even)”) – Finds <table> element whose ID is employeesTable and then finds all its <tr> child elements at even index.
  10. .addClass(“even”) – jQuery method to add a CSS class to specified DOM object.
  11. Additional Selector Examples.

    • CSS style.

      $("#myID") // Find by id.
      $(".myClass") // Find by class name.
      $("myTag") // Find by tag (element name).
      $("#id, .class, tag") // Find by multiple criteria.
    • Hierarchy.

      $("form input") // Find descendant.
      $("#main > *") // Find child.
      $("#prev ~ div") // Find sibling.
    • Form.

      $("form :radio") // Find radio elements in forms.
      $("#dvMainForm :checkbox") // Find checkbox in a form.
      $("input:disabled") // Find disabled input elements.
  12. Getting and setting Attributes

    • Getting attributes.

      $("em").attr("title")
      $("label").html()
      $("p:first").text()
      $("input").val()
    • Setting attributes.

      $("em").attr("title", "hello")
      $("label").html("hello")
      $("p:first").text("hello")
      $("input").val("hello")
  13. Dom Manipulation.

    $("#target").addClass("css_class");
    $("#target").toggleClass("css_class");
    $("p").append("Hello");
    $("span").appendTo("#foo");
    $("p").after("Hello");
    $("p").before("Hello");
  14. Example of jQuery in ASP.NET

    • Consider the following:

      <div id="MyPanel" style="background:Orange; width:300px; font-size:10pt">
       This is my lovely panel. <br /><br />
       <input id="MyButton" type="button" value="Animate" />
      </div>
    • The following Jquery statement is triggered when the user clicks the button.

      $("#MyButton").click(function () {
       $("#MyPanel")
        .animate({ width: "500px", opacity: 0.25, fontSize: "16pt" }, 2000);
       $("#MyPanel")
        .animate({ width: "300px", opacity: 1.00, fontSize: "10pt" }, 1000);
      });
    • View code file.
  15. animate

  16. Using bind() and live().

    • bind() – resolved at the time the call is made.

      $("#target").bind("click", function(){....});
    • live() – Works now and in the future.

      $("#target").live("click", function(){....});
  17. Using find(), filter() and end()

    • find() – Finds descendants of each element
      in the current set of elements.

      $("body")
      .find("p")
      .find("a")
      .addClass("myClass");
    • filter() – Reduces the set of matched elements
      to those that match a selector.

      $("tr")
      .filter(":odd")
      .addClass("oddClass")
      .end()
      .filter(":even")
      .addClass("evenClass");
    • end() – Ends the most recent filtering operation in the current chain and returns the set of matched elements to its previous state.
  18. Now to use what we have learnt above to implement into our application from Lab1
  19. Create a new class in Models called Person.cs by right clicking Model>Add>Class and use this code to store their information.

    public class Person
    {
     public string FirstName { get; set; }
     public string LastName { get; set; }
     public double Salary { get; set; }
    }
  20. We are now going to create a new controller by righting clicking on Controllers>Add>Controller calling this JQueryDemoController, inside use this code which will create a list of people and return this to the view:

    using AjaxJQueryDemo.models;
    public ActionResult Index()
    {
     List<Person> people = new List<Person>
     {
      new Person { FirstName = "Ben", LastName = "Davies", Salary = 100000 },
      new Person { FirstName = "Pablo", LastName = "Hernandez", Salary = 120000 },
      new Person { FirstName = "Chico", LastName = "Flores", Salary = 200000 },
      new Person { FirstName = "Leon", LastName = "Britton", Salary = 130000 },
      new Person { FirstName = "Miguel", LastName = "Michu", Salary = 95000 },
      new Person { FirstName = "Jonathon", LastName = "de Guzman", Salary = 110000 },
     };
     return View(people);
    }
  21. From this ActionResult method add a new view by right clicking Index()>Add View and Choose the name Index, using the razor engine and create a strongly-typed view using IEnumerable<AjaxJQueryDemo.Models.Person>. In the New view use this code:

    @model IEnumerable<AjaxJQueryDemo.Models.Person>
    @{
     Layout = null;
    }
    <!DOCTYPE html>
    <html>
    <head>
     <title>Index</title>
     <link href="@Url.Content("~/Content/Site.css")" rel="stylesheet" type="text/css" />
     <script src="@Url.Content("~/Scripts/jquery-1.7.1.min.js")" type="text/javascript"></script>
     <script src="@Url.Content("~/Scripts/jquery.unobtrusive-ajax.min.js")" type="text/javascript"></script>
    </head>
    <body>
    @*Table to show people*@
     <table id="employeesTable">
      @foreach (var person in Model) {
       <tr>
        <td>@person.FirstName</td>
        <td>@person.LastName</td>
        <td>@person.Salary</td>
       </tr>
      }
     </table>
     <hr />
     @* Text and button in panel*@
     <div id="MyPanel" style="background:Orange; width:300px; font-size:10pt">
      This is my lovely panel. <br /><br />
      <input id="MyButton" type="button" value="Animate" />
     </div>
      <a href="/Home">Go to AJAX demo</a>
     @* Call JQuery function*@
      <script type="text/javascript">
       $(document).ready(function () {
        //Shade even table rows
        $("table#employeesTable tr:nth-child(even)").addClass("even");
         //Add text before table
        $("td").css('font-style', 'italic');
        $("table").before("<h4>Added with jQuery!</h4>");
        //Add text after panel
        $("div").live("click", function () {
         $(this).after("<div>Here's another div!</div>");
        });
        //Animate width, opacity & font size of panel for 4 seconds
         $("#MyButton").click(function () {
         $("#MyPanel").animate({ width: "500px", opacity: 0.25, fontSize: "16pt" }, 500);
         $("#MyPanel").animate({ width: "300px", opacity: 1.00, fontSize: "10pt" }, 1500);
        });
       });
     </script>
    </body>
    </html>
  22. This will fill a table at the start with the result from the Actionresult called Index.A panel is created with a button, when the button is pressed it will call the function connected to MyButton and will animate MyPanel. The Jquery itself will make even table rows related to the CSS class even. Every time the button is clicked in the div section a new div will be created.
  23. For the even class to work it needs to be added to the Site.css located in the Content folder

    .even
    {
     background: yellow;
     color: Red
    }
  24. Now run the application and see the result

Lab 3: Using jQuery UI

Lab 3: Using jQuery UI
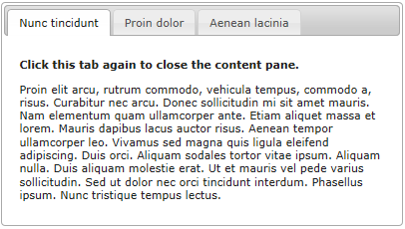
  1. jQuery UI is a free, open-source JavaScript component library based on jQuery; this is just an example of one of its components-
    jQuerytab
  2. You can download Jquery UI from this URL – https://jqueryui.com/download and you can select which parts of the library you want, especially important for low-bandwidth clients.
  3. You will need to unzip the jQuery UI folder to use it and it should contain a CSS folder for style sheets, some development aids e.g. Demos and a js folder containing all the components.
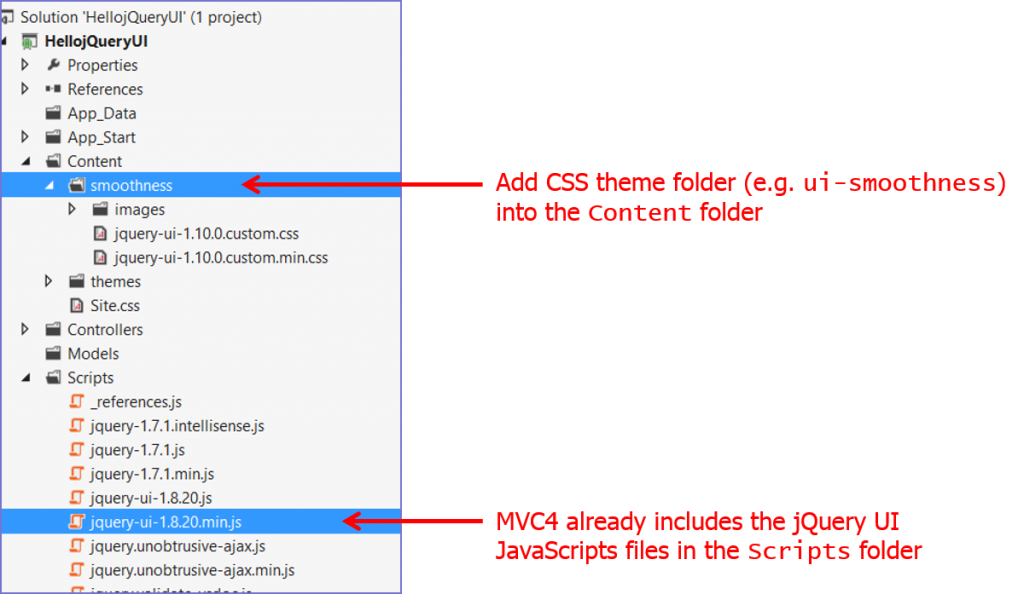
  4. To use jQuery UI in ASP.NET MVC applications you simply need to copy some files in to your app project e.g.
    jQueryfolderstru
  5. To use jQuery UI in your pages, just add the following tags, alternatively you can drag and drop from solution explorer and VS will generate the tags for you.

    <head>
     ...
     <link href="~/Content/smoothness/jquery-ui-1.10.0.custom.min.css"
     rel="stylesheet" />
     <script src="~/Scripts/jquery-1.7.1.min.js"></script>
     <script src="~/Scripts/jquery-ui-1.8.20.min.js"></script>
    </head>
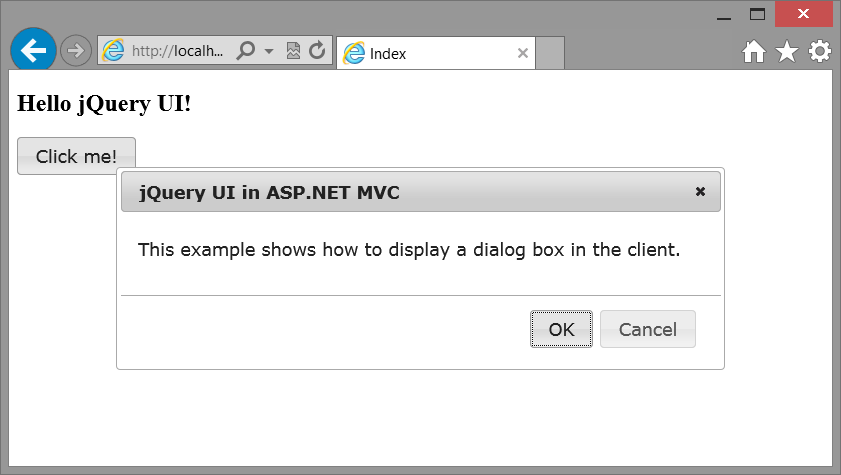
  6. The code below will open a modal dialog when you click a button in jQuery.

    <h2>Hello jQuery UI!</h2>
    <button id="my-button">Click me!</button>
    <div id="my-dialog" title="jQuery UI in ASP.NET MVC">
     <p>This example shows how to display a dialog box in the client.</p>
    </div>
    <script language="javascript" type="text/javascript">
    $(function () {
     $('#my-dialog').dialog({
      autoOpen: false,
      width: 600,
      buttons: {
       "OK": function () { $(this).dialog("close"); },
       "Cancel": function () { $(this).dialog("close"); }
      }
     });
     $("#my-button").button().click(function () {
      $('#my-dialog').dialog('open');
      return false;
     });
    });
    </script>
  7. View code file.
  8. On running the app –
    jQueryapp

In the next tutorials we will enhance the application further by creating a mobile user interface as this is becoming more predominant for user to view websites on their phones.


Well done. You have completed the tutorial in the MVC4 course. The next tutorial is

8. ASP.NET MVC4 Using jQuery Mobile


Back to beginning
Copyright © 2016 TalkIT®


If you liked this post, please comment with your suggestions to help others.
If you would like to see more content like this in the future, please fill-in our quick survey.
Scroll to Top