In this tutorial you will learn the basics of Python and how to work with XML. This will allow you to write a simple python program that you will then run. The program will be a python script run using IDLE
About this Tutorial –
Objectives –
Python is a powerful and popular object-oriented scripting language. This course provides a comprehensive introduction to the core syntax and functions provided by Python, including full coverage of its object-oriented features. The course also explores some of Python’s powerful APIs and techniques, including file handling, XML processing, object serialization, and Web service
Audience
This training course is aimed at new developers and experienced developers
Prerequisites
No previous experience in Python programming is required. But any experience you do have in programming will help. Also no experience in IDLE is required. But again any experience you do have with programming development environments will be a valuable.
Experience using a contemporary OO language such as C++ or C# would be useful but is not required.
Contents
The python course covers these topics and more:
- Strings and Regular Expressions: Overview of strings in Python; Basic string manipulation; Introduction to regular expressions
- XML Processing: XML essentials; Parsing XML documents; Searching for XML content; Generating XML data
- Web Services: Overview of Web services; Implementing Web services using Python; Caching; Compression; Handling redirects
Download Solutions
Quick Access
Overview
Estimated Time – 1 Hour
Not what you are looking? Try the next tutorial – Web Processing in Python
Lab 1: XML essentials
- The Need for XML
- Here are some of the problems organizations have to resolve in modern-day enterprise architectures:
- Representing data in such a way that it can easily be consumed by diverse applications.
- Exchanging business documents between e-commerce business partners.
- Aggregating data from multiple sources, with potentially different data formats.
- Extracting data from a database and making it available to distributed, disconnected, and mobile applications.
- The Internet era also raises technical difficulties as companies seek to integrate widely distributed solutions
- RMI, DCOM, and CORBA are not Internet-friendly
- XML overcomes many of these problems
- Here are some of the problems organizations have to resolve in modern-day enterprise architectures:
- XML Document Structure
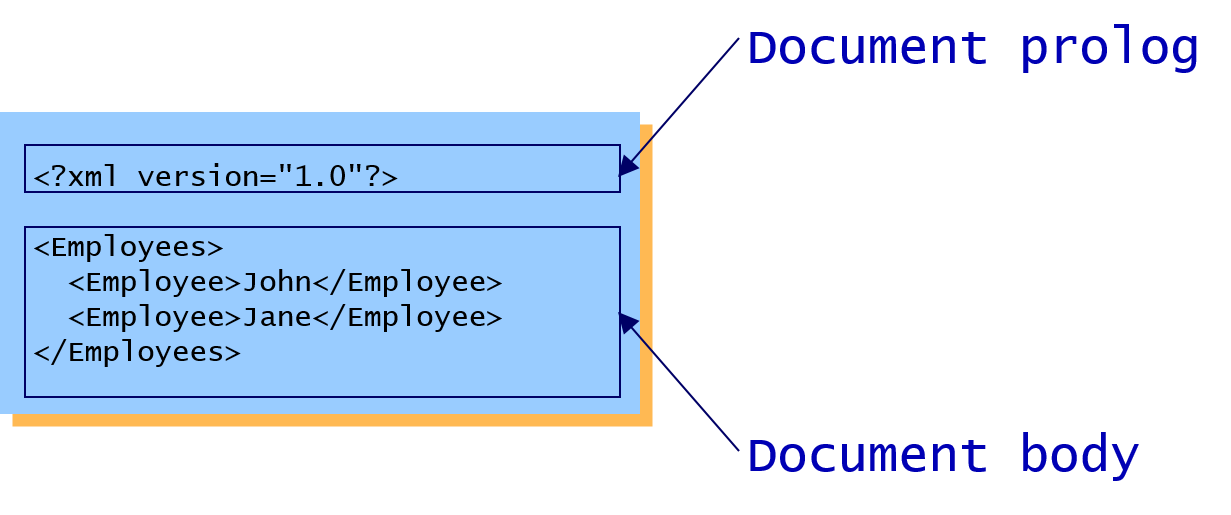
- XML documents begin with a document prolog. Some parsers let you omit this, but don’t get lazy! Always include it. You can also specify the following options in the document prolog:
- standalone=”yes”
- encoding=”ISO-8859-1″ (for example)
- After the document prolog comes the document body
- The document body must provide a single outer element that encompasses all the other elements. The outer element is called the “root element” or the “document element”.
- Note: There are two current versions of XML:
- XML version 1.0 was initially defined in 1998 is still the most widely implemented, and is recommended for general use
- XML version 1.1 contains a few extra features (some contentious) that are intended to make XML easier to use in certain cases. However, XML 1.1 is not very widely implemented and is recommended for use only by those who need its unique features. If you’re interested, see “Effective XML” from Addison-Wesley (ISBN 0-321-15040-6), pages 10-19.
- XML documents begin with a document prolog. Some parsers let you omit this, but don’t get lazy! Always include it. You can also specify the following options in the document prolog:
- Defining Elements
- An XML element can contain text content, enclosed between the start tag and the end tag of the element. The first code box in the slide shows an XML element named <Town>, and its text content in a small town name in Anglesey in North Wales (it’s the longest place name in the world). It actually means something too!
<Town>Llanfairpwllgwyngyllgogerychwyrndrobwllllantysiliogogogoch</Town>
- Any white space between the start tag and the end tag of an element is significant in XML. For example, the second code box has a <Greeting> element, and its text value is contains several space characters at the start, in the middle, and at the end. All of these spaces are retained.
<Greeting> H E L L O !!! </Greeting>
- XML elements are case-sensitive. It doesn’t matter whether you use upper-case, lower-case, or mixed-case, but the start tag name and end tag name must be consistent.
<SpotTheBug>oops</SpotTheBUG>
- An XML element can contain text content, enclosed between the start tag and the end tag of the element. The first code box in the slide shows an XML element named <Town>, and its text content in a small town name in Anglesey in North Wales (it’s the longest place name in the world). It actually means something too!
- Defining a Hierarchy of Elements
- XML documents can contain other XML documents. In this way, you can build up a hierarchy of nested content, a bit like how you define structured data. There is no limit to the amount of nesting
<FlightReservation>

 <PartyDetails>

  <NumberOfAdults>2</NumberOfAdults>

  <NumberOfChildren>2</NumberOfChildren>

 </PartyDetails>

 <ContactDetails>

  <Name>Angela Smith</Name>

  <Address>

   <HouseNumber>4</HouseNumber>

   <Postcode>SW1 1BA</Postcode>

  </Address>

 </ContactDetails>

 <BookingDetails>

  <BookingCode>FZ87YB62</BookingCode>

  <DateOfBooking>2014-01-31</DateOfBooking>

 </BookingDetails>

 <FlightDetails>

  <DateOfFlight>2014-07-31</DateOfFlight>

  <FlightCode>BA001</FlightCode>

 </FlightDetails>

</FlightReservation>
- A child element is one-level deep. E.g. <FlightReservation> has 4 child elements:
- <PartyDetails>
- <ContactDetails>
- <BookingDetails>
- <FlightDetails>
- A descendant element is any levels deep, including child elements, grand-child elements, etc. E.g. <FlightReservation> has lots of descendant elements:
- <PartyDetails>
- <NumberOfAdults>
- <NumberOfChildren>
- <ContactDetails>
- <Name>
- etc…
- XML documents can contain other XML documents. In this way, you can build up a hierarchy of nested content, a bit like how you define structured data. There is no limit to the amount of nesting
- Defining Empty Elements
- An empty element is one that has no content between the start tag and the end tag. There are two equivalent syntaxes for defining empty elements, as shown below
- An empty element
- <hr/> is equivalent to <hr></hr>
- Empty elements are often used with attributes
- Empty elements are also often used in XSLT style sheets that translate XML into HTML
- The HTML must comply with XML syntax rules
- Defining Attributes
- Attributes allow you to define simple values inside the start tag for an element. The basic syntax is to specify the name of the attribute, followed by an = sign, followed by the attribute value. The attribute value must be enclosed in quotes (either double quotes or single quotes is fine).
- You can define attributes in the start tag of an element
- Attributes provide qualifying information to elements
<UnitPrice currency="GBP" salesTaxRate="17.5">34.95</UnitPrice>
- Attributes provide qualifying information to elements
- Attributes are often used in empty elements
<Address HouseNumber="4" PostCode="SW1 1BA"/>
- Attribute values must be enclosed in quotes
- You can use “double quotes” or ‘single quotes’
- Note the following points:
- An element can have as many attributes as you like. Each attribute name must be different for a given element.
- Attribute values are just strings really. They don’t lend themselves to representing structured data (see the next slide for more on this point).
- Defining XML Namespaces
- Typically, you define XML namespaces in the root element of the document, so that the scope of the namespace applies to the whole document.
- Namespaces enable you to qualify elements (usually) and attributes (sometimes), to avoid name clashes
- You define namespaces in an element start-tag:
<elem-start-tag xmlns:namespace-prefix=namespace-uri ...>
- Simple example:
<ns:Employees xmlns:ns="https://www.mydomain.com">

 <ns:Employee>

  <ns:Name>John Smith</ns:Name>

  <ns:Salary>25000</ns:Salary>

 </ns:Employee>

 etc ...

</ns:Employees>
- The example defines a namespace as follows:
- The namespace prefix here is ns. Generally, the choice of prefix name is irrelevant – you just decide something that makes sense in this particular document. For any element that you want to be “part of that namespace”, you must prepend the element name with the namespace prefix, e.g. <ns:Employee>, otherwise the element won’t be in that namespace.
- The namespace URI here is https://www.mydomain.com. You must choose an XML namespace URI that won’t conflict with any other namespace URI that might crop up in the XML document. Developers often use their company’s domain name here, because this is unique enough.
Lab 2: Reading XML data in Python
- Overview of the ElementTree XML API
- The ElementTree XML API is popularly just known as ET. As it goes, it’s a very intuitive API. It’s much leaner and more efficient that some XML APIs in other languages, and the APIs operate at a satisfyingly high level of abstraction.
- The ElementTree XML API is a standard and efficient Python library for parsing and creating XML data
- Located in the xml.etree.ElementTree module
- The first step is to import this module
- It’s conventional to alias the module as ET, for brevity
import xml.etree.ElementTree as ET
- It’s conventional to alias the module as ET, for brevity
- Note:
- All the demo code for this section is in readXml.py
- Sample Document
- To aid our investigation of ET, we’ll use the sample XML document shown in the below as the vehicle for our discussions
- The root element is <Company>, which has 5 <Employee> child elements. Each employee has a name, one or more telephone numbers, and either an annual salary or a daily rate.
- Im not going to copy everything but it can be found in the downloadable folder under company.xml
<?xml version="1.0"?>

<Company Name="Acme" YearOfIncorporation="1997">

 <Employee EmpNum="456" JobTitle="Programmer">

  <Name>

   <FirstName>Matthew</FirstName>

   <LastName>Williams</LastName>

  </Name>

  <Tel>222-7777-111</Tel>

  <Tel>222-7777-222</Tel>

  <Tel>222-7777-333</Tel>

  <Salary>37500</Salary>

 </Employee>

 <Employee EmpNum="123" JobTitle="Director">

  <Name>

   <FirstName>Chris</FirstName>

   <LastName>Williams</LastName>

  </Name>

  <Tel>222-7777-123</Tel>

  <Salary>79500</Salary>

 ...

 </Employee>

</Company>
- Parsing XML Data
- The first step when using the ElementTree API is to load the XML data into memory, either from a file or from a string of XML in memory
- You can load XML data from a file
- Via ET.parse(xmlFilename) method that takes an XML file name as a parameter, and returns an ElementTree object
- The ElementTree object represents the whole XML document as a tree. From this, you can call getroot() to get the root element in the document. This comes back as an Element object.
tree = ET.parse("Company.xml")

root = tree.getroot()
- Alternatively you can load XML data from a string
- Via ET.fromstring(xmlString) method that takes a string of XML data rather than a file name
- Returns the root element directly, as an Element object
root = ET.fromstring("<Company> ... </Company>")
- Getting Element Information
- Once you have an Element object, you can use the following properties to get information about the element it represents in the XML document:
- tag – Returns the name of the element, e.g. Company.
- attrib – Gets all the attributes defined in the element, as a bunch of name-value pairs.
- text – Gets the text content between the start and end tags of the element, or an empty string if there isn’t any content.
- Example:
print("Root tag name: %s" % root.tag)

print("Root tag attributes: %s" % root.attrib)

print("Root tag text: %s" % root.text)
- The example displays the following information about the root element:
- Root tag name: Company
- Root tag attributes: {‘YearOfIncorporation’: ‘1997’, ‘Name’: ‘Acme’}
- Root tag text:
- Once you have an Element object, you can use the following properties to get information about the element it represents in the XML document:
- Iterating Over Child Elements
- You can use Element in a for loop, to iterate through all its child elements. Note that this causes iteration over child elements, not descendant elements.
- Example:
for child in root:

  print("  %s, %s, %s" % (child.tag, child.attrib, child.text))
- The example displays the following information about the root element:
Employee, {'JobTitle': 'Programmer', 'EmpNum': '456'},

Employee, {'JobTitle': 'Director', 'EmpNum': '123'},

Employee, {'JobTitle': 'Programmer', 'EmpNum': '923'},

Employee, {'JobTitle': 'Programmer', 'EmpNum': '789'},

Employee, {'JobTitle': 'Programmer', 'EmpNum': '101'},
- Note that the text content for the <Employee> elements is empty; it doesn’t pick up the text content of the descendent elements such as <Name>, <Salary>, or <Tel>
- Indexing Into Child Elements
- You can index into an Element’s children using []
- Returns a new Element, representing the child you selected
- You can apply subsequent [] to find one of its children, and so on
- Example:
emp1Sal = root[1][2]

print("For employee[1], %s is %s" % (emp1Sal.tag, emp1Sal.text))
- The example gets child [1] of the root element (starting at 0).
- This will be an <Employee> element, specifically Chris Williams
- We then get child [2] of that <Employee> element, which will be a <Salary> element.
- So this is the output from the code:
For employee[1], Salary is 79500
- You can index into an Element’s children using []
- Finding Specific Child Elements
- You can find child elements that have a specific tag name
- find(tagName) finds the first matching child
- findall(tagName) finds all matching children
- Example:
firstEmp = root.find("Employee")

print("\nTelephone numbers for first employee:")

for tel in firstEmp.findall("Tel"):

  print(" %s" % tel.text)
- The example in the slide finds the first <Employee> child element of the root element. It then finds all the <Tel> child elements of that <Employee>, and displays the text content for all these telephone numbers. So this is the output from the code:
Telephone numbers for first employee:

 222-7777-111

 222-7777-222

 222-7777-333
- You can find child elements that have a specific tag name
- Iterating over Descendant Elements
- You can iterate over the descendant elements that have a specific tag name
- iter(tagName)
- Example:
print("\nSalaries for all employees:")

for sal in root.iter('Salary'):

  print(" %s" % sal.text)
- The example in the slide iterates over all the descendant <Salary> child element of the root element, and displays the text content for all these salaries
- This can be more convenient than writing code to step through the tree level-by-level, but the code will be less efficient because Python has to navigate the whole tree to find all possible matching descendants
- This is the output from the code:
Salaries for all employees:

 37500

 79500

 142000

 57000
- You can iterate over the descendant elements that have a specific tag name
Lab 3: Locating content using XPath
- What is XPath?
- XPath is a W3C-standard way to locate content in an XML document
- Maps an XML document into a tree of nodes
- 7 types of node in an XML document
- Note: All the demo code for this section is in xpath.py
- Here are some examples of where XPath is used:
- In XML applications, to find XML content that you want to process.
- In XPointer, to reference other parts of the document.
- In XSLT style sheets, to find XML nodes that you want to transform.
- In XQuery, to locate “XML data” in a database.
- XPath is a W3C-standard way to locate content in an XML document
- Nodes in an XPath Tree
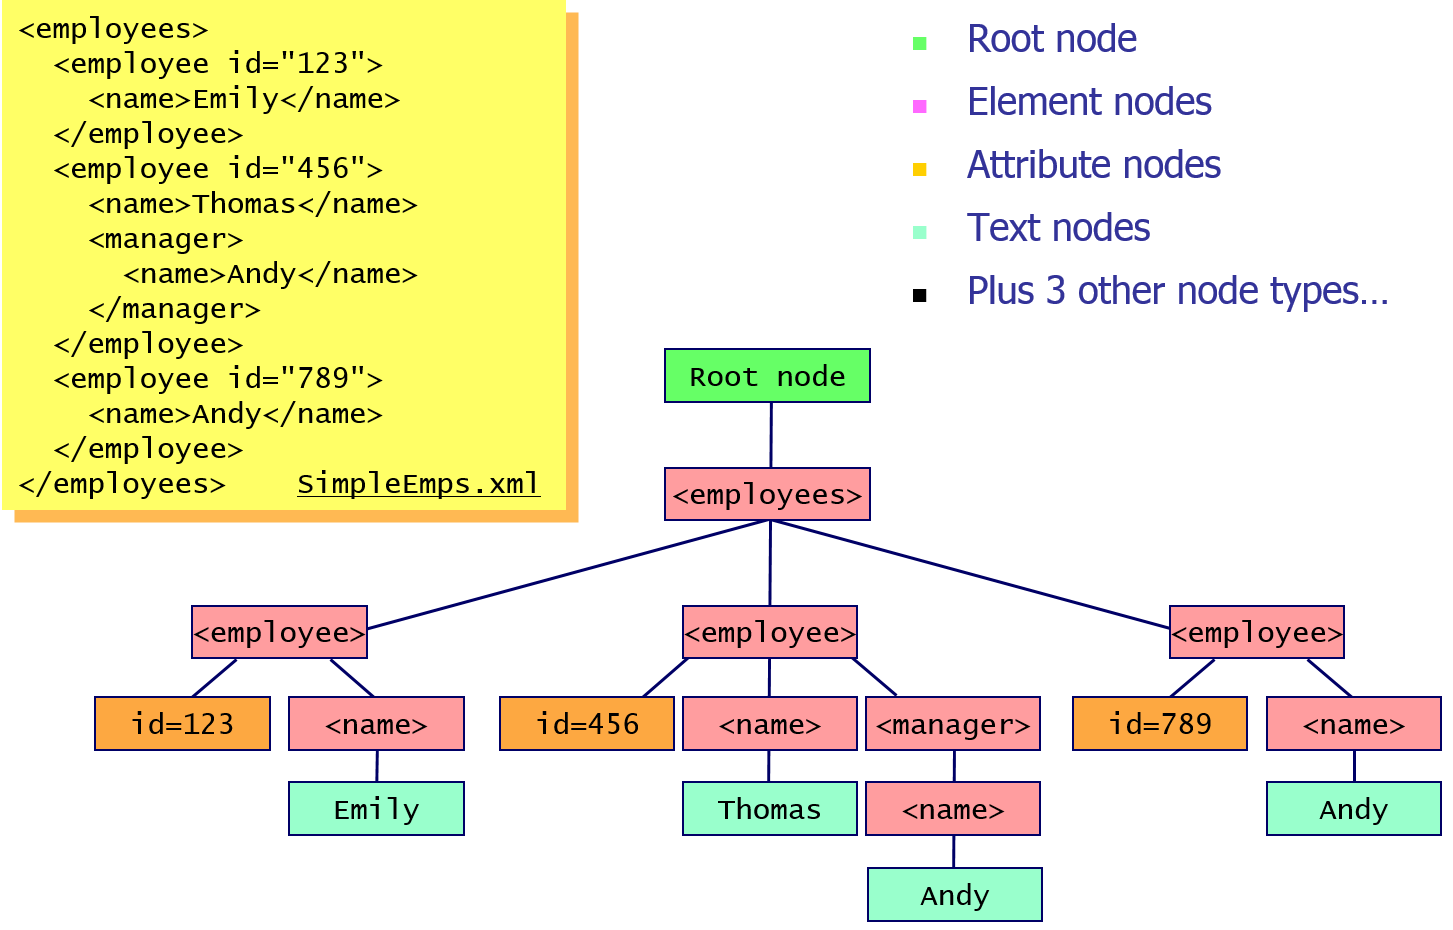
- There are 7 types of node in an XML document:
- The root node – this is a logical node that sits above the “real” content of the document
- Element nodes – note, there’s a special element node called the “document element”, which is the top-level element in the document. In the example in the slide,
is the document element - Attribute nodes – every attribute in the document is represented by a separate attribute node. An attribute knows which element it belongs to, but attribute nodes are not considered to be children of that element
- Text nodes – a text node is a sequence of characters defined inside an element. Any adjacent text is normalized into a single text node
- Namespace nodes – each element has a set of namespace nodes that describe all the namespace definitions within scope for that element
- Processing instruction nodes – processing instructions provide information to help the parser process the XML document. As we mentioned earlier in the course, processing instructions use the <? … ?> syntax
- Comment nodes – every comment is represented by a comment node in XPath, just in case you want to locate comments in the document.
- There are 7 types of node in an XML document:
- Locating Nodes using XPath
- To locate nodes in a document, you can use XPath location paths. A location path is typically a sequence of element names, separated by / or //. You can think of XPath location paths as being a bit similar to directory names:
- / allows you to find child elements
- // is a bit more extensive – it allows you to find descendant nodes at any level, rather than just 1-level deep
- Examples:
- Use a leading / to search from the root node, and use / within an expression to find child nodes
- The / at the start means “go to the root node“. After that, it searches for a document element named employees, and then finds all its employee child elements.
/employees/employee
- Finds the employees element, then finds all its employee child elements, and then finds all the name child elements of the employee elements.
/employees/employee/name
- The // will find all name elements that are descendants (rather than just direct children) of employee elements
/employees/employee//name
- Find all name elements at any level in the document. This could be a very time-consuming search!
//name
- The @ symbol means attribute. So this example will find the id attribute for all employee elements.
/employees/employee/@id
- To locate nodes in a document, you can use XPath location paths. A location path is typically a sequence of element names, separated by / or //. You can think of XPath location paths as being a bit similar to directory names:
- Filtering Node-Sets by using Predicates
- Predicates are very commonplace in XPath expressions – they offer you the flexibility to get exactly the nodes you need. For example, the lower code box will retrieve all <employee> elements that have a <manager> child element.
- The XPath expressions we have seen so far select all matching nodes
- For example, the following expression selects all <employee> elements:
/employees/employee
- For example, the following expression selects all <employee> elements:
- You can use “predicates” to filter the node-set
- A predicate is a test condition, enclosed in [brackets]
- Only nodes that satisfy the predicate are retained
- E.g. to select all <employee> elements that have a child element named <manager>:
/employees/employee[manager]
- Executing XPath Expressions in Python
- To execute XPath expressions in Python:
- find(xpathExpr)
- findAll(xpathExpr)
- Example 1:
- Code
sals = root.findall("Employee/Salary")

print("All salaries:")

for sal in sals:

  print(" %s" % sal.text)
- Output
All salaries:

37500

79500

142000

57000
- Code
- Example 2:
- Code
salEmp2 = root.find("Employee[2]/Salary")

print("\nSalary for employee[2] is %s" % salEmp2.text)
- Output
Salary for employee[2] is 79500
- Code
- Example 3:
- Code
names = root.findall("Employee[Salary]/Name")

print("\nFull names of all salaried employees:")

for name in names:

  print(" %s %s" % (name.find("FirstName").text, name.find("LastName").text))
- Output
Full names of all salaried employees:

Matthew Williams

Chris Williams

Joseff Smith

Emily Smith
- Code
- To execute XPath expressions in Python:
- Locating Attributes
- You can use attributes in your XPath expressions, of course
- Example:
sals = root.findall("Employee[@JobTitle='Programmer']/Salary")

print("\nSalary of all programmers:")

for sal in sals:

  print(" %s" % sal.text)
- The example finds all <Employee> elements that have a JobTitle attribute set to ‘Programmer’. For these employees, it then gets the <Salary> child elements. Here’s the output:
Salary of all programmers:

37500

142000

57000
- Locating Descendant Elements
- You can use the // operator in your XPath expressions if you need to find descendants
- Example:
tels = root.findall(".//Tel")

print("\nTelephone numbers for all employees:")

for tel in tels:

  print(" %s" % tel.text)
- The example finds all <Tel> elements anywhere beneath the root element, whatever level of nesting (could be quite slow!). Here’s the output:
Telephone numbers for all employees:

222-7777-111

222-7777-222

222-7777-333

222-7777-123

222-7777-923

222-7777-789

222-7777-101
Lab 4: Updating XML data in Python
- Overview
- The ElementTree API defines numerous methods that allow you to modify the content of the XML document
- Create a new element
- Add/modify/remove attributes
- Modify text content
- Append/insert/remove child nodes
- Etc.
- When you’ve finished making your modifications to the XML document, you can call the write() method in the ElementTree class to write the data back out to file.
- We’ll explore some of these capabilities in this section
- See the demo code in modifyxml.py
- The ElementTree API defines numerous methods that allow you to modify the content of the XML document
- Typical Tasks
- Create a new element
- ET.Element(tagName)
- Set an attribute on an element
- anElement.set(attrName, attrValue)
- Set the text content for an element
- anElement.text = textValue
- Append an element to an existing element:
- existingElement.append(newElement)
- Several additional methods and properties are available. For full details, see:
- https://docs.python.org/3.4/library/xml.etree.elementtree.html
- Create a new element
- Example
- This example creates everything for a new employee
emp = ET.Element("Employee")

emp.set("EmpNum", "ZZ123")

emp.set("JobTitle", "Rollercoaster designer")

root.append(emp)

firstname = ET.Element("FirstName")

firstname.text = "Zak"

lastname = ET.Element("LastName")

lastname.text = "Thunderbolt"

name = ET.Element("Name")

name.append(firstname)

name.append(lastname)

emp.append(name)

tel = ET.Element("Tel")

tel.text = "222-7777-999"

emp.append(tel)

sal = ET.Element("Salary")

sal.text = "250000"

emp.append(sal)

tree.write("UpdatedCompany.xml")
- The code creates a new employee record in the XML data, appends it as the final child of the root element, and then writes the modified document to UpdatedCompany.xml.
- This is the XML content for the new employee, nicely formatted for readability:
  <Employee EmpNum="ZZ123" JobTitle="Rollercoaster designer">

    <Name>

      <FirstName>Zak</FirstName>

      <LastName>Thunderbolt</LastName>

    </Name>

    <Tel>222-7777-999</Tel>

    <Salary>250000</Salary>

  </Employee>
- This is the XML content for the new employee, nicely formatted for readability:
- This example creates everything for a new employee
- XML Processing
- In the Student folder, there’s a file named Macbeth.xml. Open this file in a browser. The file is the entire transcript for the play very interesting, although it does bring back some rather unhappy memories of English Literature lessons in school
- Spend a few moments digesting the structure and content of the document, and then write a Python program to process the data. Part of the challenge of this lab is for you to decide what kinds of operations you’d like to perform on the data
- Here are some suggestions:
- Get all the personae
# Find all Persona

persona = root.findall(".//PERSONA")

print("All Persona")

for per in persona:

  print("  %s" % per.text)
- Get the titles for all the scenes
#Get all the titles for all the scenes

scenes = root.findall("ACT/SCENE/TITLE")

print("All Scene Titles")

for titles in scenes:

  print("  %s" % titles.text)
- Find all the speeches by Duncan
- Find the speech with the most lines
#Get the speech with most lines

print("Longest Speech in the scene")

Largest = -10

LargestSpeech = ""

for speech in root.iter('SPEECH'):

  speechLength = 0

  speechText = ""

  for lines in speech.iter('LINE'):

    try:

      speechLength += len(lines.text)

      speechText += " " + str(lines.text) + "\n"

    except TypeError:

      pass

  if speechLength > Largest:

    Largest = speechLength

    LargestSpeech = speechText

print("%s" % LargestSpeech)
- Find all lines that contain the word “castle”
- Prepend all <STAGEDIR> elements with an XML comment
#Update the XML File

print("Add an XML comment to the file: See output.xml")

for stageDir in root.iter('STAGEDIR'):

  StageDirText = stageDir.text + ""

  stageDir.text = StageDirText

tree.write('output.xml')
- Etc…
- Get all the personae
Well done. You have completed the tutorial in the Python course. The next tutorial is
9. Web Processing in Python
Copyright © 2016 TalkIT®
If you would like to see more content like this in the future, please fill-in our quick survey.