4. Using jQuery

About this Tutorial

Objectives

Delegates will learn to develop applications using HTML5/CSS3 and JS. After completing this course, delegates will be able to:

  • Use Visual Studio 2012 effectively
  • Create commercial HTML5 Web Applications
  • Develop Websites that may use web sockets, animations and geolocation

Audience

This course has been designed primarily for programmers new to the .Net development platform. Delegates experience solely in Windows application development or earlier versions of HTML/CSS and JavaScript will also find the content beneficial.

Prerequisites

No previous experience in web programming is required. But any experience you do have in programming will help. Also no experience in browser IDE’s is required. But again any experience you do have with programming development environments will be a valuable.

Download Solutions

HTML tutorial

Quick Access


Overview

Estimated Time – 1 Hour and 30 minutes

Not what you are looking? Try the next tutorial – Creating HTML5 Content

The role of jQuery:

  1. jQuery is a free, open-source JavaScript library.
    • Dramatically simplifies the task of writing client-side JavaScript code in your web pages.
    • Hides browser-specific nuances, which is a great help!
  2. The success story of jQuery.
    • First released in 2006.
    • Widely adopted by major Web platforms, including Microsoft IE6+, Chrome, Firefox 2+, Safari3+, Opera 9+.

Lab 1: jQuery Techniques

Lab 1: jQuery Techniques
  1. Jquery uses CSS3-style selector syntax to intelligently locate HTML elements, atributes etc. in your page – based on nesting, ID’s, tag names etc..
  2. Consider the following hard-coded HTML table:
    <table id="employeesTable">
     <tr>
      <td>Ben</td><td>Davies</td><td>100000</td>
     </tr>
     <tr>
      <td>Pablo</td><td>Hernandez</td><td>120000</td>
     </tr>
     ...
    </table>
  3. table

  4. This Jquery sets alternating rows to the even CSS class.
    <script type="text/javascript">
     $(document).ready(function () {
      $("table#employeesTable tr:nth-child(even)").addClass("even");
     });
    </script>
  5. View code file.
  6. $() – Short-hand for jQuery(), a powerful function for DOM queries.
  7. $(document) – Returns the document object on the page.
  8. $(document).ready – Binds a function when the DOM is ready to be manipulated.
  9. $(“table#employeesTable tr:nth-child(even)”) – Finds <table> element whose ID is employeesTable and then finds all its <tr> child elements at even index.
  10. .addClass(“even”) – jQuery method to add a CSS class to specified DOM object.
  11. Additional Selector Examples.
    • CSS style.
      $("#myID") // Find by id.
      $(".myClass") // Find by class name.
      $("myTag") // Find by tag (element name).
      $("#id, .class, tag") // Find by multiple criteria.
    • Hierarchy.
      $("form input") // Find descendant.
      $("#main > *") // Find child.
      $("#prev ~ div") // Find sibling.
    • Form.
      $("form :radio") // Find radio elements in forms.
      $("#dvMainForm :checkbox") // Find checkbox in a form.
      $("input:disabled") // Find disabled input elements.
  12. Getting and setting Attributes-
    • Getting attributes.
      $("em").attr("title")
      $("label").html()
      $("p:first").text()
      $("input").val()
    • Setting attributes.
      $("em").attr("title", "hello")
      $("label").html("hello")
      $("p:first").text("hello")
      $("input").val("hello")
  13. Dom Manipulation –
    $("#target").addClass("css_class");
    $("#target").toggleClass("css_class");
    $("p").append("Hello");
    $("span").appendTo("#foo");
    $("p").after("Hello");
    $("p").before("Hello");
  14. Example of jQuery in ASP.NET
    • Consider the following:
      <div id="MyPanel" style="background:Orange; width:300px; font-size:10pt">
       This is my lovely panel. <br /><br />
       <input id="MyButton" type="button" value="Animate" />
      </div>
    • The following Jquery statement is triggered when the user clicks the button.
      $("#MyButton").click(function () {
       $("#MyPanel")
        .animate({ width: "500px", opacity: 0.25, fontSize: "16pt" }, 2000);
       $("#MyPanel")
        .animate({ width: "300px", opacity: 1.00, fontSize: "10pt" }, 1000);
      });
    • View code file.
  15. animate

  16. Using bind() and live().
    • bind() – resolved at the time the call is made.
      $("#target").bind("click", function(){....});
    • live() – Works now and in the future.
      $("#target").live("click", function(){....});
  17. Using find(), filter() and end()
    • find() – Finds descendants of each element
      in the current set of elements.
      $("body")
      .find("p")
      .find("a")
      .addClass("myClass");
    • filter() – Reduces the set of matched elements
      to those that match a selector.
      $("tr")
      .filter(":odd")
      .addClass("oddClass")
      .end()
      .filter(":even")
      .addClass("evenClass");
    • end() – Ends the most recent filtering operation in the current chain and returns the set of matched elements to its previous state.
Lab
  1. This lab leads you step-by-step through the process of using jQuery in a Web application. You’ll start with an empty-ish Web page, link in the jQuery script file, and explore numerous jQuery techniques. We will be working with a staring application in a initial folder called UsingjQuery.sln. There is a final folder with all the code that you can refer to aftwerwards to check with.
  2. The project contains an HTML page named MainPage.htm. Take a look at this page now.
  3. View code file.
    • The <head> links in a style sheet, and also has an empty <script> tag where you’ll add your JavaScript code in this lab.
    • The <body> is empty at the moment you’ll add your HTML content here.
  4. Including the jQuery JavaScript file in the Web page
    • If you want to use jQuery in a Web page, you must include the jQuery JavaScript file in your Web page. You can either define an external link to jQuery on a CDN website on the Internet, or download the jQuery JavaScript file and reference it locally.
    • We’ll take the latter approach here, just in case there are Internet connectivity difficulties, you can find the Jquery scripts in the download at the top of the tutorial in a folder named jQuery which has two files
      • jquery.min.js is the minified version (reduced size, for faster downloads in production)
      • jquery-1.7.1.js is the human-readable version (easier to use during development
    • Add the latter file into your project, as follows:
      • In Visual Studio, in Solution Explorer, right-click the Scripts folder and then click Add > Existing Item.
      • In the Add Existing Item dialog box, browse to the jQuery folder, select jquery-1.7.1.js, and then click Add.
      • In Solution Explorer, verify the Scripts folder now contains the jQuery JavaScript file.
    • The last step in this exercise is to add a <script> tag to MainPage.htm, to link in the jQuery JavaScript file. Visual Studio makes this easy: simply drag the JavaScript file onto MainPage.htm, just before the existing <script> tag. Visual Studio adds the following statement to your page:
      <script src="Scripts/jquery-1.7.1.js" type="text/javascript"></script>
    • View code file.
  5. Using core Jquery syntax
    • Almost everything you do when using jQuery will access the DOM tree. It’s common to start adding events as soon as the DOM is ready. To do this, register a ready event for the document as follows (put this code in the empty <script> tag in the <head> section of the Web page:
      $(document).ready(function() {
       // Do stuff when DOM is ready.
      });
    • You could put an alert() into this function, but that doesn’t make much sense because alert() doesn’t need the DOM to be loaded. So let’s try something a little more sophisticated, such as showing an alert when the user clicks a link. Add the following HTML to the <body>:
      <a href="">Link</a>
    • Now update the $(document).ready handler as follows:
      $(document).ready(function() {
       $("a").click(function() {
        alert("Hello world!");
       });
      });
    • Here’s what’s going on:
      • $ is an alias for the jQuery class. Therefore, $() constructs a new jQuery object.
      • $(“a”) is a jQuery selector, in this case, it selects all <a> elements.
      • The click() function is a method of the jQuery object. It binds a click event to all selected elements (in this case, a single <a> element) and executes the provided function when the event occurs.
    • This is similar to the following code:
      <a href="" onclick="alert('Hello world')">Link</a>
    • The difference is quite obvious: You don’t need to write an onclick for every single HTML element is everything from the start tag to the end tag. A HTML element starts with opening tag (<>) and finishes with a closing tag(</>).’>element. You have a clean separation of structure (HTML) and behavior (JS), just as you can separate structure and presentation by using CSS.
  6. Using jQuery selectors
    • jQuery allows you to use a combination of CSS and XPath selectors to locate elements. To try some of these selectors, first add a couple of lists to the <body> section, something like this:
       <ol id="ukCountriesList">
        <li>England</li>
        <li>Scotland</li>
        <li>Wales</li>
        <li>Northern Ireland</li>
      </ol>
      <ol id="nordicCountriesList">
        <li>Norway</li>
        <li>Sweden</li>
        <li>Denmark</li>
        <li>Finland</li>
       </ol>
    • In this example, you can access a whole list via its id, e.g. “ukCountriesList”. In classic JavaScript, you’d select it via document.getElementById(“ukCountriesList”). With jQuery, you do it like this (add this code into the <script> element in the head of your document):
      $(document).ready(function() {
       $("#ukCountriesList").addClass("red");
      });
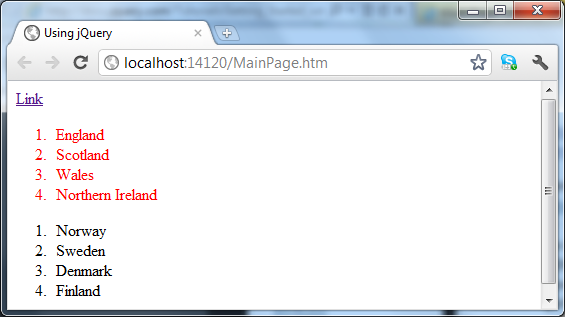
    • This code locates the element that has the specified id, and adds the “red”class to it (this CSS class is defined in Stylesheet.cs). If you reload the page in your browser, you should see that the first ordered list has red text. The second list is not modified.
      T4P1
    • It’s also possible to access children or descendant elements. To illustrate this, modify your first list as follows:
      <ol id="ukCountriesList">
       <li>England</li>
       <li>Scotland</li>
       <li>Wales
          <ul>
             <li>Swansea</li>
             <li>Cardiff</li>
             <li>Newport</li>
           </ul>
         </li>
       <li>Northern Ireland</li>
      </ol>
    • Now add the following script:
      $(document).ready(function () {
       $("#ukCountriesList > li li").addClass("green");
      });
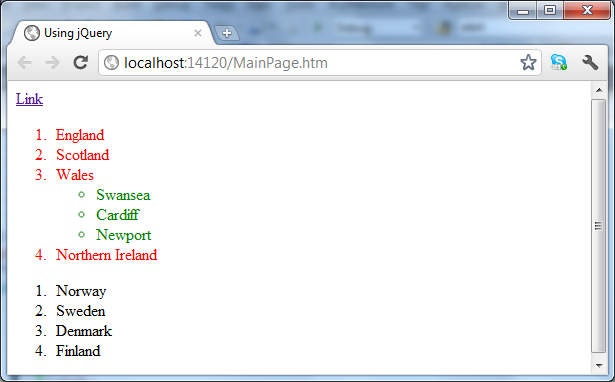
    • The selector syntax first selects the element with id “ukCountriesList”, then drills down into child <li> elements (the > means first-level child elements), and then selects descendent <li> elements (the absence of a > means descendant elements at any depth).
    • Reload the Web page. It should appear as follows:
      T4P2
    • Now for something a little more sophisticated… Imagine you want to add and remove a CSS class when the user hovers over the <li> element, but only on the last element in the list. This is the script to achieve this effect:
      $(document).ready(function() {
        $("#ukCountriesList li:last").hover(function() {
         $(this).addClass("blue");
        },function(){
         $(this).removeClass("blue");
        });
      });
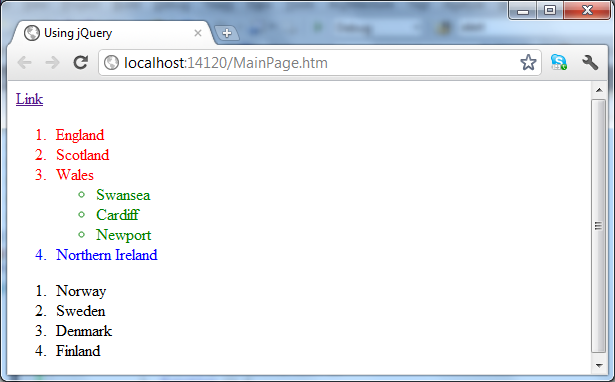
    • Reload the Web page. It should appear as follows when the user hovers over the last list item in the UK countries list:
      T4P3
    • There are many other selectors, similar to CSS and XPath syntax. You can find a list of all available expressions and some examples at https://docs.jquery.com/DOM/Traversing/Selectors.

Lab 2: Using jQuery UI

Lab 2: Using jQuery UI
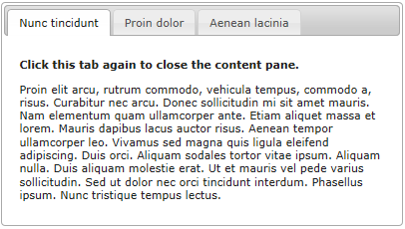
  1. jQuery UI is a free, open-source JavaScript component library based on jQuery; this is just an example of one of its components-
    jQuerytab
  2. You can download jQuery UI from this URL – https://jqueryui.com/download and you can select which parts of the library you want, especially important for low-bandwidth clients.
  3. You will need to unzip the jQuery UI folder to use it and it should contain a CSS folder for style sheets, some development aids e.g. Demos and a js folder containing all the components.
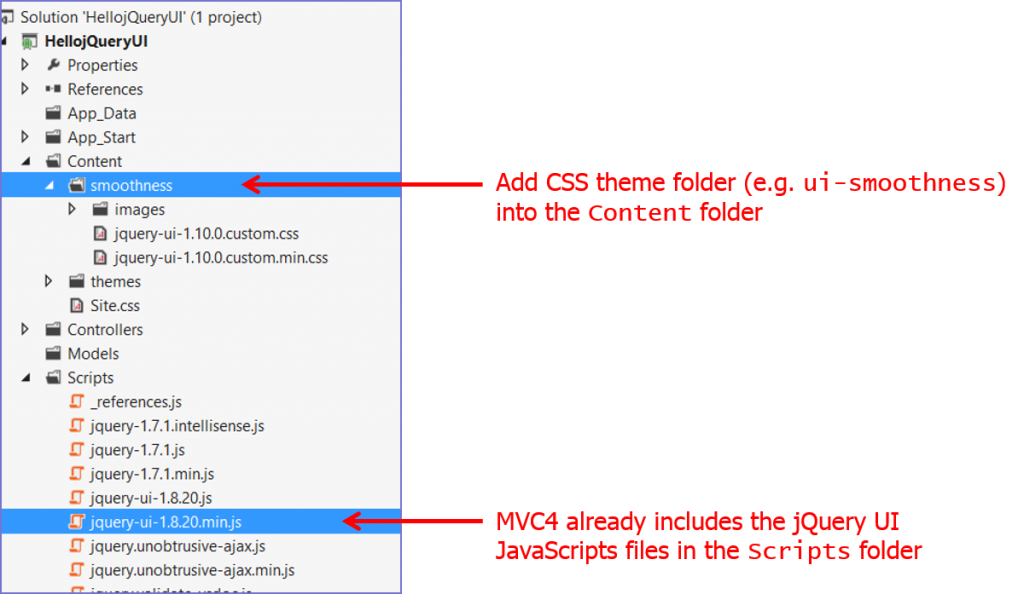
  4. To use Jquery UI in ASP.NET MVC applications you simply need to copy some files in to your app project e.g.
    jQueryfolderstru
  5. To use jQuery UI in your pages, just add the following tags, alternatively you can drag and drop from solution explorer and VS will generate the tags for you.
    <head>
     ...
     <link href="~/Content/smoothness/jquery-ui-1.10.0.custom.min.css"
     rel="stylesheet" />
     <script src="~/Scripts/jquery-1.7.1.min.js"></script>
     <script src="~/Scripts/jquery-ui-1.8.20.min.js"></script>
    </head>
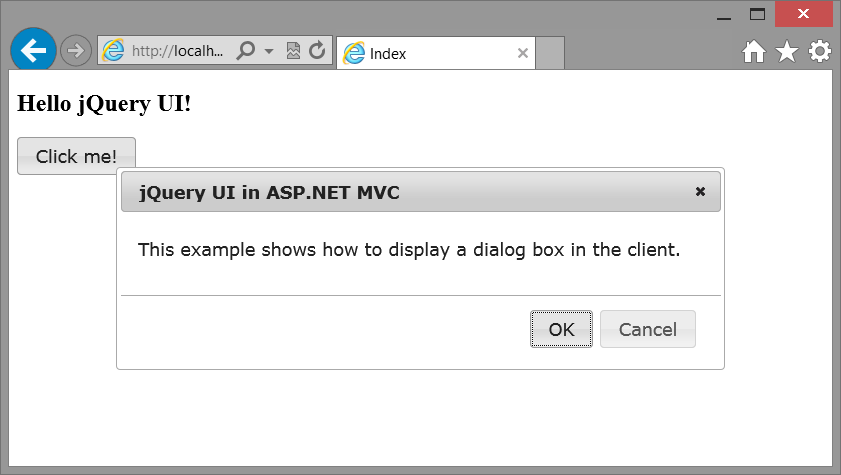
  6. The code below will open a modal dialog when you click a button in jQuery.

    <h2>Hello jQuery UI!</h2>
    <button id="my-button">Click me!</button>
    <div id="my-dialog" title="jQuery UI in ASP.NET MVC">
     <p>This example shows how to display a dialog box in the client.</p>
    </div>
    <script language="javascript" type="text/javascript">
    $(function () {
     $('#my-dialog').dialog({
      autoOpen: false,
      width: 600,
      buttons: {
       "OK": function () { $(this).dialog("close"); },
       "Cancel": function () { $(this).dialog("close"); }
      }
     });
     $("#my-button").button().click(function () {
      $('#my-dialog').dialog('open');
      return false;
     });
    });
    </script>
  7. View code file.
  8. On running the app –
    jQueryapp


Well done. You have completed the tutorial in the HTML5/CSS3/JS course. The next tutorial is

5. Creating HTML5 Content


Back to beginning
Copyright © 2016 TalkIT®


If you liked this post, please comment with your suggestions to help others.
If you would like to see more content like this in the future, please fill-in our quick survey.
Scroll to Top