In this tutorial you will learn more core C# and look at the entity data model. This will allow you to write a simple C# program that you will then compile. The program will be a Visual Studio Form application
About this Tutorial
Objectives
Delegates will learn to develop applications using C# 4.5. After completing this course, delegates will be able to:
Use Visual Studio 2012 effectively
Create commercial C# Web Applications
Develop multi-threaded applications, Use WCF and LINQ
Audience
This course has been designed primarily for programmers new to the .Net development platform. Delegates experience solely in Windows application development or earlier versions of C# will also find the content beneficial.
Prerequisites
No previous experience in C# programming is required. But any experience you do have in programming will help. Also no experience in Visual Studio is required. But again any experience you do have with programming development environments will be a valuable.
Experience using a contemporary OO language such as C++ or C# would be useful but is not required.
Not what you are looking? Try the next tutorial – Overview of WPF
Lab 1: Creating a Simple Entity Data Model
Lab 1: Creating a Simple Entity Data Model
In this section we’ll see how to create a simple entity data model – See the SimpleDemo example in the solution that can be downloaded from the top of the page.
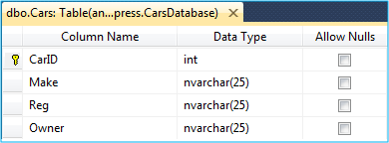
The entity data model will map the following database table – In the CarsDatabase database, see the Cars table (To create db, see readme.txt inside the soltuion). Database Table for Cars
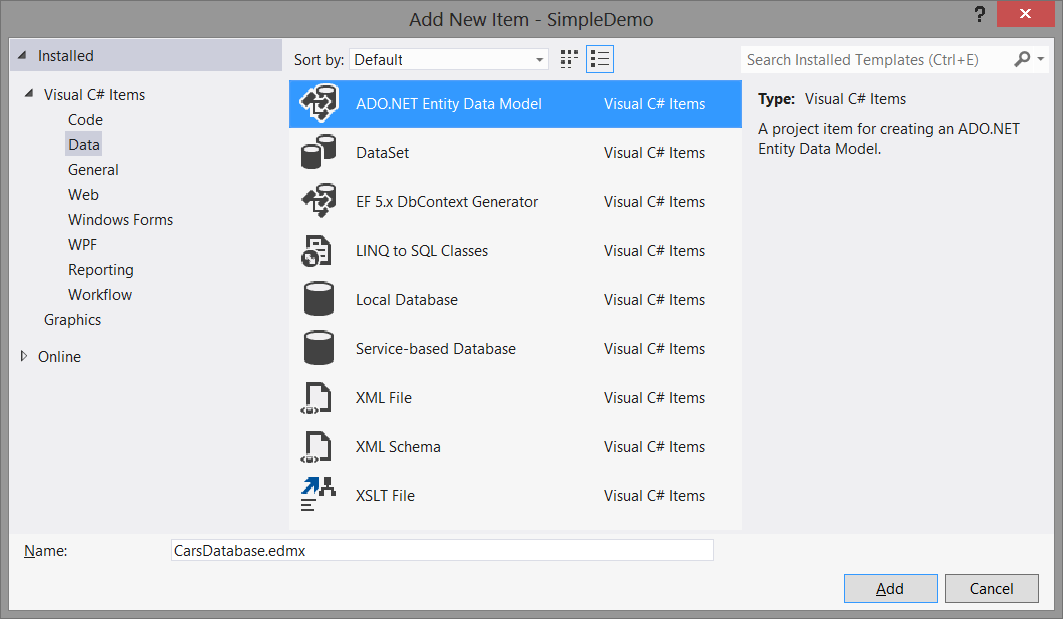
Open Visual Studio 2013 – Select New Project and using the C# language select Data>ADO.NET Entity Data Model.
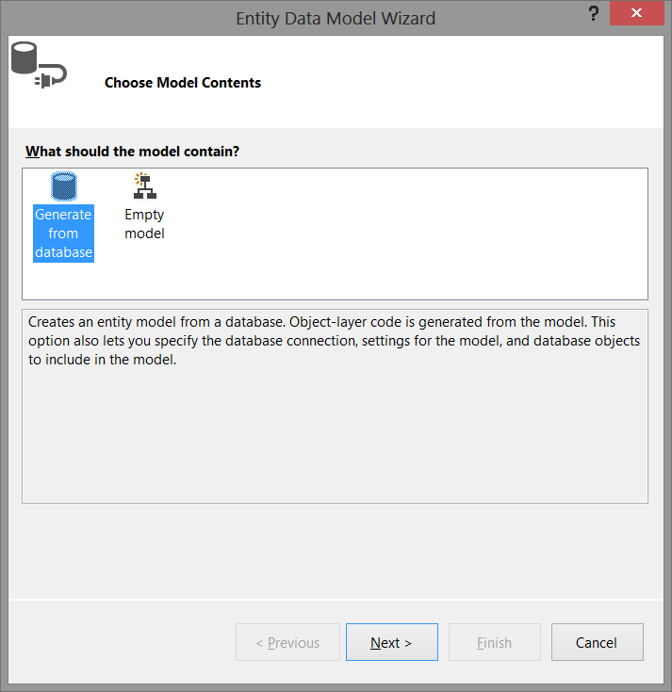
In the Choose Model Contents screen, choose one of the available options:
Generate from Database – Generates an EDM from an
existing database.
Empty model – Creates an empty EDM so you can reverse-engineer
the database from the EDM.
For this example we will be using the first version of generating from a database.
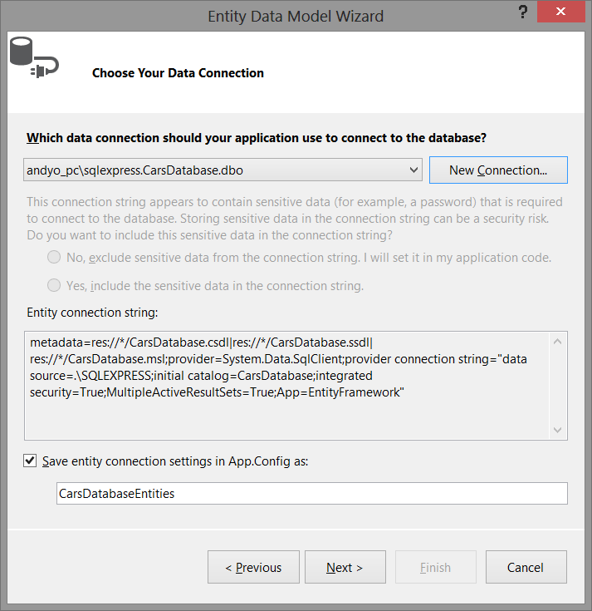
Choose Your Data Connection screen – Choose an existing connection, or specify a new one. The connection string references 3 metadata files and will contain mapping info at run time –
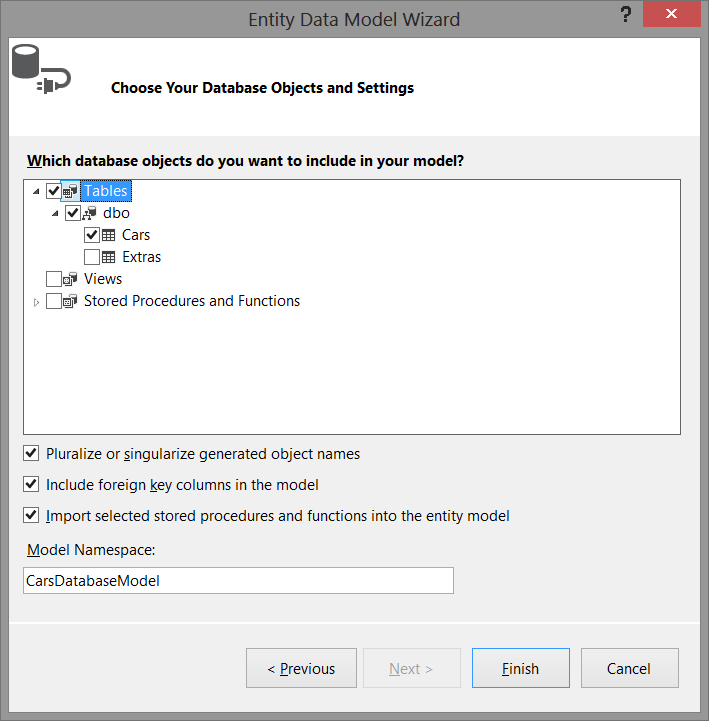
Now you need to choose your database objects – Choose tables, views, and stored procedures to map –
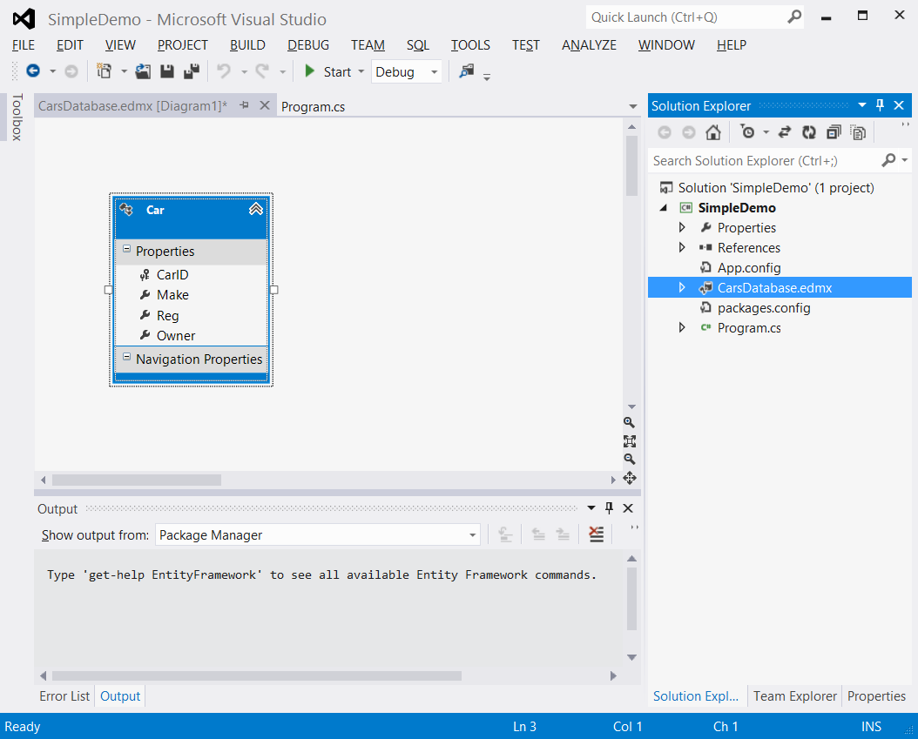
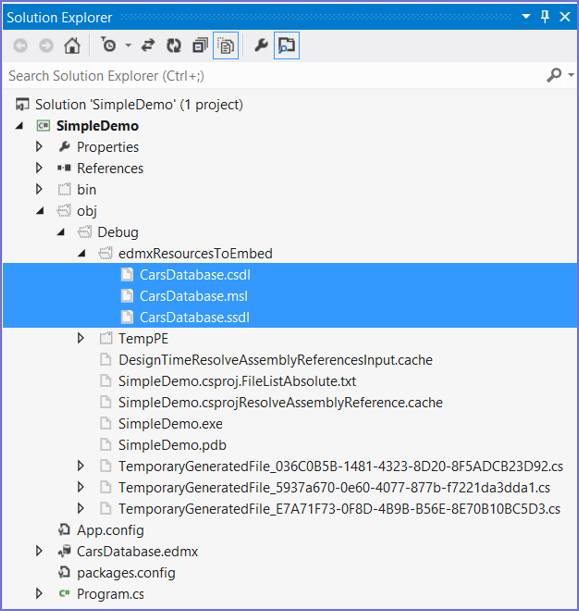
Visual Studio generates an .edmx file and displays it in the Designer –
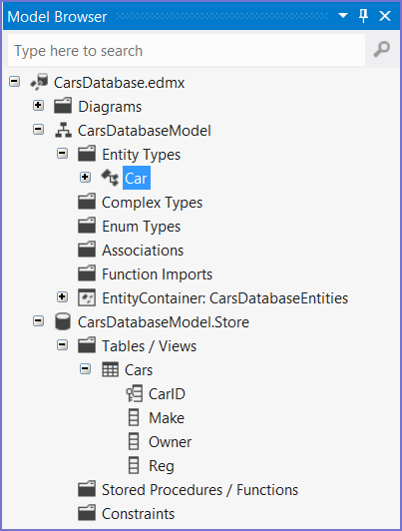
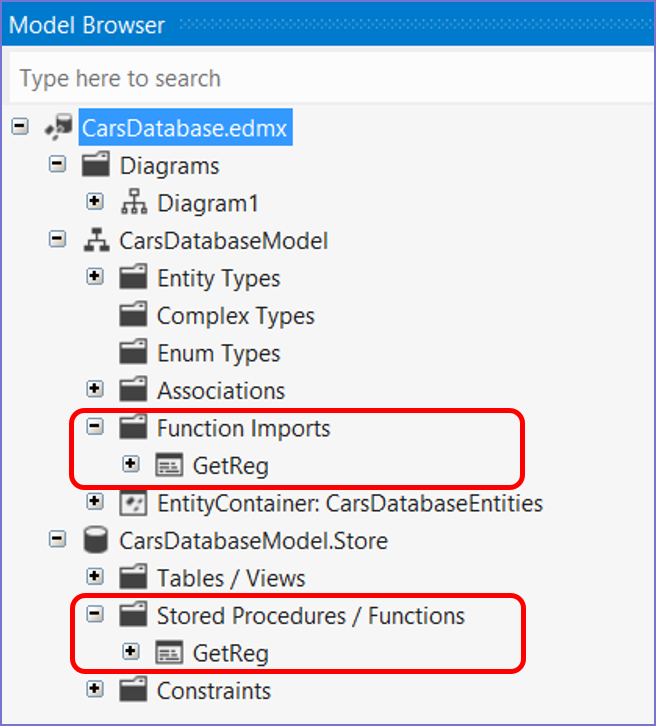
To use the Entity Data Model Browser – Select the following menu item: View>Other Windows>Entity Data Model Browser. This is what should be shown:
The CarsDatabaseModel is a conceptual model with the entity types and the association between them.
The CarsDatabaseModel.Store is a physical model with physical storage information.
Reshaping the Entity Model:
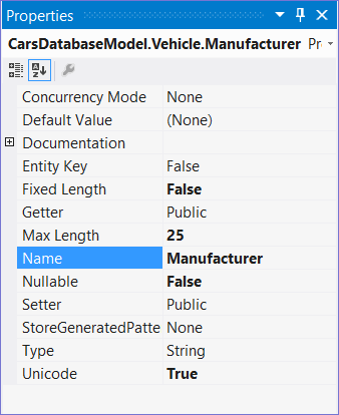
You can change the name
of your entity type – Select the entity type in the Model Browser window and change its name in the Properties window –
You can also change property
names in the entity by selecting a property in the
Model Browser window and changing its name in the
Properties window –
In this section we’ll see how to manage entities in an application:
Load entities from a database.
Create new entities in memory.
Modify existing entities.
Delete existing entities.
The Role of the DbContext Class:
The DbContext class plays a key role – Our DbContext subclass is CarsDatabaseEntities.
DbContext is a LINQ data source – So you can use it in your LINQ queries, it also has a SaveChanges()method, to save pending (in-memory) changes to the database.
DbContext maintains sets of entities – Via DbSet properties, such as Vehicles; allows you to access these entities in your code.
Lab
Querying Entities – This example shows how to query entities in the database that should be in program.cs for this example – private static void DisplayAllVehicles()
{
using (CarsDatabaseEntities context = new CarsDatabaseEntities())
{
foreach (Vehicle v in context.Vehicles)
Console.WriteLine(v);
}
}
Adding Entities – This example shows how to add an entity. This will be in program.cs for this example – private static void AddVehicle()
{
using (CarsDatabaseEntities context = new CarsDatabaseEntities())
{
try
{
context.Vehicles.Add(new Vehicle
{
...
context.SaveChanges();
}
catch (Exception ex)
...
}
}
Deleting Entities – This example shows how to delete an entity – private static void DeleteVehicle()
{
Console.Write("Enter ID of vehicle to delete: ");
int id = int.Parse(Console.ReadLine());
using (CarsDatabaseEntities context = new CarsDatabaseEntities())
...
Vehicle vehicleToDelete = (from v in context.Vehicles ...
if (vehicleToDelete != null)
{
Console.Write("Are you sure you want to delete: {0}? ", vehicleToDelete);
if (Console.ReadLine().ToUpper()[0] == 'Y')
...
}
}
}
Modifying Entities – This example shows how to modify an entity – private static void ChangeOwner()
{
Console.Write("Enter ID of vehicle: ");
int id = int.Parse(Console.ReadLine());
Console.Write("Enter new owner: ");
string newOwner = Console.ReadLine();
using (CarsDatabaseEntities context = new CarsDatabaseEntities())
{
...
Vehicle vehicleToChangeOwner = (from v in context.Vehicles ...
if (vehicleToChangeOwner != null)
...
}
}
You can select particular entityfields – var vehicleManufacturers = from v in context.Vehicles
select v.Manufacturer;
You can select projections – var vehicleSummaries = from v in context.Vehicles
select new { v.Reg, v.Manufacturer };
You can invoke LINQ extension methods – var countWalesCars = (from v in context.Vehicles
where v.Reg.StartsWith("C")
select v.CarID).Count();
Using the Entity Client API:
The EF includes an “entity client API” – This is the magic that translates database data to entities in memory.
Normally you don’t bother using the entity client API in your own code:
But you can if you like.
E.g. you can use EntityDataReader to read entities using familiar a “data reader” approach.
Used in conjunction with Entity SQL.
For example – private static void ProcessVehiclesUsingEntityDataReader()
{
// Make a connection object, based on our *.config file.
using (EntityConnection cn = new EntityConnection("name=CarsDatabaseEntities"))
{
cn.Open();
// Now build an Entity SQL query.
string query = "SELECT VALUE vehicle FROM CarsDatabaseEntities.Vehicles AS vehicle";
// Create a command object.
using (EntityCommand cmd = cn.CreateCommand())
...
}
In this section we’ll create a full entity data model:
See the FullDemo solution for this lab.
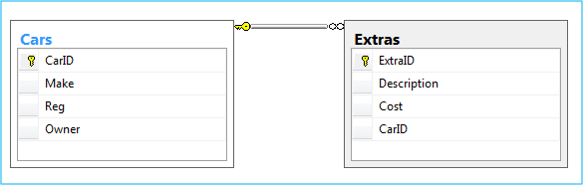
One-to-many relationship between Cars and Extras –
Plus a stored procedure –
Lab
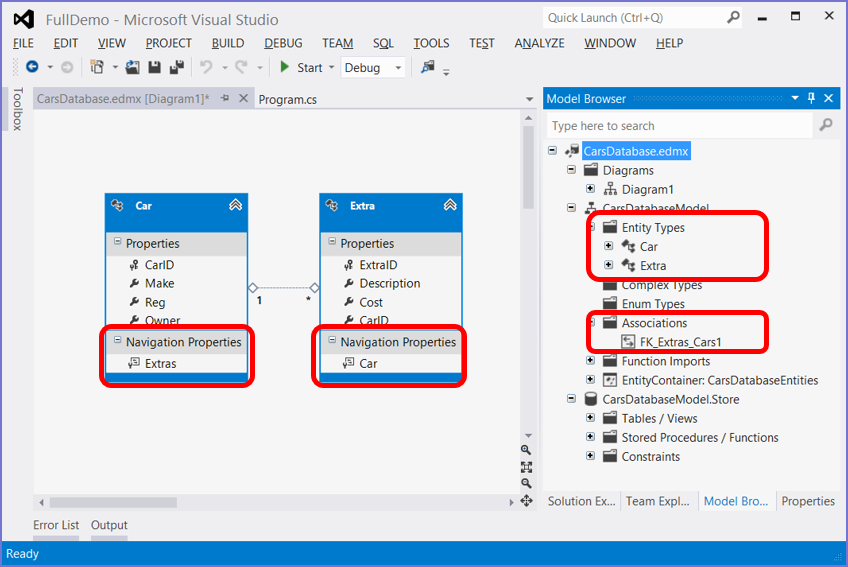
Viewing the Entity Data Model:
Note the following points in the entity data model:
The Car and Extra entity types.
The association between the Extras and Cars tables.
The navigation properties that allow you to navigate between a car and its extras, and vice versa.
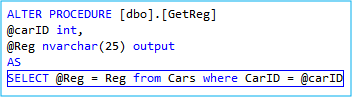
Stored Procedures – If you’ve included stored procedures in your entity model, they are automatically mapped to functions in your entity model –
Navigating Relationships:
To navigate a one-to-many relationship – E.g. for a given car, get all its extras – private static void DisplayExtrasForCar(int carID)
{
using (CarsDatabaseEntities context = new CarsDatabaseEntities())
{
var extras = from e in context.Extras
where e.CarID == carID
select e;
foreach (var e in extras)
{
Console.WriteLine(e);
}
}
}
To navigate a many-to-one relationship – E.g. for a given extra, get the car it belongs to – private static void DisplayCarsThatOwnExtras(IEnumerable<Extra> extras)
{
using (CarsDatabaseEntities context = new CarsDatabaseEntities())
{
foreach (Extra extra in extras)
{
var theCar = (from c in context.Cars
where c.CarID == extra.CarID
select c).First();
Console.WriteLine("{0}, registration {1}, owner {2}, has {3} extras.",
theCar.Make,
...
}
}
}
To add an entity in a many-to-one relationship – E.g. add an extra to a car – private static void AddEjectorSeatToCar(int carID)
{
using (CarsDatabaseEntities context = new CarsDatabaseEntities())
{
var theCar = (from c in context.Cars
where c.CarID == carID
select c).First();
theCar.Extras.Add(new Extra { Description = "Ejector seat", Cost = 40000 });
context.SaveChanges();
}
}
Use ObjectParameter to specify types for in-out params, and to access values after execution. private static void AddEjectorSeatToCar(int carID)
{
using (CarsDatabaseEntities context = new CarsDatabaseEntities())
{
var theCar = (from c in context.Cars
where c.CarID == carID
select c).First();
theCar.Extras.Add(new Extra { Description = "Ejector seat", Cost = 40000 });
context.SaveChanges();
}
}
If you liked this post, please comment with your suggestions to help others.
If you would like to see more content like this in the future, please fill-in our quick survey.
Manage cookie consent
You can view this website without consenting to extra cookies. However you will need to accept the 'marketing' cookies to send messages via the contact forms & see any maps displayed on the site
Functional
Always active
Cookies necessary for the website to work.
Preferences
The technical storage or access is necessary for the legitimate purpose of storing preferences that are not requested by the subscriber or user.
Statistics
The technical storage or access that is used exclusively for statistical purposes.Cookies used to track user interaction on the site, which helps us to evaluate & improve the website.
Marketing: Forms & additional content (Marketing)
We need your permission to place ‘marketing’ cookies, so you are able to use the contact forms & see embedded content e.g. videos and maps. - - - - We have added protection to our contact forms to help prove that a human (rather than a spambot) is filling


If you would like to see more content like this in the future, please fill-in our quick survey.