In this tutorial you will learn more Java and will look at Java Swing. This will allow you to write a simple Java app that you can then use in your IDE
About this Tutorial –
Objectives –
This course is aimed at object-oriented developers (e.g. C++ or C#) who need to transition into Java. It is also aimed at those learning to program for the first time; the course covers the Java programming constructs and APIs quickly, focussing on the differences between Java and other OO languages.
Audience
This training course is aimed at OO developers who need to transition into Java.
Prerequisites
No previous experience in Java programming is required. But any experience you do have in programming will help. Also no experience in eclipse is required. But again any experience you do have with programming development environments will be a valuable.
Experience using a contemporary OO language such as C++ or C# would be useful but is not required.
Contents
The Java course cover these topics and more:
Flow Control: Decision making: if and if-else; The switch statement; Looping: for loops; while loops; do-while loops; for-each style loops; Assertionsv
Concurrency: Overview of multithreading; Creating new threads; Object locking; Using wait, notify, and notifyAll
Collections: Overview of Java SE collection classes; Generics; Using List-based collection classes; Using Set-based collection classes; Using Map-based collection classes; Collection techniques
Exam Preparation
The Java course will help you prepare for these certifications:
Separate the data (model), from its onscreen appearance (view), from the code that links the two together (controller)
For example, JTable uses MVC
Observer-Observable
Event-handling
For example, when you click a JButton (‘observable’) an ActionEvent is raised; listeners (‘observers’) implement the ActionListener interface
Lab 1: A worked example
Lab 1: A worked example
Getting Started
The core Swing classes are located in the javax.swing package import javax.swing.JFrame;
import javax.swing.JPanel;
import javax.swing.JLabel;
import javax.swing.JTextField;
import javax.swing.JButton;
import javax.swing.UIManager;
etc...
We’ll create a standalone Swing application
See SimpleSwingDemo.java public class SimpleSwingDemo {
public static void main(String[] args) {
new SimpleSwingDemo();
}
public SimpleSwingDemo() {
// For this example, we'll put all the interesting code here in the constructor
...
}
}
Choosing the Look and Feel
Swing lets you choose a look and feel for your program BufferedReader br = new BufferedReader(new InputStreamReader(System.in));
...
System.out.print("Choose look-and-feel [windows, motif, metal, default] ");
String in = br.readLine();
if (in.equals("windows")) {
UIManager.setLookAndFeel("com.sun.java.swing.plaf.windows.WindowsLookAndFeel");
} else if (in.equals("motif")) {
UIManager.setLookAndFeel("com.sun.java.swing.plaf.motif.MotifLookAndFeel");
} else if (in.equals("motif")) {
UIManager.setLookAndFeel("javax.swing.plaf.metal.MetalLookAndFeel");
} else {
// Set the cross-platform look and feel
UIManager.setLookAndFeel(UIManager.getCrossPlatformLookAndFeelClassName());
}
Setting Up a Top-Level Container
Swing applications have at least one top-level Swing container
JFrame, JDialog, or JApplet
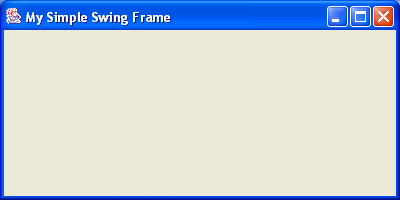
The sample application has a single JFrame // Create the Jframe.
JFrame frame = new JFrame("My Simple Swing Frame");
// Set the size of the frame (width, height).
frame.setSize(400,200);
// Ensure the window is closed properly on exit.
frame.setDefaultCloseOperation(JFrame.EXIT_ON_CLOSE);
// Make the frame visible.
frame.setVisible(true);
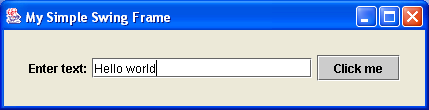
Setting Up Components
Swing defines a gamut of component classes
JLabel, JTextField, JButton, JTextArea, etc.
Components are typically contained in a JPanel JLabel label = new JLabel("Enter text:");
JTextField textField = new JTextField(20);
JButton button = new JButton("Click me");
// Create the JPanel.
JPanel pane = new JPanel();
// Set an internal border (top, bottom, left, right) for the JPanel.
pane.setBorder(BorderFactory.createEmptyBorder(20, 20, 20, 20));
// Add components to the JPanel.
pane.add(label);
pane.add(textField);
pane.add(button);
Adding Components to the Frame
Add the JPanel to the JFrame’s content pane
Call pack() instead of setSize() on the JFrame // Code, as before...
// Add the JPanel to the frame, and then display the JFrame.
frame.getContentPane().add(pane);
frame.setVisible();
Implement the methods declared in the XxxxListener interface
Call addXxxxListener() on the source object
For example, to handle button click events: import java.awt.event.ActionListener;
import java.awt.event.ActionEvent;
...
public class SimpleSwingDemo implements ActionListener {
public SimpleSwingDemo() {
...
button.addActionListener(this);
}
public void actionPerformed(ActionEvent evt) {
// Event handler code
}
}
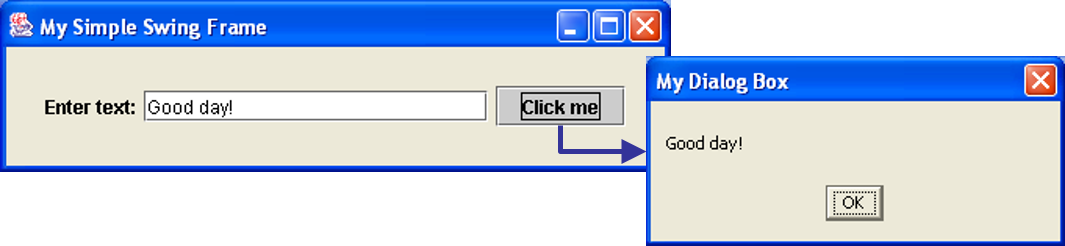
Displaying Dialog Boxes
Swing provides several ways to display dialog boxes
Use JOptionPane to create simple, standard dialogs
Use JFileChooser to display a file-chooser dialog
Use JColorChooser to display a colour-chooser dialog
Use ProgressMonitor to display a progress-indicator dialog
Use JDialog to display custom dialog boxes
For example, to display a simple dialog box: public void actionPerformed(ActionEvent evt) {
JOptionPane.showMessageDialog(frame,
textField.getText(),
"My Dialog Box",
JOptionPane.PLAIN_MESSAGE);
}
Lab 2: Using panes
Lab 2: Using panes
Overview of Panes
Panes provide areas of “real estate” on a top level window
Each frame has a content pane
There are several pane classes available
JPanel is the simplest
We’ll investigate the various panel classes in this section
See the PaneDemo.java sample code
Using JPanel
This example shows how to create and use a simple JPanel pane in a frame window public void demoJPanel() {
// Create a JFrame and a JPanel.
JFrame frame = new JFrame("Frame using JPanel");
JPanel pane = new JPanel();
// Configure the JPanel as you like.
pane.setBackground(Color.red);
pane.setBorder(BorderFactory.createLineBorder(Color.yellow, 3));
pane.setLayout(new FlowLayout(FlowLayout.LEFT, 10, 10));
// Add components to the JPanel.
pane.add(new JTextField(20));
pane.add(new JButton("A Button"));
// Add JPanel to "content pane" of Jframe.
frame.getContentPane().add(pane);
// Display the frame.
frame.setSize(300, 200);
frame.setVisible(true);
}
Using JScrollPane
JScrollPane provides a scrollable view of a component – Adds scrollable behaviour to components public void demoJScrollPane() {
JFrame frame = new JFrame("Frame using JScrollPane");
frame.setDefaultCloseOperation(JFrame.EXIT_ON_CLOSE);
// Create a JTextArea, and wrap it in a JScrollPane.
JTextArea textarea = new JTextArea(10, 30);
JScrollPane pane = new JScrollPane(textarea);
// Add JScrollPane to "content pane" of Jframe.
frame.getContentPane().add(pane);
// Display the frame.
frame.setSize(300, 100);
frame.setVisible(true);
}
Using JSplitPane
JSplitPane divides two (and only two) components – Split horizontally or vertically public void demoJSplitPane() {
JFrame frame = new JFrame("Frame using JSplitPane");
frame.setDefaultCloseOperation(JFrame.EXIT_ON_CLOSE);
// Create two JTextAreas, and wrap each in its own JScrollPane.
JTextArea textareaT = new JTextArea(10, 30);
JTextArea textareaB = new JTextArea(10, 30);
JScrollPane paneT = new JScrollPane(textareaT);
JScrollPane paneB = new JScrollPane(textareaB);
// Add the two JScrollPanes to a JSplitPane.
JSplitPane splitPane = new JSplitPane(JSplitPane.VERTICAL_SPLIT, paneT, paneB);
// Configure the panes in the JSplitPane.
splitPane.setOneTouchExpandable(true);
splitPane.setDividerLocation(100);
paneT.setMinimumSize(new Dimension(100,50));
paneB.setMinimumSize(new Dimension(100,50));
// Add JSplitPane to frame, and display.
frame.getContentPane().add(splitPane);
frame.setSize(300, 300);
frame.setVisible(true);
}
Using JToolBar
JToolBar groups components into a row or column public void demoJToolBar() {
JFrame frame = new JFrame("Frame using JToolBar");
frame.setDefaultCloseOperation(JFrame.EXIT_ON_CLOSE);
JTextArea textarea = new JTextArea(10, 30);
JScrollPane scrollpane = new JScrollPane(textarea);
JButton button1 = new JButton("Button1");
button1.setActionCommand("OPEN");
button1.setToolTipText("Open a file");
JButton button2 = new JButton("Button2");
button2.setActionCommand("CLOSE");
button2.setToolTipText("Close a file");
JToolBar toolbar = new JToolBar(); // Create toolbar.
toolbar.add(button1); // Add button1.
toolbar.add(button2); // And button2.
JPanel mainpane = new JPanel();
mainpane.setLayout(new BorderLayout());
mainpane.add(toolbar, BorderLayout.PAGE_START);
mainpane.add(scrollpane, BorderLayout.CENTER);
frame.getContentPane().add(mainpane);
frame.setSize(300, 300);
frame.setVisible(true);
}
Using JTabbedPane
JTabbedPane displays tabbed panes public void demoJTabbedPane() {
JFrame frame = new JFrame("Frame using JTabbedPane");
frame.setDefaultCloseOperation(JFrame.EXIT_ON_CLOSE);
// Create components for tab1 (wrap in a JPanel).
JTextField textfield1 = new JTextField(30);
JPanel panel1 = new JPanel();
panel1.add(textfield1);
// Create components for tab2 (wrap in a JPanel).
JButton button2 = new JButton("A button");
JPanel panel2 = new JPanel();
panel2.add(button2);
// Create a JTabbedPane, and add tabs.
JTabbedPane tabbedPane = new JTabbedPane();
tabbedPane.addTab("Tab 1", null, panel1, "Go to tab 1");
tabbedPane.addTab("Tab 2", null, panel2, "Go to tab 2");
// Add JTabbedPane to frame, and display.
frame.getContentPane().add(tabbedPane);
frame.setSize(300, 300);
frame.setVisible(true);
}
Lab 3: Creating components
Lab 3: Creating components
Overview of Components
Swing provides a wide range of components
Simple components, such as text boxes and buttons
More interesting components, such as progress bars and sliders
We’ll investigate various component classes in this section
See the ComponentDemo.java sample code
Text Fields and Text Areas
Useful classes:
JTextField = Single line of text
JPasswordField = Single line of text, displays as asterisks
JTextArea = Multiple lines of text
JEditorPane = Multiple lines of text in multiple fonts public void demoText() {
JFrame frame = new JFrame("Frame with text components");
frame.setDefaultCloseOperation(JFrame.EXIT_ON_CLOSE);
// Create a JPanel, to hold text components.
JPanel pane = new JPanel();
pane.setLayout(new FlowLayout(FlowLayout.LEFT));
// Add text components to JPanel.
pane.add(new JTextField(10));
pane.add(new JPasswordField(10));
JScrollPane scrollpane = new JScrollPane(new JTextArea(30, 30));
pane.add(scrollpane);
// Add JPanel to frame, and display.
frame.getContentPane().add(pane);
frame.setSize(300, 200);
frame.setVisible(true);
}
Push Buttons
Use JButton and handle action events public void demoPushButtons() {
JFrame frame = new JFrame("Frame with buttons");
frame.setDefaultCloseOperation(JFrame.EXIT_ON_CLOSE);
JButton b1 = new JButton("Hide icons", icon1);
b1.setVerticalTextPosition(AbstractButton.CENTER);
b1.setHorizontalTextPosition(AbstractButton.LEADING);
b1.setMnemonic(KeyEvent.VK_H);
b1.setActionCommand("hide");
b1.setToolTipText("Click to hide icons on buttons");
JButton b2 = new JButton("Show icons", icon2);
b2.setVerticalTextPosition(AbstractButton.CENTER);
b2.setHorizontalTextPosition(AbstractButton.TRAILING);
b2.setMnemonic(KeyEvent.VK_S);
b2.setActionCommand("show");
b2.setToolTipText("Click to show icons on buttons");
PushButtonActionListener listener = new PushButtonActionListener(); // See next slide
b1.addActionListener(listener);
b2.addActionListener(listener);
JPanel pane = new JPanel();
pane.setLayout(new FlowLayout(FlowLayout.LEFT));
pane.add(b1);
pane.add(b2);
...
To handle action events, define a class that implements the ActionListenerinterface
Implement actionPerformed() to handle the event // Inner class, to handle ActionEvents for the demoPushButtons() method.
class PushButtonActionListener implements ActionListener {
public void actionPerformed(ActionEvent e) {
if ("hide".equals(e.getActionCommand())) {
b1.setIcon(null);
b2.setIcon(null);
}
else if ("show".equals(e.getActionCommand())) {
b1.setIcon(icon1);
b2.setIcon(icon2);
}
}
}
Check Boxes
Use JCheckBox and listen for “item” events public void demoCheckBoxes() {
JFrame frame = new JFrame("Frame with check boxes");
frame.setDefaultCloseOperation(JFrame.EXIT_ON_CLOSE);
JCheckBox cb1 = new JCheckBox("Ski hire");
cb1.setMnemonic(KeyEvent.VK_S);
cb1.setSelected(true);
cb1.setToolTipText("Do you require ski hire?");
JCheckBox cb2 = new JCheckBox("Boots hire");
cb2.setMnemonic(KeyEvent.VK_B);
cb2.setSelected(true);
cb2.setToolTipText("Do you require boot hire?");
CheckBoxItemListener listener = new CheckBoxItemListener(); // See next slide.
cb1.addItemListener(listener);
cb2.addItemListener(listener);
JPanel pane = new JPanel();
pane.setLayout(new FlowLayout(FlowLayout.LEFT));
pane.add(cb1);
pane.add(cb2);
...
To handle them, define a class that implements ItemListener
Implement itemStateChanged() to handle the event // Inner class, to handle ItemEvents for the demoCheckBoxes() method.
class CheckBoxItemListener implements ItemListener {
public void itemStateChanged(ItemEvent e) {
Object source = e.getItemSelectable();
String label = "";
if (source == cb1) {
label = cb1.getText();
}
else if (source == cb2) {
label = cb2.getText();
}
if (e.getStateChange() == ItemEvent.SELECTED) {
System.out.println(label + " required");
}
else if (e.getStateChange() == ItemEvent.DESELECTED) {
System.out.println(label + " not required");
}
}
}
Radio Buttons
Create group of JRadioButtons, await “action” events public void demoRadioButtons() {
JFrame frame = new JFrame("Frame with radio buttons");
frame.setDefaultCloseOperation(JFrame.EXIT_ON_CLOSE);
rb1 = new JRadioButton("Male");
rb1.setMnemonic(KeyEvent.VK_M);
rb1.setActionCommand("male");
rb1.setToolTipText("Are you male?");
rb1.setSelected(true);
rb2 = new JRadioButton("Female");
rb2.setMnemonic(KeyEvent.VK_F);
rb2.setActionCommand("female");
rb2.setToolTipText("Are you female?");
RadioButtonActionListener listener = new RadioButtonActionListener(); // Next slide.
rb1.addActionListener(listener);
rb2.addActionListener(listener);
ButtonGroup group = new ButtonGroup();
group.add(rb1);
group.add(rb2);
JPanel pane = new JPanel();
pane.setLayout(new FlowLayout(FlowLayout.LEFT));
pane.add(rb1);
pane.add(rb2);
...
Handle “action” events: // Inner class, to handle ActionEvents for the demoRadioButtons() method.
class RadioButtonActionListener implements ActionListener {
public void actionPerformed(ActionEvent e) {
if ("male".equals(e.getActionCommand())) {
JOptionPane.showMessageDialog(null,
"Male",
"Item selected",
JOptionPane.PLAIN_MESSAGE);
} else if ("female".equals(e.getActionCommand())) {
JOptionPane.showMessageDialog(null,
"Female",
"Item selected",
JOptionPane.PLAIN_MESSAGE);
}
}
}
Menus
Use JMenuBar, JMenu, and JMenuItem public void demoMenus() {
JFrame frame = new JFrame("Frame with menus");
frame.setDefaultCloseOperation(JFrame.EXIT_ON_CLOSE);
JMenuBar menuBar = new JMenuBar();
frame.setJMenuBar(menuBar);
// Create a "File" menu, and add "Open" and "Close" menu items.
JMenu file = new JMenu("File");
file.setMnemonic(KeyEvent.VK_F);
menuBar.add(file);
JMenuItem open = new JMenuItem("Open...", KeyEvent.VK_O);
open.setAccelerator(KeyStroke.getKeyStroke(KeyEvent.VK_O, ActionEvent.CTRL_MASK));
JMenuItem close = new JMenuItem("Close", KeyEvent.VK_C);
close.setAccelerator(KeyStroke.getKeyStroke(KeyEvent.VK_F4, ActionEvent.ALT_MASK));
file.add(open);
file.addSeparator();
file.add(close);
// Now create an "Edit" menu.
JMenu edit = new JMenu("Edit");
edit.setMnemonic(KeyEvent.VK_E);
menuBar.add(edit);
...
Other Controls
JProgressBar
Vertical or horizontal progress indicator
ProgressMonitor
Similar to JProgressBar (but invisible until a task completes)
JSlider
Enables the user to select a numerical value in a specified range
And more:
Lookup JComponent in the Swing API documentation, and find the list of known subclasses
Well done! you have completed the Java courses. How do I get a TalkIT certificate for this course?
Once you have subscribed, TalkIT can monitor some of your activity on the website. But as the tutorials are designed to allow you to work when you want, we do not know exactly when you have finished a course – So just email TalkIT with:
The date you have completed all the tutorials in the course
Include the title of the course
TalkIT will then send you a TalkIT certificate for that course
If you liked this post, please comment with your suggestions to help others.
If you would like to see more content like this in the future, please fill-in our quick survey.
Manage cookie consent
You can view this website without consenting to extra cookies. However you will need to accept the 'marketing' cookies to send messages via the contact forms & see any maps displayed on the site
Functional
Always active
Cookies necessary for the website to work.
Preferences
The technical storage or access is necessary for the legitimate purpose of storing preferences that are not requested by the subscriber or user.
Statistics
The technical storage or access that is used exclusively for statistical purposes.Cookies used to track user interaction on the site, which helps us to evaluate & improve the website.
Marketing: Forms & additional content (Marketing)
We need your permission to place ‘marketing’ cookies, so you are able to use the contact forms & see embedded content e.g. videos and maps. - - - - We have added protection to our contact forms to help prove that a human (rather than a spambot) is filling


If you would like to see more content like this in the future, please fill-in our quick survey.