In this tutorial you will learn more Java and will look at serialization and files. This will allow you to write a simple Java app that you can then use in your IDE
About this Tutorial –
Objectives –
This course is aimed at object-oriented developers (e.g. C++ or C#) who need to transition into Java. It is also aimed at those learning to program for the first time; the course covers the Java programming constructs and APIs quickly, focussing on the differences between Java and other OO languages.
Audience
This training course is aimed at OO developers who need to transition into Java.
Prerequisites
No previous experience in Java programming is required. But any experience you do have in programming will help. Also no experience in eclipse is required. But again any experience you do have with programming development environments will be a valuable.
Experience using a contemporary OO language such as C++ or C# would be useful but is not required.
Contents
The Java course cover these topics and more:
Flow Control: Decision making: if and if-else; The switch statement; Looping: for loops; while loops; do-while loops; for-each style loops; Assertionsv
Concurrency: Overview of multithreading; Creating new threads; Object locking; Using wait, notify, and notifyAll
Collections: Overview of Java SE collection classes; Generics; Using List-based collection classes; Using Set-based collection classes; Using Map-based collection classes; Collection techniques
Exam Preparation
The Java course will help you prepare for these certifications:
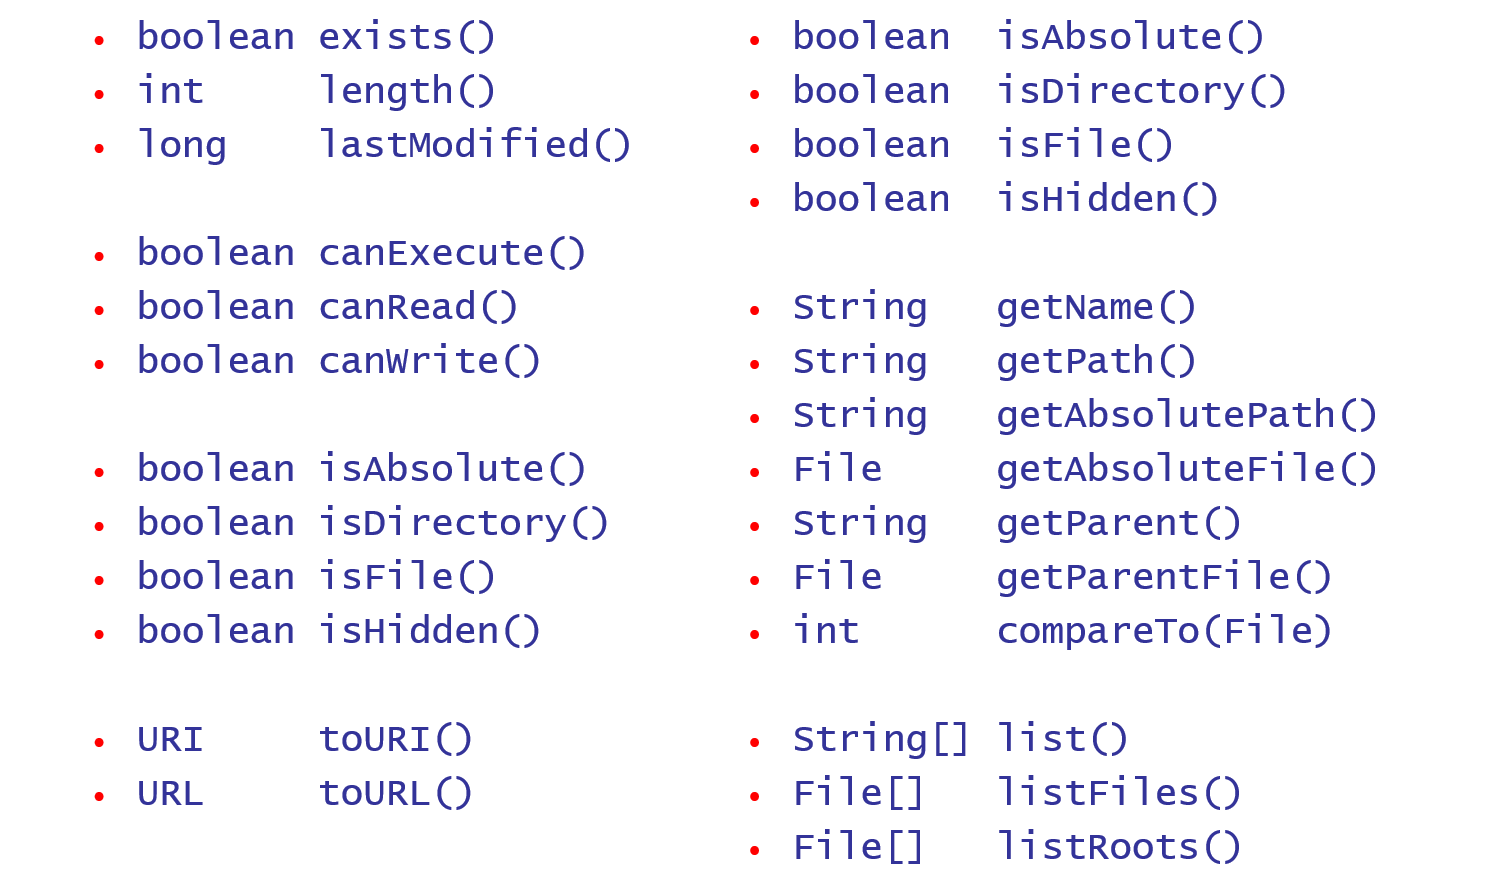
In EmployeePersister, write the readFromTextFile() and writeToTextFile()methods as per the comments in the code, to read/write an Employee to a text file @Override
public Employee readFromTextFile(BufferedReader reader) throws IOException {
String line = reader.readLine();
if (line == null) {
// No Employee data read from file.
return null;
}
// Split the line at tab characters, to get at each piece of Employee data separately.
String[] columns = line.split("\t");
// Create an Employee object, using data from file.
return new Employee(columns[0],
columns[1],
Double.parseDouble(columns[2]),
Boolean.parseBoolean(columns[3]));
}
@Override
public void writeToTextFile(BufferedWriter writer, Employee emp) throws IOException {
PrintWriter out = new PrintWriter(writer);
// Output the Employee's fields on one line, separated by tabs.
out.print(emp.getId() + "\t");
out.print(emp.getName() + "\t");
out.print(emp.getSalary() + "\t");
out.print(emp.isRetired());
// Output a newline to indicate the end of this Employee's data in the file.
out.println();
}
In CompanyPersister, write the readFromTextFile() and writeToTextFile() methods as per the comments in the code, to read/write a Company to a text file. @Override
public Company readFromTextFile(BufferedReader reader) throws IOException {
String line = reader.readLine();
if (line == null) {
return null;
}
Company company = new Company(line);
EmployeePersister empPersister = new EmployeePersister();
Employee emp;
while ((emp = empPersister.readFromTextFile(reader)) != null) {
company.getEmployees().put(emp.getId(),emp);
}
return company;
}
@Override
public void writeToTextFile(BufferedWriter writer, Company company) throws IOException {
PrintWriter out = new PrintWriter(writer);
// Output company name, on its own line.
out.println(company.getCompanyName());
// Output company employees, one per line.
EmployeePersister empPersister = new EmployeePersister();
for (Employee emp: company.getAllEmployees()) {
empPersister.writeToTextFile(writer, emp);
}
}
Back in main(), uncomment the statements to load/save data at application start-up and shut-down. Run the application, and verify that it successfully loads and saves data to a text file. Company theCompany = loadCompany("Company.txt");
saveCompany("Company.txt", theCompany);
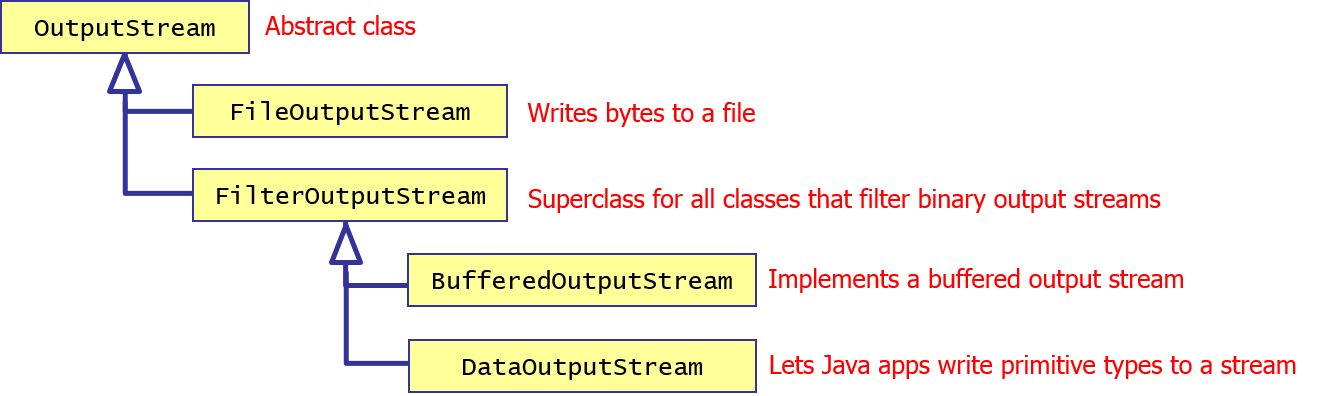
It automatically inherits the implementation of Serializable from the superclass
Customizing Serialization
If you want to, you can customize how an object is serialized / deserialized
Implement the following private methods in your class
The JVM will invoke these methods if they exist public class BankAccount implements Serializable {
...
private void writeObject(ObjectOutputStream os) throws IOException {
os.defaultWriteObject(); // Optionally invoke normal serialization behavior.
os.writeInt(42); // Do some custom serialization.
}
private void readObject(ObjectInputStream is) throws IOException, ClassNotFoundException {
is.defaultReadObject(); // Optionally invoke normal deserialization behavior.
int life = is.readInt(); // Do some custom deserialization.
}
...
}
Lab
Serialization
Enhance the Employee and Company classes, so that they are serializable. Then add code in Main.java, to implement the deserializeCompany() and serializeCompany()methods. import java.io.Serializable;
import java.util.Scanner;
public class Employee implements Serializable { ...}
import java.io.Serializable;
import java.util.ArrayList;
import java.util.Collection;
import java.util.TreeMap;
public class Company implements Serializable { ... }
deserializeCompany() and serializeCompany() methods public static Company deserializeCompany(String filename) {
Company company = null;
try {
FileInputStream fs = new FileInputStream(filename);
ObjectInputStream is = new ObjectInputStream(fs);
company = (Company) is.readObject();
is.close();
System.out.println("Deserialized company data for " + company.getCompanyName());
} catch (Exception ex) {
System.err.println("deserializeCompany() exception: " + ex.getMessage());
}
return company;
}
public static void serializeCompany(String filename, Company company) {
try {
FileOutputStream fs = new FileOutputStream(filename);
ObjectOutputStream os = new ObjectOutputStream(fs);
os.writeObject(company);
os.close();
System.out.println("Serialized company data for " + company.getCompanyName());
} catch (Exception ex) {
System.err.println("serializeCompany() exception: " + ex.getMessage());
}
}
In main(), uncomment the statements to deserialize/serialize data at application start-up and shut-down. Run the application, and verify that it successfully deserializes and serializes data to a Java serialization file. Company theCompany = deserializeCompany("Company.ser");
serializeCompany("Company.ser", theCompany);
If you liked this post, please comment with your suggestions to help others.
If you would like to see more content like this in the future, please fill-in our quick survey.
Manage cookie consent
You can view this website without consenting to extra cookies. However you will need to accept the 'marketing' cookies to send messages via the contact forms & see any maps displayed on the site
Functional
Always active
Cookies necessary for the website to work.
Preferences
The technical storage or access is necessary for the legitimate purpose of storing preferences that are not requested by the subscriber or user.
Statistics
The technical storage or access that is used exclusively for statistical purposes.Cookies used to track user interaction on the site, which helps us to evaluate & improve the website.
Marketing: Forms & additional content (Marketing)
We need your permission to place ‘marketing’ cookies, so you are able to use the contact forms & see embedded content e.g. videos and maps. - - - - We have added protection to our contact forms to help prove that a human (rather than a spambot) is filling


If you would like to see more content like this in the future, please fill-in our quick survey.