In this tutorial you will learn more HTML and look at form handling and mark-up tags. This will allow you to write a simple HTML site that you can then view in a web browser of your choice
About this Tutorial
Objectives
Delegates will learn to develop applications using HTML5/CSS3 and JS. After completing this course, delegates will be able to:
- Use Visual Studio 2012 effectively
- Create commercial HTML5 Web Applications
- Develop Websites that may use web sockets, animations and geolocation
Audience
This course has been designed primarily for programmers new to the .Net development platform. Delegates experience solely in Windows application development or earlier versions of HTML/CSS and JavaScript will also find the content beneficial.
Prerequisites
No previous experience in web programming is required. But any experience you do have in programming will help. Also no experience in browser IDE’s is required. But again any experience you do have with programming development environments will be a valuable.
Experience using a contemporary OO language such as C++ or C# would be useful but is not required.
Download Solutions

Quick Access
Overview
Estimated Time – 1 Hour
Not what you are looking? Try the next tutorial – CSS3 Techniquess
Lab 1: Semantic mark-up tags
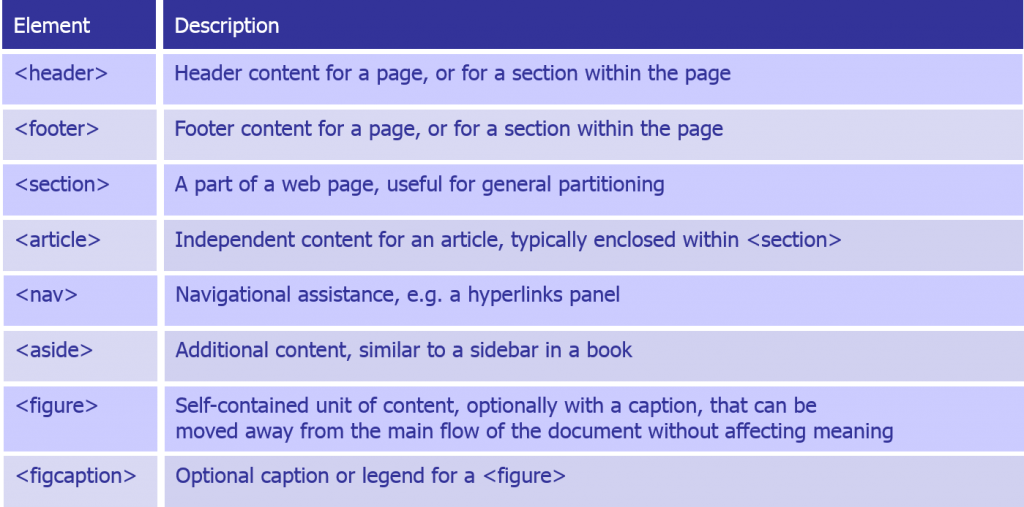
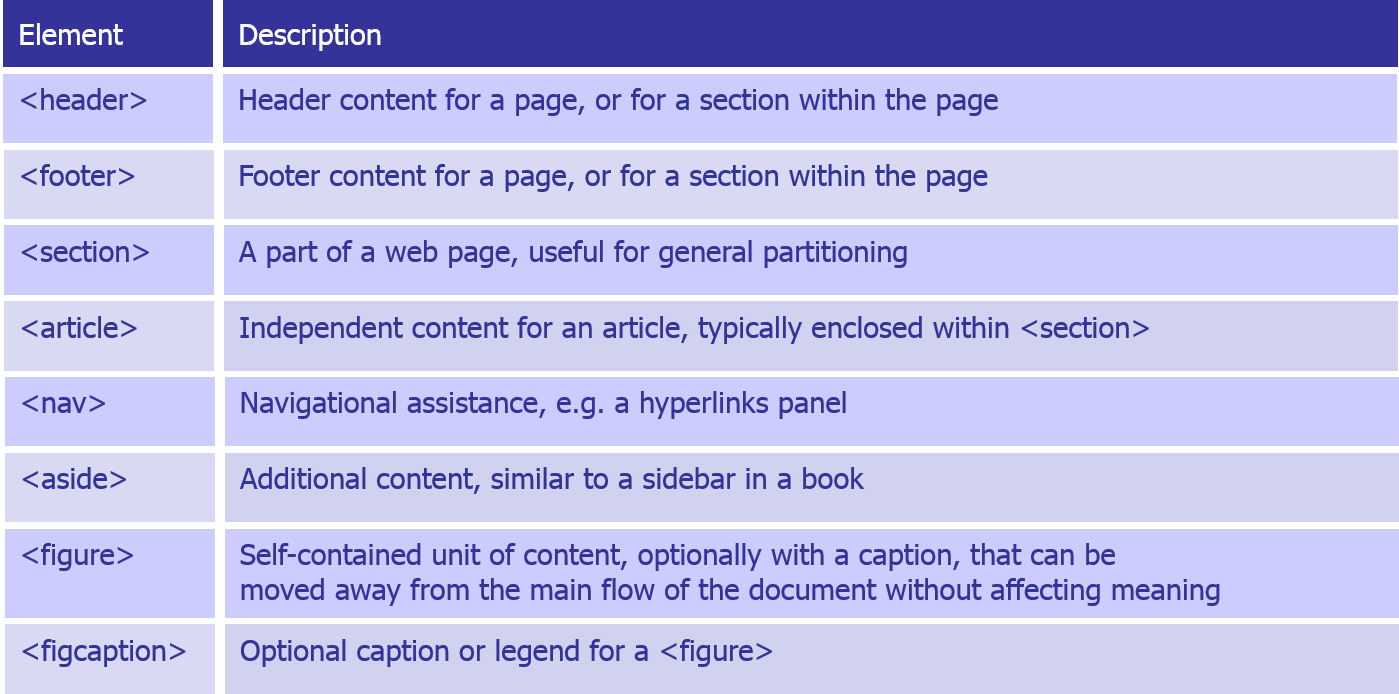
- Overview of Semantic Mark-up Tags
- HTML5 defines semantic mark-up tags
- Emphasise the purpose of the mark-up in a page
- More meaningful than <div id=”header”> etc…
- Emphasise the purpose of the mark-up in a page
- HTML5 defines semantic mark-up tags
- Using Sematic Tags
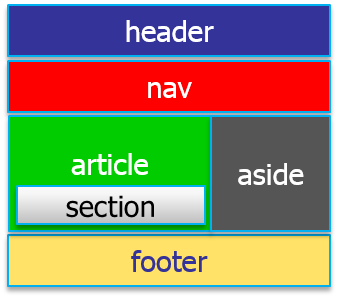
- Here’s an HTML document that makes use of the semantic tags to define the overall framework of the document
<!DOCTYPE html>

<html>

<head>

 <meta charset="utf-8" />

 <title>Hello HTML5</title>

</head>

<body>

 <header> Header for document </header>

 <div>

  <nav> Navigation links </nav>

  <section> Main content of this page </section>

  <aside> Additional info, similar to a sidebar </aside>

  <footer> Footer for this part of the page </footer>

 </div>

</body>

</html>
- Here’s an HTML document that makes use of the semantic tags to define the overall framework of the document
- Going Further with Semantic Tags
- It’s common to use nested semantic tags in combination
- To achieve the desired effect
- Very useful when you apply CSS style sheets
<section>

 <article>

  <header> ... </header>

  <p>This example shows how to use HTML5 semantic markup tags </p>

  <p>This page looks much better if you link it to the stylesheet!</p>

  <footer> ...</footer>

 </article>

 <article>

  <header> ... </header>

  ...

  <footer> ...</footer>

 </article>

</section>
- It’s common to use nested semantic tags in combination
- Using Traditional HTML Elements
- You can mix-and-match semantic tags with traditional HTML elements; For Example:
<header>

 <h1>Hello HTML5</h1>

 <h2>Enjoy the ride!</h2>

 <h4>Fancy eh!</h4>

</header>
- And also like this
<aside>

 <h3>By the way...</h3>

 <p>You can also use many of the traditional HTML tags, such as h1, h2, h3,

   p, div, etc. HTML5 is all about evolution, not revolution.

 </p>

</aside>
- You can mix-and-match semantic tags with traditional HTML elements; For Example:
- Viewing the Sample Document
- Here’s the document with a style sheet attached
- SemanticTags/MyDocumentWithStyles.html
- View code file.
- SemanticTags/MyStylesheet.css
- View code file.
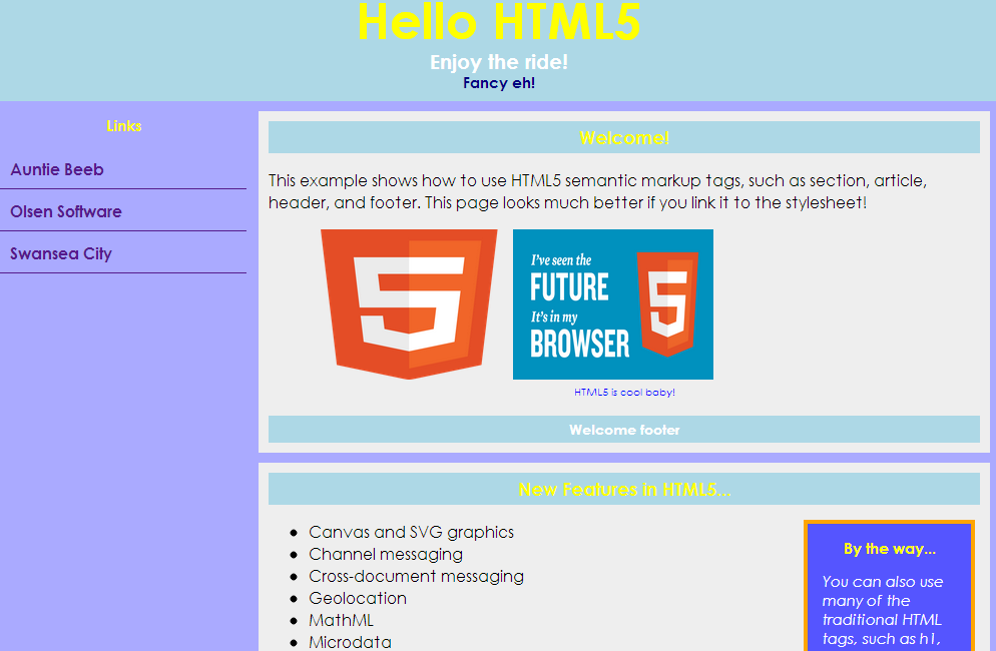
- Here’s the document with a style sheet attached
- In this lab you will start using HTML5 features in your Web pages, including semantic tags and new form input controls. You’ll also get another chance to use the HTML5 selector API, which we mentioned earlier in the course. You will be working with the html page under the initial folder with the completed version of the html page in the final folder.
- Using semantic tags – In the initial folder, open UserInfo.html in an editor (visual Studio etc..).
- View code file.
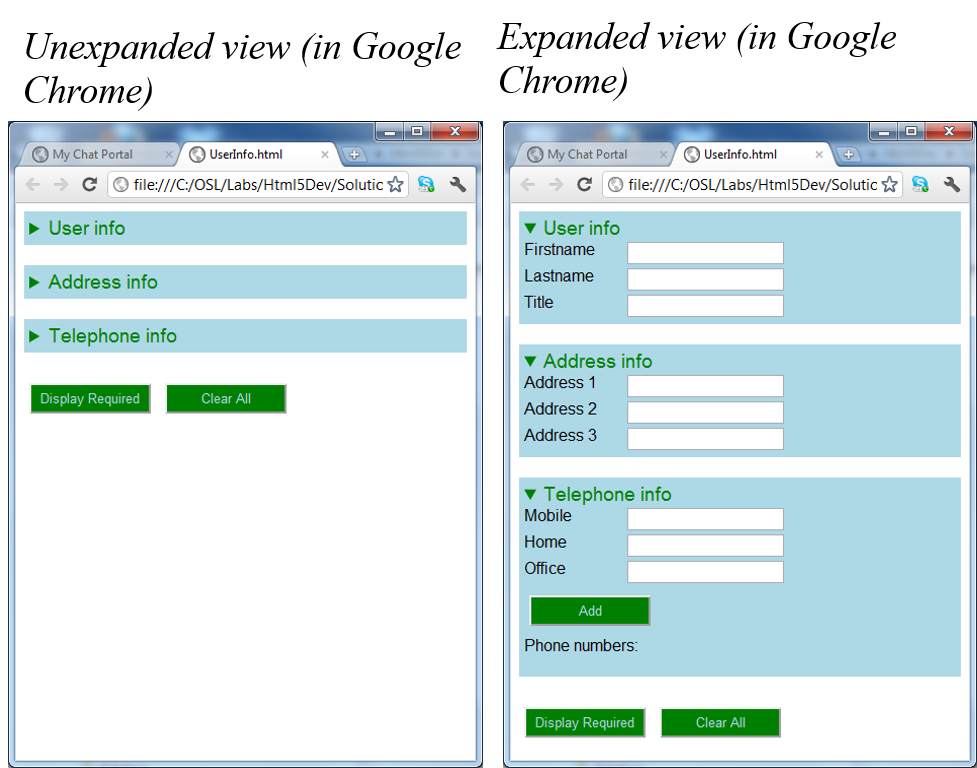
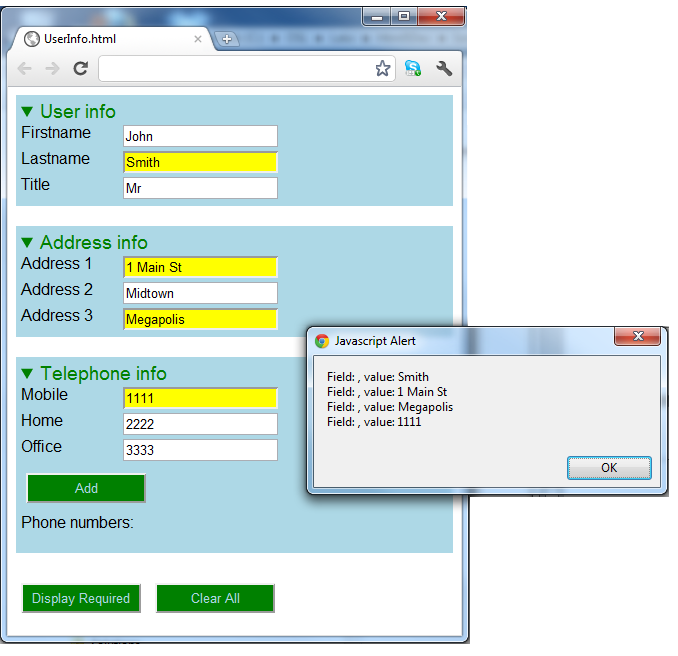
- Take a look at the existing markup, and then refactor it to use HTML5 semantic markup tags to define the structure of the document. When you’re done, the page should look something like the screenshots show below (you can use <details> elements to create expander controls, and use <summary> to create the caption for each <details> element) – For Example:
  <section>

    <details>

      <summary>User info</summary>


      <label>Firstname</label>

      <input type="text" id="fname" /><br/>


      <label>Lastname</label>

      <input type="text" id="lname" required="required" /><br/>


      <label>Title</label>

      <input type="text" id="title" /><br/>

    </details>

  </section>

  ...
Lab 2: Additional tags and attributes
- Defining Custom Data Attributes
- HTML5 allows you to add custom attributes to any element
- Prefix with “data-“
- Allows you to augment elements with any additional info that makes sense in your application
- E.g. validation rules
- E.g. semantic business data
- Etc…
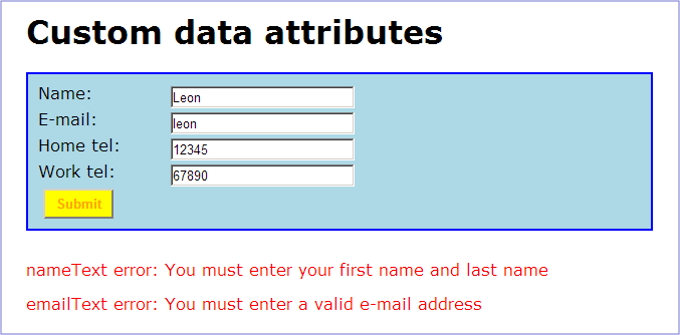
<input id="nameText"

    data-format="[A-Za-z]+\s[A-Za-z]+"

    data-error-message="You must enter your first name and last name" />

<input id="emailText"

    data-format="\w+@[\w.]+([.][A-Za-z]{2,})$"

    data-error-message="You must enter a valid e-mail address" />
- HTML5 allows you to add custom attributes to any element
- Using Custom Data Attributes
- You can access custom data attributes in JavaScript code
- Via the element’s dataset attribute
- E.g. if the custom data attribute is named data-my-info
- use dataset.myInfo
- not dataset.data-my-info
- nor dataset.my-info
- Example:
// Get an element.

var elem = ...;

// Get its custom data attributes.

var format   = elem.dataset.format;        // Or elem.dataset["format"]

var errorMsg = elem.dataset.errorMessage;  // Or elem.dataset["errorMessage"]
- You can access custom data attributes in JavaScript code
- Example
- Example of custom data attributes
- See Additional/CustomDataAttributes.html –
- View code file.
- Note: For non-supporting browsers (e.g. IE10), do this:
var elem = ...;

var format   = elem.getAttribute('data-format');

var errorMsg = elem.getAttribute('data-error-message');
- Example of custom data attributes
- Miscellaneous Additional Tags
- HTML5 defines some additional useful elements –
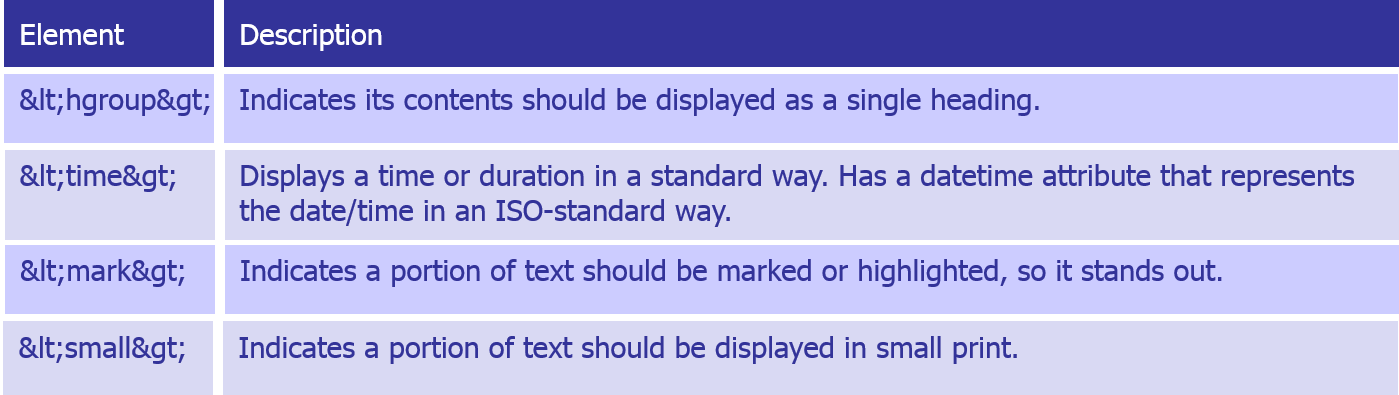
- HTML5 defines some additional useful elements –
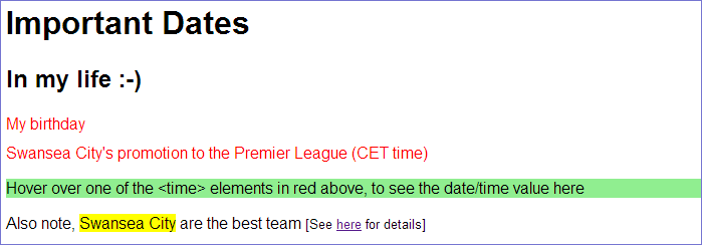
- Example
- Example of miscellaneous additional tags: – See Additional/MiscellaneousTags.html.
- View code file.
- Using the selector API
- You might have noticed that some of the text boxes are “required” – i.e. they have a required=”required” attribute. Bearing this in mind, implement the Display Required button-click handler as follows:
- Get all the required text boxes by using the HTML5 selector API.
document.querySelector("#displayAllRequiredFieldsButton").onclick = function() {

var requiredFields = document.querySelectorAll("input[required]");
- Change the background colour of all the required text boxes to yellow.
for (var i = 0; i < requiredFields.length; i++) { requiredFields[i].style["background-color"] = "yellow"; result += "Field: " + requiredFields[i].name + ", value: " + requiredFields[i].value + "\n"; } - Display an alert popup showing the current values from all the required text boxes.
var result=""; // Above for loop for yellow background

result += "Field: " + requiredFields[i].name + ", value: " + requiredFields[i].value + "\n"; // In for loop

alert(result); // just after for loop
- After the user closes the alter popup, revert all the required text boxes to a white background colour.
for (var i = 0; i < requiredFields.length; i++) { // After Alert(result) requiredFields[i].style["background-color"] = "white"; } - Putting all that together:
document.querySelector("#displayAllRequiredFieldsButton").onclick = function() {

      var requiredFields = document.querySelectorAll("input[required]");


      var result="";

      for (var i = 0; i < requiredFields.length; i++) {
        requiredFields[i].style["background-color"] = "yellow";
        result += "Field: " + requiredFields[i].name + ", value: " + requiredFields[i].value + "\n";
      }
      alert(result);
      for (var i = 0; i < requiredFields.length; i++) {
        requiredFields[i].style["background-color"] = "white";
      }
    }
- Get all the required text boxes by using the HTML5 selector API.
- This is the kind of thing you're aiming for:
- Then implement the Clear All button-click handler, so that it clears the content of all the text boxes (use the HTML5 selector API to get all the text boxes):
// Function to clear all fields.

    document.querySelector("#clearAllFieldsButton").onclick = function() {

      var fields = document.querySelectorAll("input[type='text']");


      for (var i = 0; i < fields.length; i++) {
        fields[i].value = "";
      }

      var lists = document.querySelectorAll("ul, ol");
      for (var i = 0; i < lists.length; i++) {
        lists[i].innerHTML = "";
      }

    }
- You might have noticed that some of the text boxes are “required” – i.e. they have a required=”required” attribute. Bearing this in mind, implement the Display Required button-click handler as follows:
Lab 3: Form handling
- Organising a Form
- HTML5 allows you to partition a forms into field sets
- Use <fieldset> to group related fields
- Add a <legend> child element, if you want to define a heading
- Example:
<form>

 <fieldset>

  <legend>Home address</legend>

  <div class="formpanel">

   ...input controls here ...

  </div>

 </fieldset>

 <fieldset>

  <legend>Work address</legend>

  <div class="formpanel">

   ...input controls here ...

  </div>

 </fieldset>

</form>
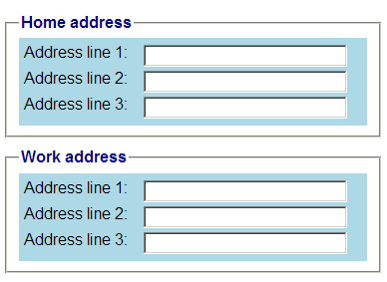
- HTML5 allows you to partition a forms into field sets
- Input Control Attributes
- HTML5 supports several new attributes on input controls
- autocomplete
- autofocus
- list
- multiple
- pattern
- placeholder
- required, min, max
- CSS3 supports pseudo-classes for indicating if an input control is valid or invalid
- input:valid
- input:invalid
- Example - open in IE10 for best effects - See Forms/InputControlAttributes.html
- View code file.
<input type="text" id="myName" size="30"

    autofocus

    autocomplete="off"

    placeholder="Enter your name"

    required="true" />

<input type="text" id="myHouseNumber" size="30"

    placeholder="Enter your house number"

    required="true" />

<input type="text" id="myPostCode" size="30"

    pattern="[a-zA-Z]{1,2}\d{1,2}\s\d[a-zA-Z]{2}"

    placeholder="Enter a UK post code" />

<input list="countries" id="myBirthCountry" size="30"

    placeholder="Select your country of birth" />

<input list="countries" id="myResidenceCountry" size="30"

    placeholder="Select your country of residence" />

<input type="file" id="myPics" multiple />
- HTML5 supports several new attributes on input controls
- Input Control Tags
- New date/time input controls:
- date
- time
- datetime, datetime-local
- month
- week
- New general-purpose input controls:
- number
- range
- tel
- colour
- Url
- search
- Example - Open in chrome for best effects - See Forms/InputControlTags.html
- View code file.
- For date and time inputs
<input type="date" placeholder="Enter a date" .../>

<input type="time" placeholder="Enter a time" .../>

<input type="datetime" placeholder="Enter a date and time" .../>

<input type="month" placeholder="Enter a month" .../>

<input type="week" placeholder="Enter a week" .../>
- For General input
<input type="number" min="10000" max="50000" value="25000" step="1000" />

<input type="range" min="1" max="10" value="5" />

<input type="tel" placeholder="Enter a telephone number" />

<input type="email" placeholder="Enter an email address" />

<input type="url" placeholder="Enter a URL" />

<input type="color" value="red" placeholder="Choose a color" />

<input type="search" results="3" autosave="mySearch" placeholder="Enter search string" />
- New date/time input controls:
- Updating the DOM
- Enhance the Web page so that it displays a bulleted list of all the telephone numbers entered by the user (the Telephone info part of the Web page has an empty <ul> element named phoneNumbers ready to receive list items).
- Here are some hints:
- In the button-click handler for the Add button, get the text entered in the three text boxes and create a string in the format mobileNumber homeNumber officeNumber.
- Use DOM to create a new <li> element containing the string, and append the <li> to the phoneNumbers element.
- The end result should look something like this:
// Function to add phone numbers to the list.

    document.querySelector("#addPhoneNumbersButton").onclick = function() {

      var numbers = document.querySelectorAll("#phoneNumbers input");

      var listItemText = "";

      for (var i = 0; i < numbers.length; i++) {
       listItemText += numbers[i].value + " "
      }
      var ul = document.querySelector("#phoneList");
      var li = document.createElement("li");
      li.innerHTML = listItemText;
      ul.appendChild(li);
    }
Well done. You have completed the tutorial in the HTML5/CSS3/JS course. The next tutorial is
6. CSS3 Techniques
Copyright © 2016 TalkIT®
If you would like to see more content like this in the future, please fill-in our quick survey.