In this tutorial you will learn more core C# and look at multithreading. This will allow you to write a simple C# program that you will then compile. The program will be a Visual Studio Form application
About this Tutorial
Objectives
Delegates will learn to develop applications using C# 4.5. After completing this course, delegates will be able to:
- Use Visual Studio 2012 effectively
- Create commercial C# Web Applications
- Develop multi-threaded applications, Use WCF and LINQ
Audience
This course has been designed primarily for programmers new to the .Net development platform. Delegates experience solely in Windows application development or earlier versions of C# will also find the content beneficial.
Prerequisites
No previous experience in C# programming is required. But any experience you do have in programming will help. Also no experience in Visual Studio is required. But again any experience you do have with programming development environments will be a valuable.
Experience using a contemporary OO language such as C++ or C# would be useful but is not required.
Overview
In this Tutorial you will be learning about multithreading and parallelization which both allow “stuff” to happen simultaneously. In terms on multithreading you can create thread which can run concurrently with the program currently running for instance allowing you to have one GUI to handle user input and one GUI to handle image processing at the same time. Parallelization enables you as the programmer to make maximum efficiency of the computer resources in completing tasks; most notable is that of using the CPU as efficiently as possible.
Estimated Time – 3 Hours
Not what you are looking? Try the next tutorial – Dynamic Programming
Lab 1: Creating Multiple Threads
Overview
- The System.Threading namespace contains various thread-related classes.
- The most obvious class is Thread, which represents a thread:
- You can get the current thread as follows –
Thread currThread = Thread.CurrentThread;
- You can pause the current thread as follows –
Thread.Sleep(2000); // Sleep for 2 seconds.
- You can get the current thread as follows –
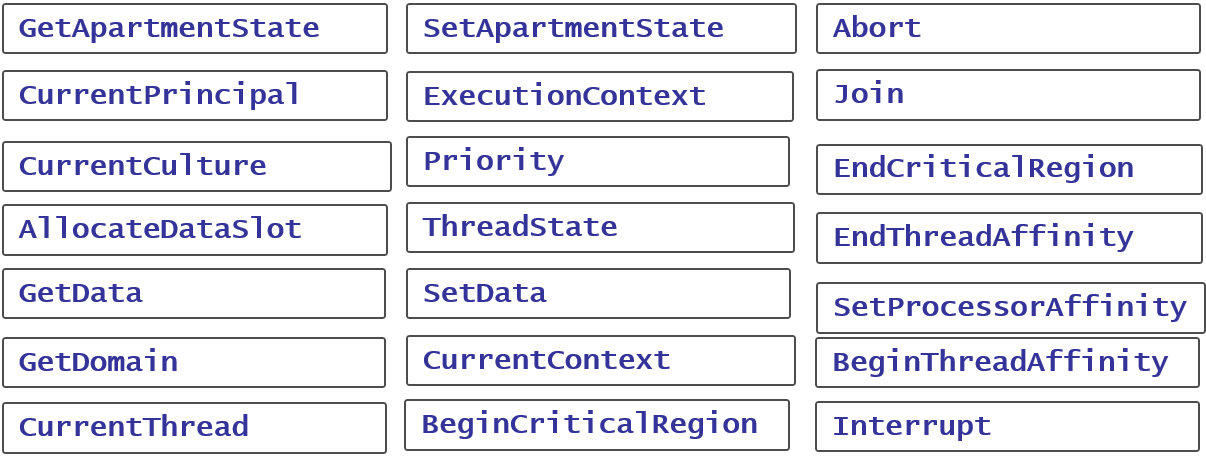
- Members of the Thread Class:
- Categories of methods/properties in the Thread class:
- Getting Thread information:
- The Thread class has various properties describing the state of the thread; see the ThreadInfo.sln sample application –
// Get the current thread,and give it a name

Thread mainThread = Thread.CurrentThread;

mainThread.Name = "MainThread";

 Console.WriteLine("Thread Name: {0}", mainThread.Name);

 Console.WriteLine("Has thread started?: {0}", mainThread.IsAlive);

 Console.WriteLine("Priority Level: {0}", mainThread.Priority);

 Console.WriteLine("Thread State: {0}", mainThread.ThreadState);

 Console.WriteLine("Current culture: {0}", mainThread.CurrentCulture);

 Console.WriteLine("Current UI culture: {0}", mainThread.CurrentUICulture);

 Console.WriteLine("Is thread-pool thread? {0}", mainThread.IsThreadPoolThread);
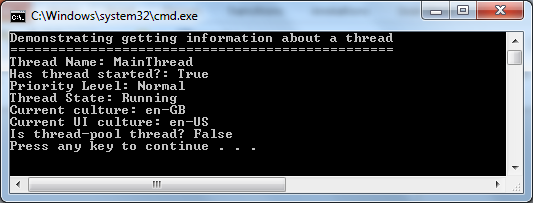
- View code file.
- The Thread class has various properties describing the state of the thread; see the ThreadInfo.sln sample application –
- Asynchronous Delegates:
- The easiest way to create multiple threads in an application is to use asynchronous delegates:
- As we saw earlier in the course.
- Create a delegate to represent the method you want to call asynchronously:
- Call BeginInvoke() to invoke the method asynchronously.
- Optionally specify an AsyncCallback to identify a call-back.
- The BeginInvoke() method returns IAsyncResult, allows you to poll the thread to see if it’s finished.
- Optionally you can define a call-back method:
- Will be called when the asynchronous method has completed.
- Key Points illustrated by example below:
- Using a delegate to invoke a method asynchronously.
- Polling a delegate to see if the operation has completed.
- Specifying and implementing a call-back method.
- Waiting on a delegate to ensure the operation has completed.
- Additional points illustrated by the sample:
- Passing/retrieving object state in an asynchronous operation.
- Retrieving output parameters from an asynchronous operation.
- The easiest way to create multiple threads in an application is to use asynchronous delegates:
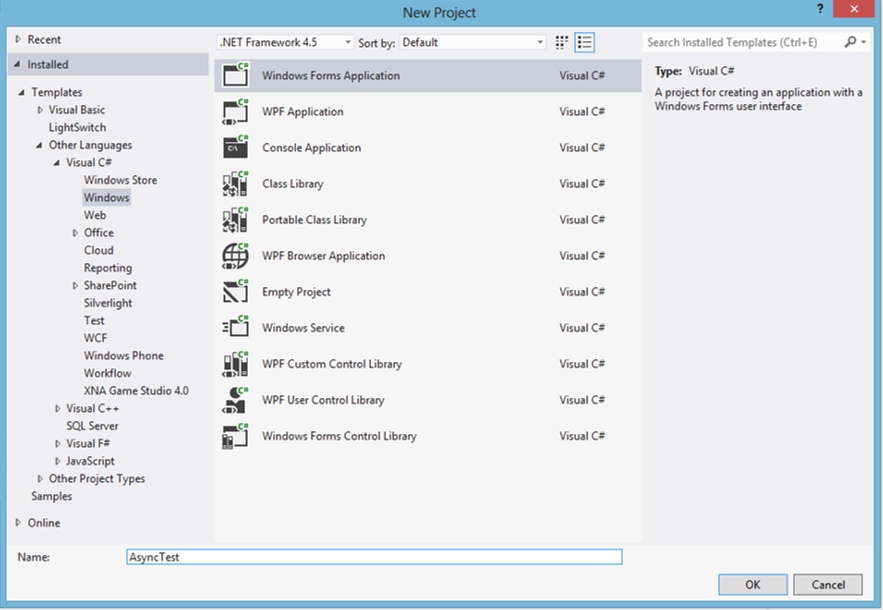
- Open up Visual studio>New Project>C#>Windows>Console Application; Call this AsyncTest, this application is going to demonstrate the use of polling and callbacks using delegates and threading –
- Right Click on the solution, Choose Add>Class and call this MyAsyncMethods. Make sure to include the using statement for threading if it isn’t there already-
using System.Threading;
Then you can insert this code that is creating two asynchronous methods that can be used by the delegates in the main program to calculate the area/perimeter of a rectangle and circle. On call these will sleep for 10 seconds before they will calculate the answers –
class MyAsyncMethods

  {

    public static void CircleCalc(double width, double height, out double area, out double perimeter)

    {

      Thread.Sleep(TimeSpan.FromSeconds(10));

      area = Math.PI * width * width;

      perimeter = 2 * Math.PI * width;

    }

    public static void RectangleCalc(double width, double height, out double area, out double perimeter)

    {

      Thread.Sleep(TimeSpan.FromSeconds(10));

      area = width * height;

      perimeter = 2 * (width + height);

    }

  }
- View code file.
- For the main program called program.cs make sure these using statements are included –
using System.Threading;

using System.Runtime.Remoting.Messaging;
And the class variable for the delegate is included –
delegate void MyDelegate(double width, double height, out double area, out double perimeter);
- In Main() add this code to call our methods –
DemoPolling();

DemoCallback();

Console.WriteLine("Press any key to close the application...");

Console.ReadKey();
- View code file.
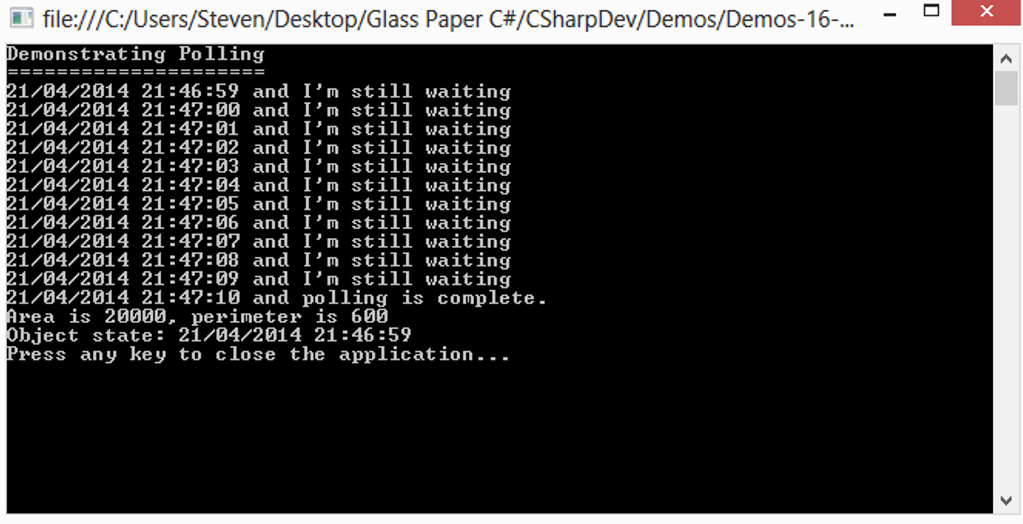
- Now lets add our code that is going to use delegates, we are going to create the first method that is going to demonstrate polling by creating an asynchronous result for getting the area and perimeter of a rectangle and then waiting for this to finish using polling which is just constantly checking to see when it has finished –
private static void DemoPolling()

{

 Console.WriteLine("Demonstrating Polling");

 Console.WriteLine("=====================");

 // Create a delegate and call a method asynchronously.

 MyDelegate theDel = MyAsyncMethods.RectangleCalc;

 double area, perimeter;

 IAsyncResult ar = theDel.BeginInvoke(100, 200, out area, out perimeter, null, DateTime.Now);

 // Poll until the thread has completed.

 while (!ar.IsCompleted)

 ...
- View code file.
- The result of running this should hopefully look like this –
- Next we will add our second method; this is going to use a callback that will run when the asynchronous result has finished.
This is using the AsyncCallback class that is connected to the method MyProcessAsyncResults that holds the asynchronous result. We will just add the Callback method for now –
private static void DemoCallback()

{

 Console.WriteLine("\nDemonstrating Callbacks");

 Console.WriteLine("=======================");

 // Create a delegate and call a method asynchronously.

 MyDelegate theDel = MyAsyncMethods.CircleCalc;

 AsyncCallback callbackDel = new AsyncCallback(MyProcessAsyncResults);

 double area, perimeter;

 IAsyncResult ar = theDel.BeginInvoke(100, 100, out area, out perimeter, callbackDel, DateTime.Now);

 ...
- View code file.
- The main parts of the code to pay attention to are the AsyncCallback callbackDel and ar.AsyncWaitHandle.WaitOne(). But these only work with ProcessAsyncResult() method that is called when the async result finishes –
// Callback method.

private static void MyProcessAsyncResults(IAsyncResult ar)

{

 // Downcast IAsyncResult interface into AsyncResult class type.

 AsyncResult result = (AsyncResult)ar;

 // Get our delegate from the AsyncResult object.

 MyDelegate theDelegate = (MyDelegate)result.AsyncDelegate;

 // Get the results of the asynchronous method.

 double area, perimeter;

 theDelegate.EndInvoke(out area, out perimeter, ar);

 Console.WriteLine("{0} and the callback has been called.", DateTime.Now);

 ...

}
- View code file.
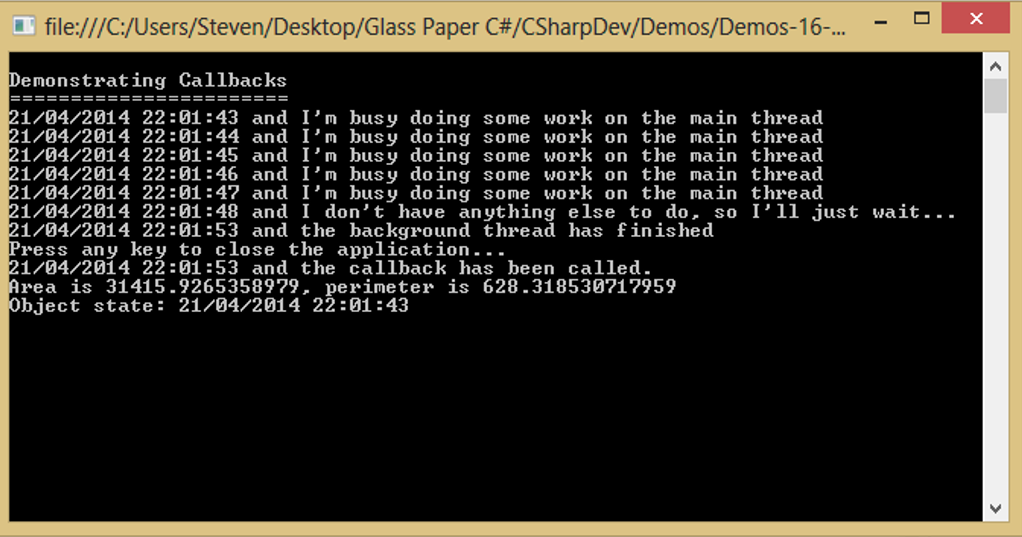
- When you run the application you should see something similar to this where the application actually ends and then displays the data of the async result afterwards which is quite cool –
Lab 2: Additional Thread Techniques
- Creating Threads:
- Using the Thread class:
- Create a new Thread object, pass thread procedure to constructor.
- Call Start() to run the thread procedure.
- If your procedure takes no parameters:
- Use a ThreadStart delegate.
Thread t = new Thread(new ThreadStart(MyProc1));

t.Start();
- Use a ThreadStart delegate.
- If your procedure takes a parameter:
- Use a ParameterizedThreadStart delegate – Pass the parameter into the Start() method –
Thread t = new Thread(new ParameterizedThreadStart(myProc2));

t.Start("Hello World");
- Use a ParameterizedThreadStart delegate – Pass the parameter into the Start() method –
- For a full example of asynchronous delegates – See the MultipleThreads.sln sample project –
NumberPrinter printer = new NumberPrinter(5);

Info info1 = new Info { From = 100, To = 200, Pause = 1 };

Thread thread1 = new Thread(new ParameterizedThreadStart(printer.Print));

thread1.Name = "Thread 1";

thread1.Start(info1);
- View code file.
- Using the Thread class:
- Thread States:
- The ThreadState enum indicates the state of a thread:
- Unstarted – Initial state, before you call Start().
- Running – After you call Start().
- WaitSleepJoin – Thread is blocked, E.g. due to Sleep() or Join(), waiting for a lock or thread synch object.
- Aborted – Abort() has been called on thread, Your thread procedure can catch ThreadAbortException, and call ResetAbort() to undo the abort.
- Stopped – Thread has stopped, You can poll a Thread to see if it’s in this state, if you like.
- For example:
- Start a thread.
- Wait 1 second for thread to stop.
- See if it actually has stopped after that time.
Thread t = new Thread(new ThreadStart(MyProc));

t.Start();

if (t.ThreadState != ThreadState.Stopped)

{

  Console.WriteLine("Thread has not completed yet.");

}

t.Join(1000); // Wait one second for the thread to stop.

if (t.ThreadState != ThreadState.Stopped)

{

  Console.WriteLine("Waited 1 sec and thread still hasn't completed.");

}

else

{

  Console.WriteLine("Thread has completed its work.");

}
- The ThreadState enum indicates the state of a thread:
- Using Thread Pool Threads:
- ThreadPool static class:
- The thread pool maintains a pool of generic worker threads:
- Call SetMinThreads() and SetMaxThreads() to set its size.
- Call QueueUserWorkItem() method and pass a WaitCallback delegate to the thread procedure:
- If there is an available thread, the thread procedure is executed.
- When the thread procedure has completed, the thread is returned to the pool and becomes available.
- If there are no available threads, the request is queued.
void CallMethod()

{

 ThreadPool.QueueUserWorkItem(new WaitCallback(MyThreadProc), 1000);

}

void MyThreadProc(object obj)

{

 int i = (int)obj;

 // Do some work...

}
- The thread pool maintains a pool of generic worker threads:
- ThreadPool static class:
- Using Timers:
- Timer class:
- Uses a ThreadPool thread to make repeated calls to a user function
- Use constructor to start the timer:
- Pass the TimerCallback delegate that will be called.
- Pass a value for the delay before the timer starts.
- Pass a value for the interval between calls.
- Pass a state object that will be passed to the method called.
// Wait 1 second, then call MyProc every half second.

Timer timer = new Timer(new TimerCallback(MyThreadProc), null, 1000, 500);

...

void MyThreadProc(Object obj)

{

 // This is called on a thread pool thread

}
- Timer class:
Lab 3: Thread Synchronization
- Thread Synchronization Objects –
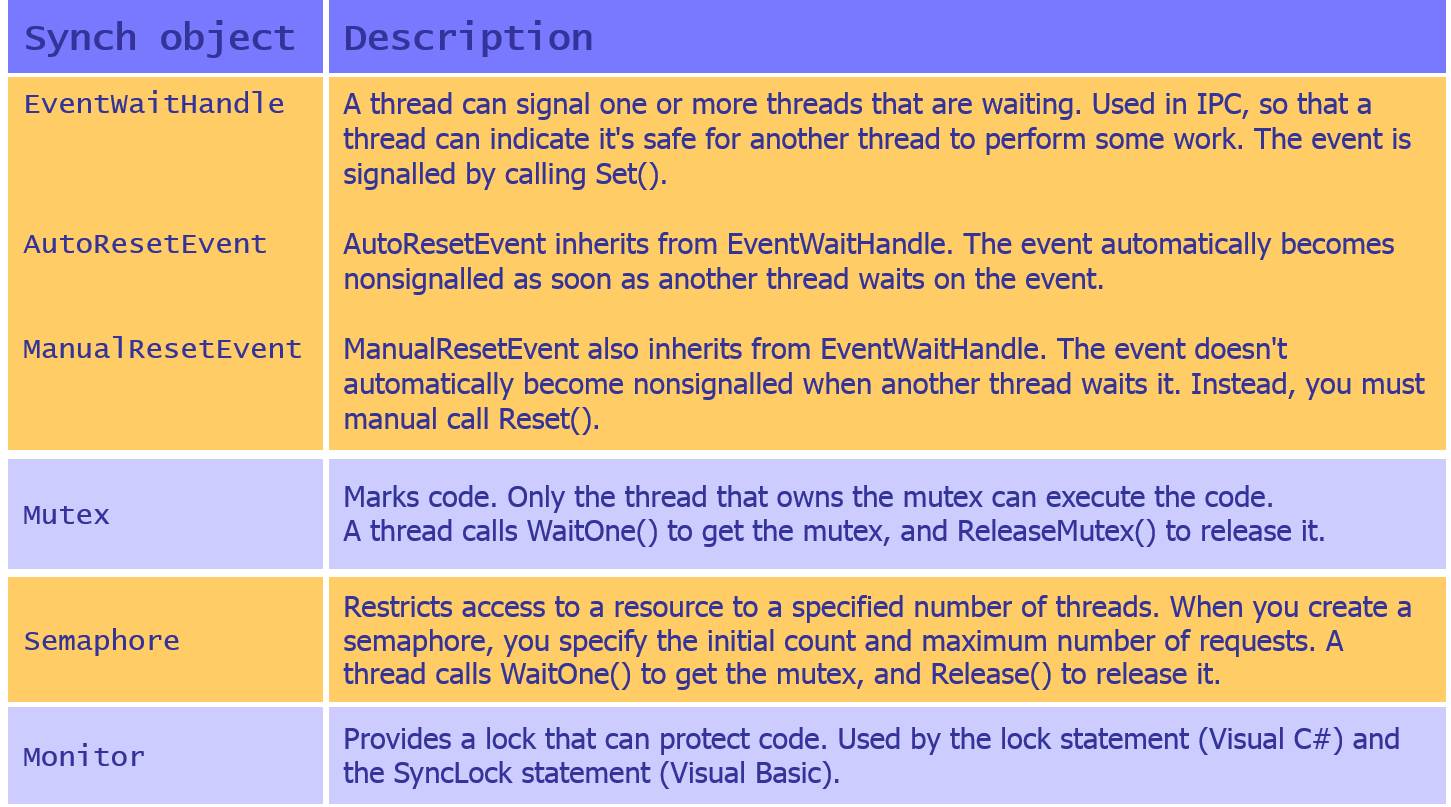
- Using ManualResetEvent:
- Example of how to use ManualResetEvent:
- Create several threads to perform a task.
- Ensure the threads start work at the same time.
- Synchronize their work with a ManualResetEvent object.
ManualResetEvent mre = new ManualResetEvent(false); // Non-signalled initially.

for (int i = 0; i < 10; ++i)

{

 new Thread(new ParameterizedThreadStart(MyThreadProc)).Start(mre);

}

// All threads are blocked, set event to start all of them.

mre.Set();
void MyThreadProc(object obj)

{

 // Block until sync object is signalled...

 WaitHandle wait = obj as WaitHandle;

 wait.WaitOne();

 // Do work now...

}
- Example of how to use ManualResetEvent:
- Using Mutex:
- Example of how to use Mutex to help protect shared resources between threads – Create several threads that access a protected object –
Mutex mutex;

object protectedObject; // Created elsewhere

Mutext mutex = new Mutex(false); // This thread does not own the mutex.

for (int i = 0; i < 10; ++i)

{

 new Thread(new ThreadStart(MyThreadProc)).Start();

}
void MyThreadProc()

{

 // Do some work...

 // Get ownership of mutex, use protected object, then release mutex.

 mutex.WaitOne();

 DoSomethingWithObj(protectedObject);

 mutex.ReleaseMutex();

 // Do some work...

}
- Example of how to use Mutex to help protect shared resources between threads – Create several threads that access a protected object –
- Using Monitor:
- Example of how to use Monitor (implicitly) to lock access hence to help stop deadlock – Use the C# lock keyword to lock/wait for a monitor on an object –
void One()

{

 lock(this)

 {

  // Only One() or Two() can be called, but not both at the same time.

 }

}

void Two()

{

 lock(this)

 {

   // Only One() or Two() can be called, but not both at the same time.

 }

}
- Example of how to use Monitor (implicitly) to lock access hence to help stop deadlock – Use the C# lock keyword to lock/wait for a monitor on an object –
- Using [Synchronization]:
- You can annotate a class with [Synchronization]:
- Locks-down all instance members of the object for thread safety.
- Tells the CLR to places each object in a synchronized context.
- Note, the class should derive from ContextBoundObject.
using System.Runtime.Remoting.Contexts;

...

// All methods of NumberPrinter are now thread-safe!

[Synchronization]

public class NumberPrinter : ContextBoundObject

{

 public void Print()

 {

  ...

 }

}
- You can annotate a class with [Synchronization]:
Lab 4: Parallelization
Overview
- Many (most?) computers these days are multi-core:
- i.e. they contain 2 or more CPUs
- e.g. most laptops these days are dual-core (at least)
- When a machine supports multiple CPUs:
- It has the ability to execute threads in a parallel fashion
- Can significantly improve the run-time performance of applications
- The Task Parallel Library (TPL):
- .NET 4.0 introduced the Task Parallel Library (TPL):
- The TPL automatically distributes workload across CPUs dynamically, using the CLR thread pool:
- Takes care of thread scheduling, state management, etc…
- You don’t have to work directly with threads or the thread pool.
- This is the preferred way to do parallel programming in .NET 4.
- .NET 4.0 also introduced PLINQ:
- Parallel LINQ.
- Allows you to make use of strongly-typed LINQ queries to divide up your workload.
- Data Parallelization:
- Use the Task class to start a new task –
Task.Factory.StartNew(() =>

{

 MyProcessingMethod ();

});
- You can create a ParallelOptions object, to configure parallelization –
ParallelOptions parOpts = new ParallelOptions();

parOpts.MaxDegreeOfParallelism = System.Environment.ProcessorCount;

CancellationTokenSource cancelToken = new CancellationTokenSource();

parOpts.CancellationToken = cancelToken.Token;
- You can use Parallel to achieve “data parallelization”:
- Via Parallel.For() and Parallel.ForEach() methods.
- You provide an IEnumerable or IEnumerable<T> collection.
- You use Func<T> and Action<T> delegates (or lambdas) to specify the target method to process the data.
try

{

 Parallel.ForEach(theCollection, parOpts, currentItem =>

 {

  parOpts.CancellationToken.ThrowIfCancellationRequested();

  // Process currentItem in theCollection ...

 });

}

catch (OperationCanceledException ex)

{

 // User cancelled operation, so maybe display cancellation message to user.

}
Client code to end handler
// Some button-click handler, to let user to cancel threads.

private void btnCancelTask_Click(object sender, EventArgs e)

{

 cancelToken.Cancel();

}
- Use the Task class to start a new task –
- Task Parallelization:
- You can also use Parallel for “task parallelization”:
- Via Parallel.Invoke() method.
- You provide a params array of Action delegates.
- Allows you to fire off any number of asynchronous tasks.
Parallel.Invoke(

 () => { /* Some task to execute asynchronously    */ },

 () => { /* Another task to execute asynchronously   */ },

 () => { /* Yet another task to execute asynchronously */ }

);
- PLINQ = Parallel LINQ :
- Allows you to perform LINQ queries in parallel.
- The PLINQ framework automatically determines whether a query would perform faster if parallelized.
- PLINQ is facilitated via some new extension methods – Defined in the System.Linq.ParallelEnumerable class –

- PLINQ example – Uses AsParallel() in the LINQ query and also uses WithCancellation() in the LINQ query –
CancellationTokenSource cancelToken = new CancellationTokenSource();

try

{

 var result = (from product in

        productsCollection.AsParallel().WithCancellation(cancelToken.Token)

        where product.UnitPrice < 100

        orderby product.UnitPrice descending

        select product).ToArray();

 // Process result here ...

}

catch (OperationCanceledException ex)

...

}
- You can also use Parallel for “task parallelization”:
- Now lets add a little example to show two thread working concurrently together which for this example will be two number printers starting at different numbers with a different pause time.
- Open Visual Studio, New Project>C#>Windows>Console Application and call this MultipleThreads.
- In this project add a new class called NumberPrinter and in this file add this class to be used in a for loop to set the start point of the printer and the stop point –
class Info

{

 public int From { get; set; }

 public int To { get; set; }

 public int Pause { get; set; }

}
- View code file.
- Next add the code to start the printer to print the results from each thread and set the increment number for the printer –
class NumberPrinter

{

 private int step;

 public NumberPrinter(int step)

 {

  this.step = step;

 }

 public void Print(object obj)

 {

  Info info = obj as Info;

  Thread currThread = Thread.CurrentThread;

  for (int i = info.From; i < info.To; i += step)

  ...

 }

}
- View code file.
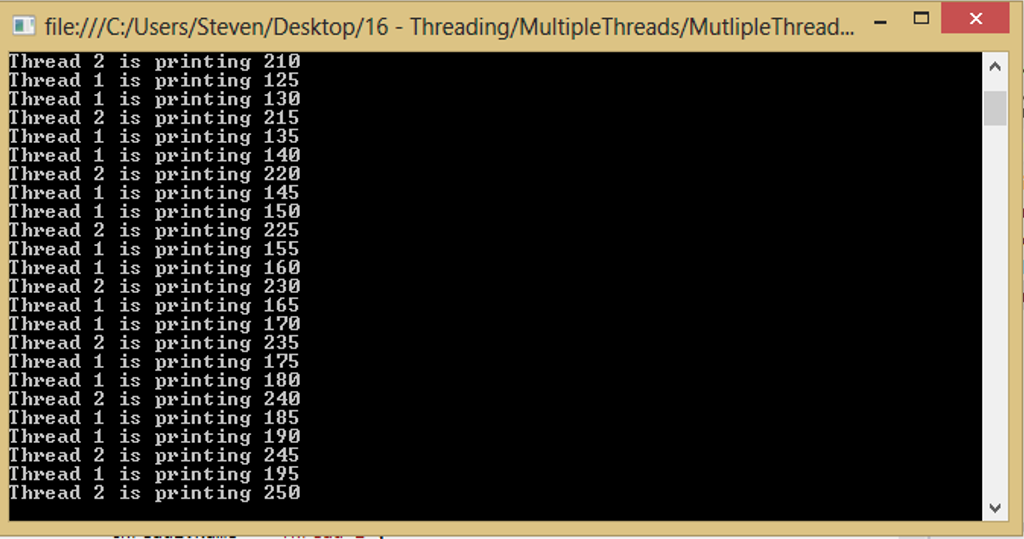
- Now all that is left is to create our Main() to actually test the number printers class we just made and see the results of what happens when running thread concurrently. To do this we are creating two threads where thread one is two times quicker than thread two by setting a pause time of 1 instead of 2 –
...

 NumberPrinter printer = new NumberPrinter(5);

 Info info1 = new Info { From = 100, To = 200, Pause = 1 };

Thread thread1 = new Thread(new ParameterizedThreadStart(printer.Print));

thread1.Name = "Thread 1";

thread1.Start(info1);

 Info info2 = new Info { From = 200, To = 300, Pause = 2 };

 Thread thread2 = new Thread(new ParameterizedThreadStart(printer.Print));

...

Console.ReadLine();
- View code file.
- The result of the application should look like this where thread 1 finishes as thread 2 reaches 250 –
Lab 5: Using the Async and Await Keywords
- Async methods are a new feature in .NET 4.5 – Enable you to create methods that execute part of their code asynchronously.
- To implement an async method – Decorate the method with the async keyword; Call asynchronous methods within your method, and await their outcome via the await operator.
- Defining an async Method:
- To define an async method:
- Decorate the method with the async modifier.
- Specify a return type of Task or Task<T>.
- Name the method so that it ends in “Async”.
- For example –
async Task<int> MyFirstMethodAsync()

{

 ...

}
- To define an async method:
- Implementing an async Method:
- In your async method, invoke another async method:
- Use the await operator if you need the other method to complete before you can continue.
- This blocks your method, and returns control to the caller of your method.
- Control returns to your method automatically when the other method has completed.
async Task<int> MyFirstMethodAsync()

{

 Task<string> otherTask = MyOtherMethodAsync();

 DoSomethingWhileOtherMethodIsDoingItsThing();

 string resultOfOtherMethod = await otherTask;

 DoSomethingElseAfterWaiting();

 ...

}
- In your async method, invoke another async method:
Well done. You have completed the tutorial in the C# course. The next tutorial is
17. Dynamic Programming
Copyright © 2016 TalkIT®


If you would like to see more content like this in the future, please fill-in our quick survey.