In this tutorial you will learn the basics of ASP.NET and how to create a URL schema and filter pages. This will allow you to write a simple ASP.NET site that you will then run. The program will be a visual studio application
About this Tutorial
Objectives
Delegates will learn to develop web applications using C# 4.0. After completing this course, delegates will be able to:
Use Visual Studio 2012 effectively
Create commercial ASP.NET Web Applications
Develop user interfaces using Master Pages, Site Navigation and Themes
Audience
This course has been designed primarily for programmers new to the .Net development platform. Delegates experience solely in Windows application development or earlier versions of ASP.Net will also find the content beneficial.
Prerequisites
No previous experience in ASP.NET programming is required. But any experience you do have in programming will help. Also no experience in visual studio is required. But again any experience you do have with programming development environments will be a valuable.
Experience using a contemporary OO language such as C++ or C# would be useful but is not required.
Not what you are looking? Try the next tutorial – ASP.NET MVC4 State Management
In this tutorial we will enhance the film application you last worked on in the “ASP.NET MVC4 View Techniques” lab
By the end of the tutorial the solution will be able to display films based on their genre, in doing this a new URL schema will be needed so the user wont need to type in a query string. To combat this hyperlinks will be made so the user wont need to enter any information.
Lab 1: Filtering Items Displayed
Lab 1: Filtering Items Displayed
In the solution folder there is an application called FilmsRUsOnline and what we are going to do is to allow the user to filter items e.g. such as on the genre of the film.
To allow the project to be able to filter by genre we need a new property for the FilmViewModelclass indicating their current genre. This tells the view about the “current genre”.
                namespace FilmsRUsOnline.Models

                {

                 public class FilmsViewModel

                 {

                  public IEnumerable Films { get; set; }

                  public PaginationInfo PaginationInfo { get; set; }

                  public string CurrentGenre { get; set; }

                 }

                }
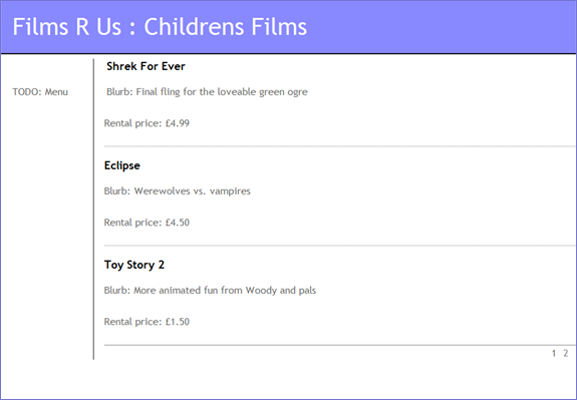
We need to edit the view List.cshtml so as to display the current genre or “All Films”, if no genre is selected.
                @section header {

                 Films R Us : @(Model.CurrentGenre ?? "All") Films

                }
Pass the genre information into the FilmsViewModel.
This is the new List() action method:
                        public ViewResult List(string genre, int pageNumber = 1)

                        {

                         // If the URL specifies a genre, only show films in that genre.

                         var filmsToShow = (genre == null)

                          ? filmsRepository.Films

                          : filmsRepository.Films.Where(x => x.Genre == genre);

                          FilmsViewModel vm = new FilmsViewModel()

                          {

                           Films = filmsToShow.Skip((pageNumber - 1) * PageSize)

                             .Take(PageSize)

                             .ToList(),

                           PaginationInfo = new PaginationInfo

                           {

                             CurrPage = pageNumber,

                             ItemsPerPage = PageSize,

                             NumItems = filmsToShow.Count()

                           },

                          // Pass "current genre" info to view.

                          CurrentGenre = genre

                         };

                         return View(vm);

                        }
We can now run the application with various URL’s; the only way for the user to specify a genre is via a genre parameter. This is in the query string For example, localhost:54420/?genre=Childrens.
Lab 2: Defining a Better URL Schema
Lab 2: Defining a Better URL Schema
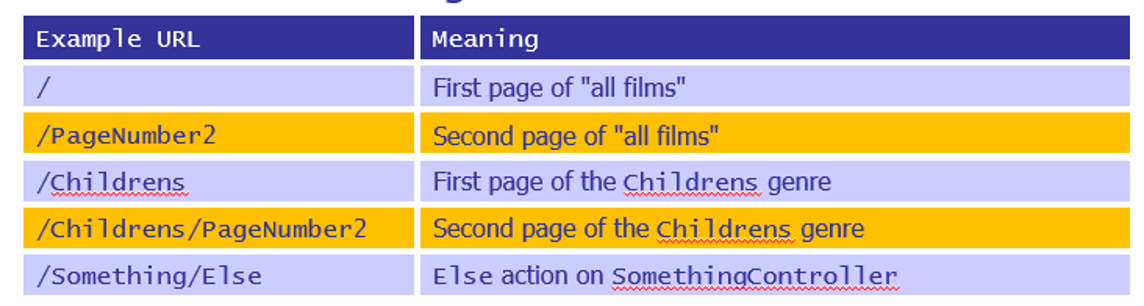
This is our current URL schema. But it makes no mention of genre or page-number.
                routes.MapRoute(

                   name: "Default",

                   url: "{controller}/{action}/{id}",

                   defaults: new { controller="Films", action="List", id=UrlParameter.Optional }

                );
ASP.NET MVC encourages you to define a logical URL schema – This is the logical URL schema we want.
To implement the URL schema, modify RouteConfig.cs in App_Start as follows.
                public class RouteConfig

                {

                 public static void RegisterRoutes(RouteCollection routes)

                 {

                  routes.IgnoreRoute("{resource}.axd/{*pathInfo}");

                  routes.MapRoute( // Match the empty URL (i.e. ~/).

                  name: null,

                  url: "",

                  defaults: new { controller="Films", action="List", genre=(string)null, pageNumber=1 }

                  );

                 routes.MapRoute( // Match ~/PageNumber2, ~/PageNumber123, but not ~/PageNumberXYZ

                  name: null,

                  url: "PageNumber{pageNumber}",

                  defaults: new { controller="Films", action="List", genre=(string)null },

                  constraints: new { pageNumber=@"\d+" }

                 );

                 routes.MapRoute( // Match ~/Childrens or anything without another /

                  name: null,

                  url: "{genre}",

                  defaults: new { controller="Films", action="List", pageNumber=1 }

                 );

                 routes.MapRoute( // Match ~/Childrens/PageNumber2

                  name: null,

                  url: "{genre}/PageNumber{pageNumber}",

                  defaults: new { controller="Films", action="List" },

                  constraints: new { pageNumber=@"\d+" }

                 );

                 routes.MapRoute( // Most generic route

                  name: null,

                  url: "{controller}/{action}/"

                 );

                 }

                }
We need to now incorporate the schema – any hyperlink generated by our application must retain the “genre” information. Hence we need to update the pagination information.
                @Html.PaginationLinks(Model.PaginationInfo,

                   x => Url.Action("List",

                   new {pageNumber=x, genre=Model.CurrentGenre}))
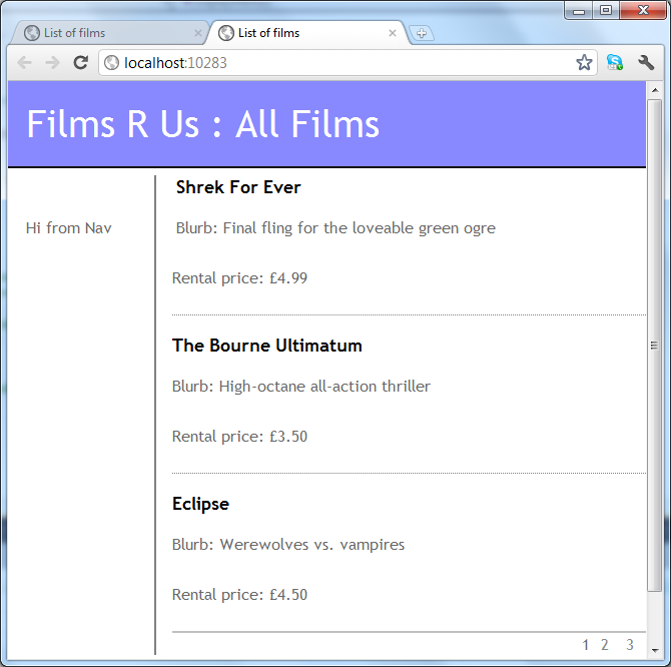
Our application currently allows the user to view films by genre by specifying an appropriate URL but in real life the user won’t know what URL’s to enter. Hence we can improve the user experience by providing navigation links.
To achieve navigation, we’ll define a new controller names NavigationController and this will have a DisplayMenu() method.
                public class NavigationController : Controller

                {

                 public string DisplayMenu()

                 {

                  return "Hi from Nav";

                 }

                }
The navigation controller needs to render many links now. So lets define a new model class to represent a navigation link calling this NavigationLink and indicate whether or not a link is selected.
                using System.Web.Routing;

                namespace FilmsRUsOnline.Models

                {

                 public class NavigationLink

                 {

                  public string Text { get; set; }

                  public RouteValueDictionary RouteValues { get; set; }

                  public bool IsSelected { get; set; }

                 }

                }
We can now enhance the navigation controller – creating links for all the genres and return the navigation links.
                public class NavigationController : Controller

                {

                 // Needs the repository to get genres.

                 private IFilmsRepository filmsRepository;

                 // DI injects repository for us.

                 public NavigationController(IFilmsRepository filmsRepository)

                 {

                  this.filmsRepository = filmsRepository;

                 }

                 // Action method now takes a string and returns a ViewResult.

                 public ViewResult DisplayMenu(string genre)

                 {

                  Func<string, NavigationLink> makeLink = genreName => new NavigationLink

                  {

                   Text = genreName ?? "Home",

                   RouteValues = new RouteValueDictionary(new { controller="Films",

                   action="List",

                   genre=genreName,

                   pageNumber=1 }),

                   IsSelected = (genreName == genre)

                  };

                  // Put a Home link at the top.

                  List<NavigationLink> links = new List<NavigationLink>();

                  links.Add(makeLink(null));

                  // Add a link for each distinct genre.

                  var genres = filmsRepository.Films.Select(x => x.Genre);

                  foreach (string genreName in genres.Distinct().OrderBy(x => x))

                   links.Add(makeLink(genreName));

                  // Return the information to the default view.

                  return View(links);

                 }

                }
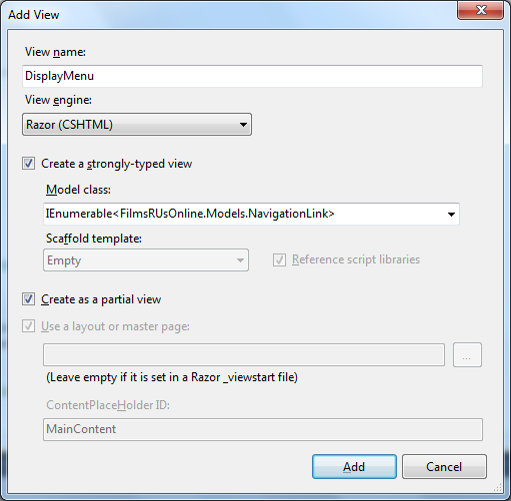
The DisplayMenu()action method relates to partial page content, so it would be smart to associate this with a partial view using IEnumerable<FIlmsRUsOnline.Models.NavigationLink>.
Here is the implementation of the partial view.
                @model IEnumerable<FilmsRUsOnline.Models.NavigationLink>

                @{

                 Layout = null;

                }

                @foreach (var link in Model) {

                 @Html.RouteLink(link.Text,

                   link.RouteValues,

                   new Dictionary<string, object> {

                   { "class", link.IsSelected ? "selectedMenu" : "unselectedMenu" }

                 })

                }
If you liked this post, please comment with your suggestions to help others.
If you would like to see more content like this in the future, please fill-in our quick survey.
Manage cookie consent
You can view this website without consenting to extra cookies. However you will need to accept the 'marketing' cookies to send messages via the contact forms & see any maps displayed on the site
Functional
Always active
Cookies necessary for the website to work.
Preferences
The technical storage or access is necessary for the legitimate purpose of storing preferences that are not requested by the subscriber or user.
Statistics
The technical storage or access that is used exclusively for statistical purposes.Cookies used to track user interaction on the site, which helps us to evaluate & improve the website.
Marketing: Forms & additional content (Marketing)
We need your permission to place ‘marketing’ cookies, so you are able to use the contact forms & see embedded content e.g. videos and maps. - - - - We have added protection to our contact forms to help prove that a human (rather than a spambot) is filling

If you would like to see more content like this in the future, please fill-in our quick survey.