8. Graphics with Canvas

About this Tutorial

Objectives

Delegates will learn to develop applications using HTML5/CSS3 and JS. After completing this course, delegates will be able to:

  • Use Visual Studio 2012 effectively
  • Create commercial HTML5 Web Applications
  • Develop Websites that may use web sockets, animations and geolocation

Audience

This course has been designed primarily for programmers new to the .Net development platform. Delegates experience solely in Windows application development or earlier versions of HTML/CSS and JavaScript will also find the content beneficial.

Prerequisites

No previous experience in web programming is required. But any experience you do have in programming will help. Also no experience in browser IDE’s is required. But again any experience you do have with programming development environments will be a valuable.

Download Solutions

HTML tutorial


Overview

Estimated Time – 1 Hour

Not what you are looking? Try the next tutorial – Working with Text

  1. Introduction to Graphics with Canvas in HTML5
    • Before the advent of HTML5, you could only use drawing APIs in a browser via plug-ins
      • E.g. Flash
      • E.g. Vector Markup Language (VML)
      • E.g. Silverlight
    • HTML5 provides native graphics support
      • Without the need for plug-ins!
    • There are two graphics models in HTML5:
      • Canvas
      • Scalable Vector Graphics with Canvas (SVG)
  2. Canvas Basics
    • Canvas enables you to draw onto a bitmap area
      • Think of it as a dynamic PNG
    • Immediate mode: “fire and forget”
      • It doesn’t remember what you drew last
      • It’s up to you to maintain your objects tree
    • JavaScript APIs and drawing primitives
      • Simple API: 45 methods, 21 attributes
      • Rectangles, lines, fills, arcs, Bezier curves, etc.
    • No DOM support
      • A canvas is a “black box”
  3. Tools to Generate Canvas Content
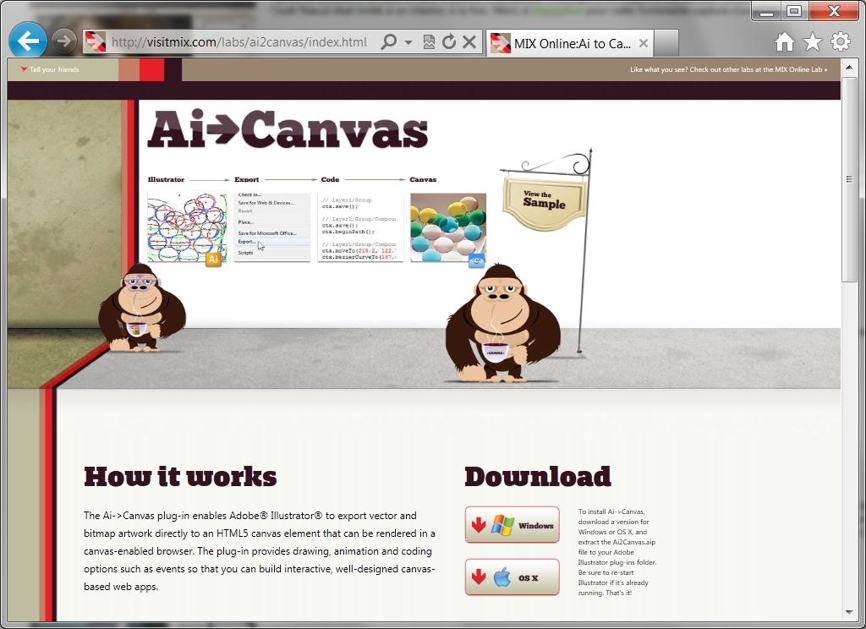
    • Ai->Canvas plug-in
      • Exports vector and bitmap artwork directly to an HTML5 canvas
      • Available at https://visitmix.com/labs/ai2canvas/
        T8P1 Graphics
  4. SVG Basics
    • SVG enables you to draw 2D vector graphics
      • Using XML elements
    • Retained mode
      • The objects tree is kept in memory
    • SVG XML elements
      • Elements for a wide range of graphics elements
      • You can style elements with CSS
    • Full DOM support
      • You can access SVG elements through DOM
  5. tools to Generate SVG Content
    • Microsoft Visio – Export as SVG
    • Adobe Illustrator – Save as SVG
    • Inkspace – Free open-source software
      T8P2 Graphics
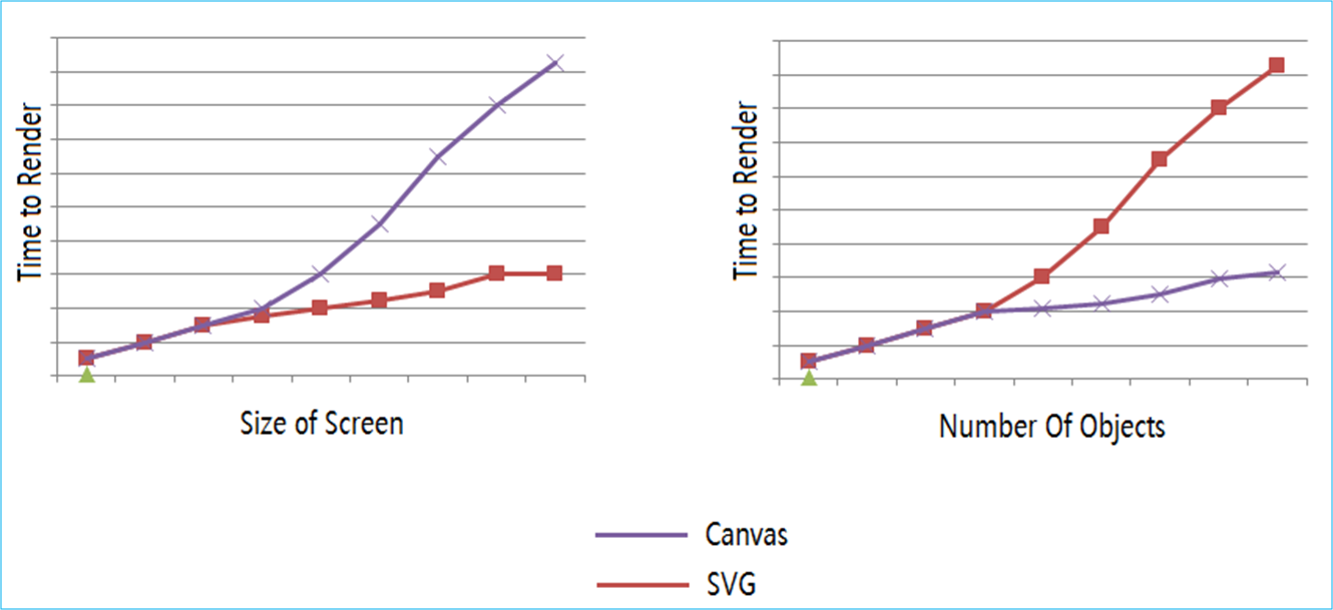
    • Performance Comparison –
      T8P3 Graphics

Lab 1: Getting started with canvas

Lab 1: Getting started with canvas
  1. Creating a Canvas Element
    • A canvas is a rectangular area on a Web page
      • Default size: 300 pixel wide, 150 pixels high
        <canvas></canvas>
      • You can specify an exact size:
        <canvas width="200" height="200"></canvas>
      • You can also specify additional attributes, such as:
        <canvas id="myCanvas" style="border: 1px solid;" width="400" height="600">
    • Once you’ve added a <canvas> element to your page, you can use JavaScript to manipulate it any way you want
      • Add graphics, lines, and text
      • Draw on it
      • Add advanced animations to it
  2. Using a Canvas Programmatically
    • To use a canvas, you must get its 2D context
      • You can then perform actions on the context, and finally apply those actions to the context
      • You can think of making canvas modifications as similar to using database transactions
        • You start a transaction…
        • Perform certain actions…
        • And then commit the transaction
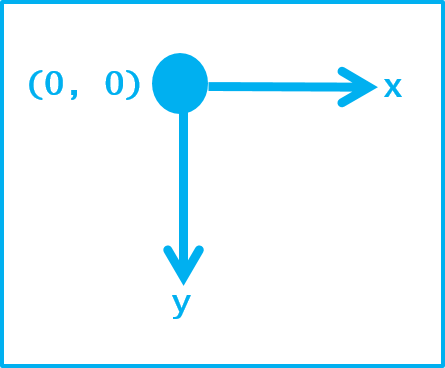
    • Canvas coordinate system:
      T8P4
  3. Additional Considerations
    • Don’t use canvas for simple bits of UI, such as headings
      • Canvas is overkill, and will slow your page down unnecessarily
      • Use simple HTML elements instead, e.g. <h1>
    • Always define fallback content
      • In case the browser doesn’t support the <canvas> element, or a subset of the HTML5 Canvas API features
      • For example:
        <canvas>
         Your browser doesn't support canvas. Time to upgrade :-)
        </canvas>
      • Or:
        <canvas>
         <img src="CanvasNotSupported.jpg" />
        </canvas>
  4. Checking for Canvas Support
    • To check whether your browser supports the canvas element:
      function testCanvasSupport()
      {
       try
       {
        document.createElement("canvas").getContext("2d");
        alert("Your browser supports the HTML5 canvas element");
       }
       catch (e)
       {
        alert("Your browser doesn't support the HTML5 canvas element");
       }
      }
Lab
  1. In this lab, you’ll implement a web page that displays graphics on a <canvas> element, you will be working through the solutions in the initial folder and if you need help the finished solution is in the final folder. This is available to download at the top of the page.
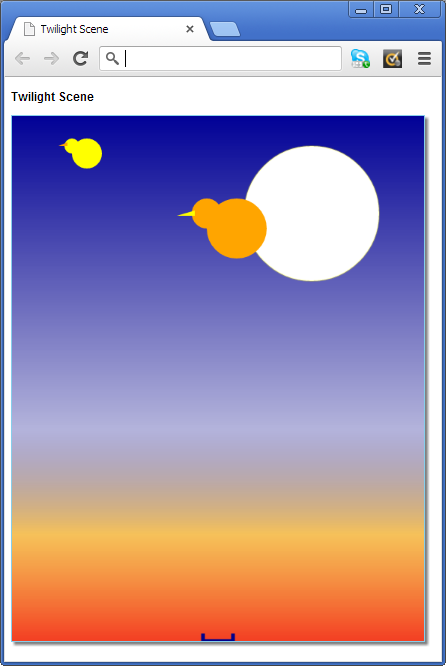
  2. Open a browser window and browse to TwilightScene.html in the Solutions folder. The web page appears as follows:
  3. View code file.
  4. T8P11

  5. This might be the background scene for an HTML game. Your task in this lab is to draw this scene on the canvas:
    • First you’ll fill the entire content of the canvas using a gradient colour scheme.
    • Next you’ll draw the full moon in the top right corner.
    • Then you’ll draw the two birds (a small yellow bird and a larger orange bird). In the real game, these birds will be flying across the screen.
    • Finally you’ll draw the bucket at the bottom of the canvas. In a real game, the user would probably be able to move the bucket to catch balls before they hit the ground.
  6. Creating a Canvas and Getting the Context
    • In File Explorer, go to the initial folder and open TwilightScene.html in the text editor. Where indicated by the TODO comment, define a <canvas> element. Set its width and height to suitable values (e.g. 550 and 700 respectively).
    • View code file.
    • <canvas id='mainCanvas' width='550' height='700'>
      Canvas not supported
      </canvas>

  7. Now open TwilightScene.js in the text editor. This file will contain all the implementation logic for the web page. In the init() function, add code to get the 2d context for the <canvas> element, and store it in the global context variable.
  8. View code file.
  9. context = document.getElementById('mainCanvas').getContext('2d');

  10. Locate the drawSky() function, and add code to draw the sky as a blue-to-red linear gradient (like a sunset). Here are some hints:
    • First, save the current state of the context.
      context.save();
    • Create a linear gradient that starts at the top-left corner of the canvas and ends at the bottom-left corner of the canvas. (Note that the context object has a canvas property, which gives you the <canvas> element associated with the context. Once you have the <canvas> element, you can then get its height).
      var grad = context.createLinearGradient(0, 0, 0, context.canvas.height);
    • Add several colour stops to define a colour gradient similar to that in the final web page.
      grad.addColorStop(0.0, 'rgba(0,0,150,1.0)');
      grad.addColorStop(0.6, 'rgba(0,0,135,0.3)');
      grad.addColorStop(0.8, 'rgba(242,167,18,0.7)');
      grad.addColorStop(1.0, 'rgba(242,44,11,0.9)');
    • Set the context’s fill style to use the linear gradient.
      context.fillStyle = grad;
    • Draw a filled rectangle on the context (it will automatically use the current fill style, i.e. the linear gradient).
      context.fillRect(0,
            0,
            context.canvas.width,
            context.canvas.height);
    • Finally, restore the original state of the context (so that your colour changes are not retained).
      context.restore();
  11. Open the initial web page in the browser. Verify the canvas is painted with the linear gradient.

Lab 2: Using canvas

Lab 2: Using canvas
  1. Overview
    • In this section, we’ll step through the most common uses of the HTML5 canvas API
      • The aim is to explain the important concepts and to see some typical usage
    • Full API documentation is available here:
      • https://www.whatwg.org/specs/web-apps/
        current-work/multipage/
        the-canvas-element.html
  2. A Simple Canvas Example
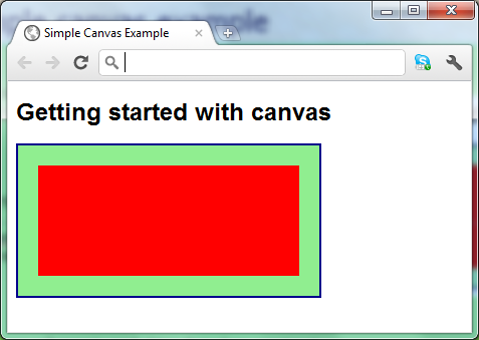
    • Here’s a simple canvas example
      • The HTML and CSS first to create and style the page with the canvas
        <style>
         canvas {
          border: 2px solid darkblue;
          background-color: lightgreen; 
         }
        </style>
        ...
        <h1>Getting started with canvas</h1>
        <canvas id="myCanvas">
         Sorry, your browser doesn't support canvas.
        </canvas>
      • Now for the script
        <script>
         // Get the canvas element and its drawing context.
         var canvas = document.getElementById('myCanvas');
         var context = canvas.getContext('2d');
         // Draw a simple filled rectangle.
         var edge = 20;
         context.fillStyle = "red";
         context.fillRect(edge, edge, canvas.width - edge*2, canvas.height - edge*2);
        </script>
        T8P5
  3. Drawing Straight Lines
    • To draw a rectangle:
      ctx.fillRect(x1, y1, width, height); // Draw a solid rectangle.
      ctx.strokeRect(x1, y1, width, height); // Draw a rectangle outline.
    • To draw a path connecting various points:
      // Start drawing a path.
      ctx.beginPath();
      // Move to a new point (without drawing a line).
      ctx.moveTo(x1, y1);
      // Draw lines to new points.
      ctx.lineTo(x2, y2);
      ctx.lineTo(x3, y3);
      ...
      // Optionally, connect the final point to the first point.
      ctx.closePath();
      // Stroke the line onto the canvas (i.e. do the rendering).
      ctx.stroke();
    • Examples – See StraightLines.html
    • View code file.
    • T8P6

  4. Fine-Tuning the Output
    • Line width
      ctx.lineWidth = width;
    • Line caps
      ctx.lineCap = 'round' | 'square' | 'butt';
    • Line joins
      ctx.lineJoin = 'bevel' | 'round' | 'miter';
    • Shadows
      ctx.shadowOffsetX = horizDistance;
      ctx.shadowOffsetY = verticalDistance;
      ctx.shadowBlur = amountOfBlurring;
      ctx.shadowColor = color;
      T8P7
  5. Drawing Curves
    • To draw an arc:
        ctx.arc(centerX, centerY, radius, startAngle, endAngle, isAntiClockwise);

        ctx.arcTo(startX, startY, endX, endY, radius);
    • To draw a quadratic curve:
        ctx.quadraticCurveTo(controlPointX, controlPointY, endX, endY);
    • To draw a bezier curve:
        ctx.bezierCurveTo(controlPoint1X, controlPoint1Y,
                 controlPoint2X, controlPoint2Y,
                 endX, endY);
    • Examples – See Curves.html
    • View code file.
    • T8P8

  6. Setting Color Styles
    • To set a fill style or a stroke style:
      ctx.fillStyle = color;  // Or cxt.strokeStyle.
      ctx.fill();        // Or cxt.stroke().
    • To fill a shape with a gradient:
      // Create a linear gradient or a radial gradient.
      var grad = ctx.createLinearGradient(startX, startY, endX, endY);
      var grad = ctx.createRadialGradient(startCircleX, startCircleY, startCircleRadius,
                        endCircleX,  endCircleY,  endCircleRadius);
      // Set the colors in a gradient.
      grad.addColorStop(fraction1, color1);
      grad.addColorStop(fraction2, color2);
      ...
      // Fill a shape with a gradient.
      ctx.fillStyle = grad;
    • To fill a shape with a pattern:
      var image = document.getElementById("anImageElement");
      var pattern = ctx.createPattern(image, "repeat");
      ctx.fillStyle = pattern;
    • Examples – See Colours.html
    • View code file.
    • T8P9

  7. Transformations
    • To rotate:
      ctx.rotate(clockwiseAngleInRadians);
    • To translate:
      ctx.translate(deltaX, deltaY);
    • To scale:
      ctx.scale(xScaleMultiple, yScaleMultiple);
    • To adjust the current transformation matrix:
      ctx.transform(scaleX, skewX, scaleY, skewY, translateX, translateY);
    • To set a new transformation matrix:
      ctx.setTransform(scaleX, skewX, scaleY, skewY, translateX, translateY);
  8. Animations
    • You can draw animations on a canvas
      • Define a function that draws on the canvas
      • Call the function in a timer, to draw a different image each time
    • Transformations and Animations Demo
Lab
  1. Drawing Shapes on the Canvas
    • Locate the drawMoon() function, and add code to draw a big moon in the top-right corner of the canvas (after you’ve implemented the function, refresh the web page in the browser to ensure it all looks fine). Here are some hints:
      • First, save the current state of the context as always.
        context.save();
      • Set the context’s fill style to white (for the moon filler), and set its stroke style to a faint yellowish colour (for the moon outline). Also set the line width to 2 pixels.
        context.strokeStyle = 'rgba(255, 255, 0, 0.25)';
        context.lineWidth = 2;
      • Call context.beginPath() ready to draw the new shape. You always call beginPath() before you draw a new shape, to ensure you don’t tag on to any previous shapes that might have been drawn.
        context.beginPath();
      • Call context.arc() to draw the moon as a full circle.
        context.arc(400, 130, 90, 0, 2 * Math.PI, true);
      • Call context.fill() and context.stroke() to draw the filler and outline of the moon.
        context.fill();
        context.stroke();
      • Finally, restore the original state of the context as always.
        context.restore();
    • Locate the drawSmallBird() function, and add code to draw a small yellow bird at the specified x, y coordinates. Here are some brief hints:
      • The bird’s head is a small yellow circle.
        context.arc(x-20, y-10, 10, 0, 2 * Math.PI, true);
      • The bird’s body is a larger yellow circle.
        context.arc(x, y, 20, 0, 2 * Math.PI, true);
      • The beak is an orange triangle use the moveTo() and lineTo() functions to draw the triangle.
        context.fillStyle='orange';
        context.beginPath();
        context.moveTo(x-26, y-10);
        context.lineTo(x-38, y-10);
        context.lineTo(x-26, y-15);
        context.fill();
    • Now locate the drawLargeBird() function, and add code to draw a larger orange bird. The code is similar to drawSmallBird(), but the maths and colours are different!
      context.save();
      // BIRD
      context.fillStyle='orange';
      context.beginPath();
      context.arc(x, y, 40, 0, 2 * Math.PI, true);
      context.arc(x-40, y-20, 20, 0, 2 * Math.PI, true);
      context.fill();
      // BEAK
      context.fillStyle='yellow';
      context.beginPath();
      context.moveTo(x-56, y-17);
      context.lineTo(x-80, y-17);
      context.lineTo(x-56, y-24);
      context.fill();
      context.restore();
    • Finally, locate the drawBucket() function, and add code to draw a bucket at the bottom of the canvas (in the middle). The bucketWidth and bucketHeight parameters specify the desired size of the bucket. Here are some brief hints:
      • The bucket comprises three thick straight lines, representing the left-hand side of the bucket, the bottom, and the right-hand side.
        context.lineTo(canvasWidth / 2 - bucketWidth / 2, canvasHeight);
        context.lineTo(canvasWidth / 2 + bucketWidth / 2, canvasHeight);
        context.lineTo(canvasWidth / 2 + bucketWidth / 2, canvasHeight - bucketHeight);
      • Ensure the bucket is positioned centrally at the bottom of the canvas you’ll need to do some maths based on the width and height of the canvas.
        context.moveTo(canvasWidth / 2 - bucketWidth / 2, canvasHeight - bucketHeight);
      • Overall looking like this:
        var canvasWidth = context.canvas.width;
        var canvasHeight = context.canvas.height;
        context.save();
        context.strokeStyle = 'darkblue';
        context.lineWidth = 5;
        context.beginPath();
        context.moveTo(canvasWidth / 2 - bucketWidth / 2, canvasHeight - bucketHeight);
        context.lineTo(canvasWidth / 2 - bucketWidth / 2, canvasHeight);
        context.lineTo(canvasWidth / 2 + bucketWidth / 2, canvasHeight);
        context.lineTo(canvasWidth / 2 + bucketWidth / 2, canvasHeight - bucketHeight);
        context.stroke();
        context.restore();


Well done. You have completed the tutorial in the HTML5/CSS3/JS course. The next tutorial is

9. Working with Text


Back to beginning
Copyright © 2016 TalkIT®


If you liked this post, please comment with your suggestions to help others.
If you would like to see more content like this in the future, please fill-in our quick survey.
Scroll to Top