In this tutorial you will learn more core C# and look at members and types. This will allow you to write a simple C# program that you will then compile. The program will be a Visual Studio Form application
About this Tutorial
Objectives
Delegates will learn to develop applications using C# 4.5. After completing this course, delegates will be able to:
- Use Visual Studio 2012 effectively
- Create commercial C# Web Applications
- Develop multi-threaded applications, Use WCF and LINQ
Audience
This course has been designed primarily for programmers new to the .Net development platform. Delegates experience solely in Windows application development or earlier versions of C# will also find the content beneficial.
Prerequisites
No previous experience in C# programming is required. But any experience you do have in programming will help. Also no experience in Visual Studio is required. But again any experience you do have with programming development environments will be a valuable.
Experience using a contemporary OO language such as C++ or C# would be useful but is not required.
Quick Access
Overview
In this tutorial we will look at going further with types and members. In a previous tutorial we created some basic classes and their members. In this tutorial we will examine how C#.Net is a full OOP language, allowing us to use some sophisticated features. We will work with:
- Being able to use static fields, static methods and static constructors for classes
- Using operators to overload on struct and class types
- Using Partial types and Partial Methods which is useful when defining a large class or struct or interface
Estimated Time – 2 Hours
Not what you are looking? Try the next tutorial – Inheritance and Interfaces
Lab 1: Static Members
Overview
- As we know, classes contain members like fields and methods. We can work with these members by first instantiating an object from the class, and then accessing the member via this object. But sometimes we want to access the member directly from the class, rather than having to use an object. To allow this behaviour we create static members. The members that are accessed only via an object are referred to as instance members.
- Static fields – Per-class data, rather than per-instance.
- Static methods – Per-class behaviour, rather than per-instance.
- Static Constructor:
- Per-class initialization, rather than per-instance.
- No accessibility specified, no parameters, cannot be overloaded.
- Called by CLR when needed (you cannot call explicitly).
- Static Properties:
- We are going to create an Employee Management program to show how to use static variables and methods- First Open Visual Studio 2012 and create a New Project C#>Windows>Console Application and Name this EmployeeManagement –
- Inside our Program.cs add this to Main() which will be used later as we build the application, this will call the relevant methods when testing our code –
AddEmployee();

 Console.ReadLine();

TestTheirPerformace();

 Console.ReadLine();

AddTelephone();

 Console.ReadLine();

 Console.WriteLine("\nEnd of Main()");

 Console.WriteLine("----------------------------------");
- View code file.
- To Start we are going to create the Employee class and use some class variables inside it. Firstly create a new class right click the solution>Add>Class and name this Employee; Secondly create 2 class variables for the minimum salary and number of employees and a static method that allows you to adjust minimum salary –
private static double minimumSalary = 70000;

private static int numEmployees = 0;

// Static methods/properties.

public static void AdjustMinimumSalary(double amount)

{

 minimumSalary += amount;

 Console.WriteLine(" Message from AdjustMinimumSalary: minimum salary is now {0}.",    minimumSalary);

}
- View code file.
- Now to add the Constructors and destructor for the employee class as to be able to create an employee and deal with them correctly if they leave. The first Constructor will accept just a string as a name for the employee and give them generic information that will be sent to the second constructor. If the Data is given by the User then constructor two will be called –
// Constructor 1.

// Name only, rely on defaults for everything else.

public Employee(string name)

  : this(name,

     DateTime.Today,

     new UserProfile(name.Replace(" ", ""), "password", "GeneralUser@CompanyDomain.com"))

{}

// Constructor 2.

// Name, date joined, and profile. Plus salary and/or numskills.

public Employee(string name, DateTime joined, UserProfile profile, double salary = 20000, int totalSkills = 10)

{

 // Initialize this employee.

 this.Name = name;

 this.Salary = salary;

 ....

 // Increment the (static) number of employees.

 numEmployees++;

 Console.WriteLine(" Message from Employee constructor: there are now {0} employee(s).", numEmployees);

}
- Now of the destructor to finalise what we have made in our constructor classes. We have no files to close etc… so we only need to decrement the number of employees –
 // Destructor.

~Employee()

{

 // Decrement the (static) number of employees.

 numEmployees--;

 Console.WriteLine(" Message from Employee destructor: there are now {0} employee(s).", numEmployees);

}
- View code file.
- Now all that is left is to add in our methods and properties to use in the class; this will allow us to score the employee, give them a pay rise and override the ToString Method – The PerformanceLevel wont work at the moment so you can comment this out but will be used in lab2 and the same for goes for TelephoneNumber for Lab3 –
private PerformanceLevel performanceLevel = new PerformanceLevel();

public TelephoneNumber TelephoneNumber { get; set; }

// Instance variables.

private DateTime joined;

private string[] skills;

private UserProfile profile;

// Properties.

public string Name  { get; private set; }

public double Salary { get; private set; }
- Now adding our methods that will allow a pay rise for a person salary and a method that will allow us to score their performance which can be used in lab two –
// Additional methods.

public void PayRaise(double amount)

{

 Salary += amount;

}

public override string ToString()

{

 return string.Format("{0} joined {1}, salary {2:c}, performance level: {3}\n{4}.", Name, joined.ToShortDateString(), Salary, performanceLevel, profile);

}

public void ScoreEmployee(int score)

{

 performanceLevel += score;

}
- View code file.
- For everything to work we need to have a UserProfile; to do this create a new class as shown above and call this UserProfile.
- In UserProfile add the following code to hold the fields of a user and the override method for ToString() –
private string username;

private string password;

private string emailAddress;

// Override method

public override string ToString()

{

 return string.Format("User name: {0}, e-mail address: {1}", username, emailAddress);

}
- View code file.
- Next in UserProfile add the method for changing a password and the constructor for a user profile –
public UserProfile(string username, string password, string emailAddress)

{

 ...

}

public bool ChangePassword(string currentPassword, string newPassword)

{

 if (currentPassword == password)

 {

  password = newPassword;

  return true;

 }

 else

 {

  return false;

 }

}
- View code file.
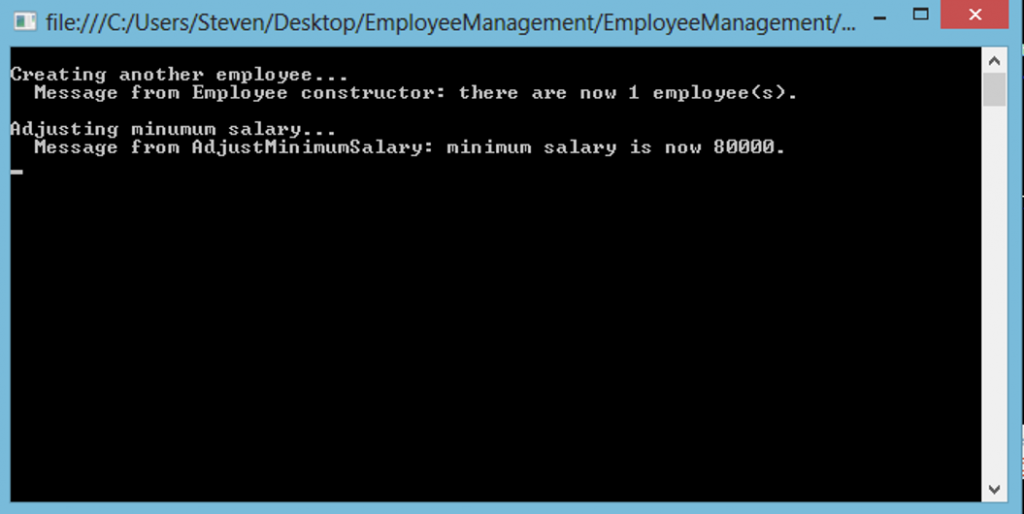
- You can now add an employee by using this code for the AddEmployee() method inside Program.cs and should see the Console as below –
 Console.WriteLine("\nCreating another employee...");

Employee emp2 = new Employee("Sara Davies", new DateTime(2007, 10, 31), new UserProfile("sarad", "mypassword", "sara.davies@myisp.com"), 30000);

 Console.WriteLine("\nAdjusting minumum salary...");

Employee.AdjustMinimumSalary(10000);    // Nice :-)}
- View code file.
Lab 2: Operators
Overview
- In a previous tutorial we used some C# operators, for example the > (greater than) operator to compare two numbers. We can also define our own operators to do things with the classes or stucts we create. For example, if we create a Cat class we can define a > operator to compare two Cat objects.
- But what exactly does comparing cats mean? Well, it means what we decide it to mean. Comparing two cats could mean you just compare their weight properties. So Tiddles is greater than Frisky, if Tiddles weighs more. Defining operators is called operator overloading since, like method overloading, we replace or overload the existing definition.
- Existing operators can be overloaded for struct and class types:
- You define a method in the following general syntax – The compiler converts it into a normal method call in IL –
access-specifier static result-type operator op-symbol(operand-params)

{ ... }
- You define a method in the following general syntax – The compiler converts it into a normal method call in IL –
- Overloadable operators:
- Unary: + – ! ~ ++ —
- Binary: + – * / % & | ^ >> <<
- Comparison: == != < >=
- For example for Arithmetic Operators –
public struct Money

{

 private double mAmount;

 private const string mCurrencySymbol = "$";

 public Money(double amount)

 { this.mAmount = amount; }

 public static Money operator+(Money m1, Money m2)

 { return new Money(m1.mAmount + m2.mAmount); }

 public static Money operator-(Money m1, Money m2)

 { return new Money(m1.mAmount - m2.mAmount); }

 public static Money operator++(Money m1)

 { return m1 + new Money(1.0); }

 public static Money operator--(Money m1)

 { return m1 - new Money(1.0); }

 ...

}
- View code file.
- For example comparison operators –
public struct Money

{

 ...

 public static bool operator==(Money m1, Money m2)

 { return m1.mAmount == m2.mAmount; }

 public static bool operator!=(Money m1, Money m2)

 { return !(m1 == m2); }

 ...

}
- View code file.
- Now to create our PerformanceLevel class using operators, to do this right click on the solution>Add>Class and call this PerformanceLevel.
- Firstly create the class PerformanceLevel and add our fields and normal methods, this will have the number of rankings that have been made and the overall score between all of these rankings. –
// Private fields.

private int numRankings;

private int totalScore;

// Helper functions.

public PerformanceLevel(int numRankings = 1, int score = 0)

{

 this.numRankings = numRankings;

 this.totalScore = score;

}

public override string ToString()

{

 ...

}

public int EffectiveAverageScore

{

 get { return totalScore / numRankings; }

}
- View code file.
- Now to add in our more specific methods that will override Equals and GetHashCode methods, mainly looking at GetHashCode with it allowing us to return the effective average score –
public override bool Equals(object obj)

{

 // Try to convert other object to a PerformanceLevel type.

 PerformanceLevel? other = obj as PerformanceLevel?;

 if (other == null)

 {

  return false;

 }

 else

 {

  // Use operator== to determine if this object equals the other object.

  return this == other.Value;

 }

}

public override int GetHashCode()

{

 // Return this object's average score as an effective hashcode.

 return EffectiveAverageScore;

}
- View code file.
- Now to add the actual operators to perform the comparisons and enable the employee management score ranking system to work –
// Operators.

public static PerformanceLevel operator +(PerformanceLevel p1, int score)

{

 return new PerformanceLevel(p1.numRankings + 1, p1.totalScore + score);

}

public static bool operator ==(PerformanceLevel p1, PerformanceLevel p2)

{

 return p1.EffectiveAverageScore == p2.EffectiveAverageScore;

}

public static bool operator !=(PerformanceLevel p1, PerformanceLevel p2)

{

 return p1.EffectiveAverageScore != p2.EffectiveAverageScore;

}

// See code file for the rest
- View code file.
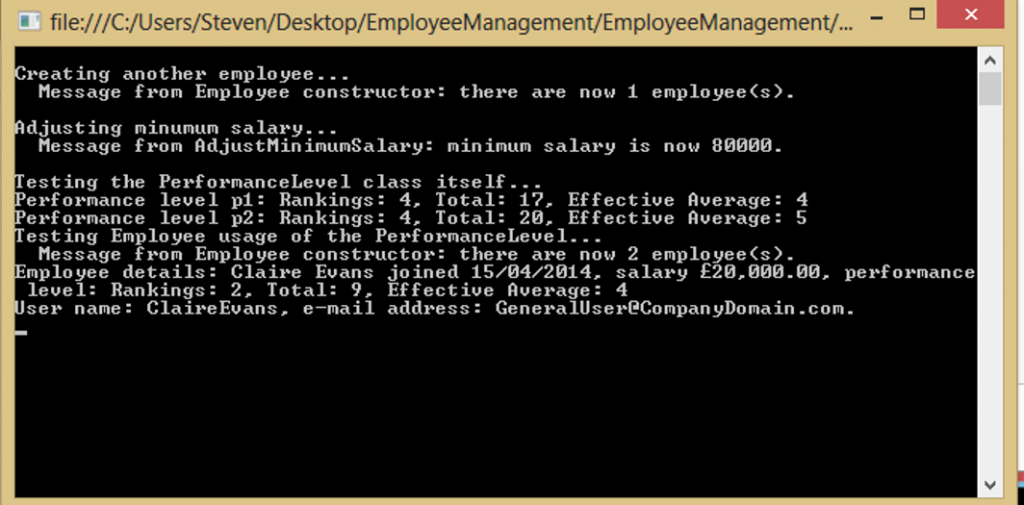
- Now we can run the application for testing the employees performance, use this code in the program.cs method TestTheirPerformace(). The code will add some new performance levels to start with so that the employee Claire can be compared against the average at the end of the method. NOTE – remember to uncomment the PerfomanceLevel Code from Employee –
Console.WriteLine("Testing the PerformanceLevel class itself...");

PerformanceLevel p1 = new PerformanceLevel();

 p1 += 5;

 ...

Console.WriteLine("Performance level p1: {0}", p1);

PerformanceLevel p2 = new PerformanceLevel();

 p2 += 5;

 ...

Console.WriteLine("Performance level p2: {0}", p2);

Console.WriteLine("Testing Employee usage of the PerformanceLevel...");

 Employee emp1 = new Employee("Claire Evans");

 emp1.ScoreEmployee(5);

 emp1.ScoreEmployee(4);

Console.WriteLine("Employee details: {0}", emp1);
- View code file.
Lab 3: Partial Types
Overview
- In previous tutorials we created some basic classes and worked with them. Each class definition was contained in one place. But sometimes it is useful to put a class definition in several places, for example in two separate code files. To allow this we define a partial type. Then the type’s definition can be split between several places.
- A struct that is preceded by the partial modifier.’>partial type is a class, interface, or struct that is preceded by the partial modifier:
- Indicates to the compiler that additional parts of the class/struct/interface might exist elsewhere.
- Useful when you need to define a large class/struct/interface.
- All parts of a partial type must:
- include the partial modifier.
- Useful when you need to define a large class/struct/interface.
- have the same accessibility specifier (e.g. public, private).
- be in the same namespace.
- be compiled together.
- Partial Types and Inheritance:
- Abstract partial classes – A partial class is abstract if a part is abstract.
- Sealed partial classes – A partial class is sealed if a part is sealed.
- Base class – If a partial class specifies a base class, it must agree with all the other parts that specify a base class.
- Base interfaces – The set of interfaces implemented by a partial type is the union of the interfaces specified on each part, typically each part contains the implementation for the interfaces declared on that part.
- The set of members in a partial type is the union of the members declared in each part:
- All the members from all the parts are coalesced on compilation.
- This means you cannot declare the same member in multiple parts.
public partial class MyClass

{

 private int field1;            // Error, field1 declared more than once

 public void Method1() {...}      // Error, Method1 declared more than once

 public void Method2() {...}      // OK

}
public partial class MyClass

{

 private int field1;            // Error, field1 declared more than once

 private int field2;            // OK

 public void Method1()    {...}   // Error, Method1 declared more than once

 public void Method2(int) {...}   // OK

 public void Method3()    {...}   // OK

}
Lab 4: Partial Methods
Overview
- In our partial types we can even define partial methods. A partial method is defined in one part of the class but (optionally) implemented in another part of the class.
- A partial type can define partial methods:
- A partial method is defined in one part of a type, using the partial keyword.
- Other methods can invoke partial methods as normal.
- Elsewhere, in another part of your type, you can choose to implement the partial method:
- But you don’t have to!.
- If you don’t implement the partial method, the compiler ignores all calls to that method (as if it never existed!).
- Partial methods are effectively “optional methods”:
- Defined by original class author, as extensibility hooks.
- Other class developers can provide implementation if they want to.
- There are some specific rules regarding partial methods:
- An Example –
public partial class SavingsAccount

{

 public void Withdraw(double amount)

 {

  // Call a partial method (might not actually exist).

  OnWithdrawing(amount);

  if (amount > Balance )

   amount = Balance;

  Balance -= amount;

  // Call another partial method (might not actually exist).

  OnWithdrawn(amount);

 }

 // Partial methods (may be implemented in another "partial" part of class).

 partial void OnWithdrawing(double amount);

 partial void OnWithdrawn(double amount);

 ...

}
- View code file.
- Lets Create a partial class now to finish off our application.
- Create a new class called TelephoneNumber but this time use a partial signature and this can be created as before –
public partial class TelephoneNumber
- In this class add this code, this will allow you to add a telephone number for an employee –
public string Prefix { get; set; }

public string NationalNumber { get; set; }

public TelephoneNumber(string prefix, string nationalNumber)

{

 Prefix = prefix;

 NationalNumber = nationalNumber;

}

public override string ToString()

{

 return string.Format("{0} {1}", Prefix, NationalNumber);

}
- View code file.
- To finish lets add the TelephoneNumberAdditions class which can be done as usual as described above. This will contain two methods FormatedPrefix and FormatedNumber –
public partial class TelephoneNumber

{

 public string FormattedPrefix

 {

  get { return "+" + Prefix; }

 }

 public string FormattedNumber

 {

  get

  {

   return string.Format("+{0} (0){1}", Prefix, NationalNumber.Substring(1));

  }

 }

}
- View code file.
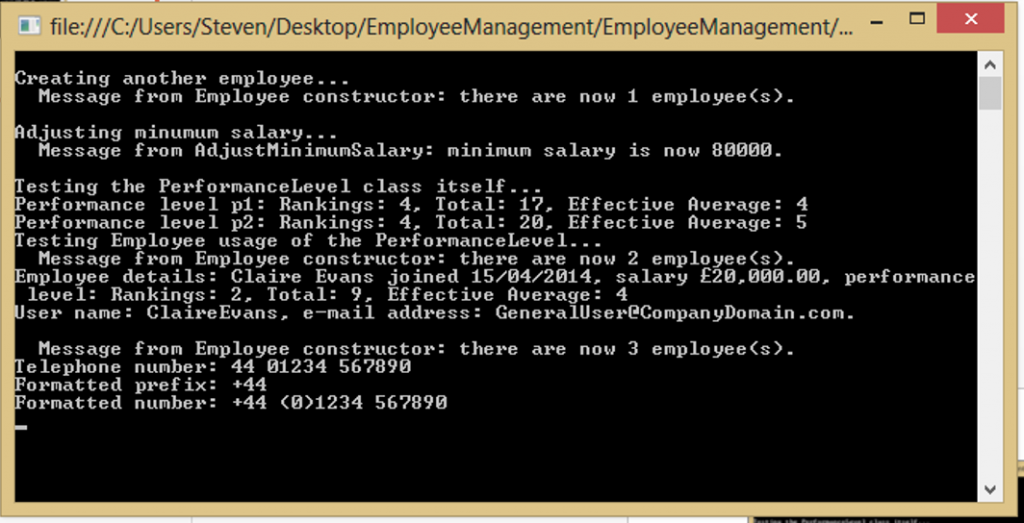
- Now you should be able to run the whole application but remember to uncomment the telephone code in Employee.cs –
Employee emp1 = new Employee("Claire Evans");

emp1.TelephoneNumber = new TelephoneNumber("44", "01234 567890");

 Console.WriteLine("Telephone number: {0}", emp1.TelephoneNumber);

 Console.WriteLine("Formatted prefix: {0}", emp1.TelephoneNumber.FormattedPrefix);

 Console.WriteLine("Formatted number: {0}", emp1.TelephoneNumber.FormattedNumber);
- View code file.
Well done. You have completed the tutorial in the C# course. The next tutorial is
6. Inheritance and Interfaces
Copyright © 2016 TalkIT®


If you would like to see more content like this in the future, please fill-in our quick survey.