In this tutorial you will learn more HTML and look at handling events. This will allow you to write a simple HTML site that you can then view in a web browser of your choice
About this Tutorial
Objectives
Delegates will learn to develop applications using HTML5/CSS3 and JS. After completing this course, delegates will be able to:
- Use Visual Studio 2012 effectively
- Create commercial HTML5 Web Applications
- Develop Websites that may use web sockets, animations and geolocation
Audience
This course has been designed primarily for programmers new to the .Net development platform. Delegates experience solely in Windows application development or earlier versions of HTML/CSS and JavaScript will also find the content beneficial.
Prerequisites
No previous experience in web programming is required. But any experience you do have in programming will help. Also no experience in browser IDE’s is required. But again any experience you do have with programming development environments will be a valuable.
Experience using a contemporary OO language such as C++ or C# would be useful but is not required.
Quick Access
Overview
Estimated Time – 1 Hour
Not what you are looking? Try the next tutorial – Using jQuery
- HTML elements raise various events
- E.g. page loaded
- E.g. keyboard and mouse interactions
- E.g. button clicks
- The simplest way to handle events is by using an event attribute:
Lab 1: Event-handling techniques
- Inline Event Handlers
- As discussed earlier, you can implement an event handler inline
- Multiple Inline Event Handlers
- This example shows how to handle multiple events on the same element
- Handles the mouseover and mouseout events for a <p> element, via onmouseover and onmouseout
- Executes inline JavaScript in response to each event
<p onmouseover="this.style.background='orange'; this.style.color='blue'"

 onmouseout="this.style.background='grey'; this.style.color='white'">

  <b>Script / Text of Act I Macbeth</b>

</p>

- This example shows how to handle multiple events on the same element
- Event Handler Functions:
- You can simplify element definitions (and reuse JavaScript) by placing event-handling logic in a separate function. It is common to pass this as a parameter, to identify target element.
- First create the functions:
<script type="text/javascript">

function handleMouseOver(elem) {

  elem.style.background = 'orange';

  elem.style.color = 'blue';

}

function handleMouseOut(elem) {

  elem.style.background = 'grey';

  elem.style.color = 'white';

}

</script>
- Next add the handlers:
<p onmouseover="handleMouseOver(this)" onmouseout="handleMouseOut(this)">

  <b>Script / Text of Act I Macbeth</b>

</p>

<p onmouseover="handleMouseOver(this)" onmouseout="handleMouseOut(this)">

  ...

</p>
- Using DOM and the Event Object:
- The simple handlers in the previous examples are fine for basic tasks…
- However, for more sophisticated tasks, it’s better to work with DOM and the Event object
- To use DOM to hook up events, follow these steps:
- To implement event handler functions, follow these steps:
- Here’s an example of how to handle events by using DOM and the Event object.
- First create some paragraphs to show the effects of the events on –
<p>

  <b>Script / Text of Act I Macbeth</b>

</p>

<p>

  ...

</p>
- And then, add the script that will run over all the elements that are paragraphs and assign them to the handlers
<script type="text/javascript">

  function handleMouseOver(e) {

    e.target.style.background = 'orange';

    e.target.style.color = 'blue';

  }

  function handleMouseOut(e) {

    e.target.style.background = 'grey';

    e.target.style.color = 'white';

  }

  var pElems = document.getElementsByTagName("p");

  for (var i = 0; i < pElems.length; i++) {

    pElems[i].onmouseover = handleMouseOver;

    pElems[i].onmouseout = handleMouseOut;

  }

</script>
- First create some paragraphs to show the effects of the events on –
- The simple handlers in the previous examples are fine for basic tasks…
- Dynamically Adding/Removing Handlers
- You can at runtime dynamically add or remove listeners this is done by using addEventListener()/removeEventListener() and is one way of controlling behaviour and interactivity within the page.
- First add the code to create a button with the id as toggle and then in the script to add and remove the listeners –
<button id="toggle">Toggle events</button>

<script type="text/javascript">

  function toggleEvents() {

    eventsEnabled = !eventsEnabled;

    if (eventsEnabled) {

      for (var i = 0; i < pElems.length; i++) {

        pElems[i].addEventListener("mouseover", handleMouseOver);

        pElems[i].addEventListener("mouseout", handleMouseOut);

      }

    }

    else {

      for (var i = 0; i < pElems.length; i++) {

        pElems[i].removeEventListener("mouseover", handleMouseOver);

        pElems[i].removeEventListener("mouseout", handleMouseOut);

      }

    }

  }

  ...
- Next add the code to be used in the same script but this will use the function and button created above –
var pElems = document.getElementsByTagName("p");

var buttonElem = document.getElementById("toggle");

buttonElem.onclick = toggleEvents;

var eventsEnabled = false;

...
- Distinguishing Event Types
- The Event object has a type property
- Identifies the event type (e.g. “mouseover”, “mouseout”, etc.)
- Allows you to define a common event–handler function that handles multiple types of events
<script type="text/javascript">

  function handleMouseEvent(e) {

    if (e.type == "mouseover") {

      e.target.style.background = 'orange';

      e.target.style.color = 'blue';

    }

    else if (e.type == "mouseout") {

      e.target.style.background = 'grey';

      e.target.style.color = 'white';

    }

  }

  var pElems = document.getElementsByTagName("p");

  for (var i = 0; i < pElems.length; i++) {

    pElems[i].onmouseover = handleMouseEvent;

    pElems[i].onmouseout = handleMouseEvent;

  }

</script>
- The Event object has a type property
- We are going to carry on using our project from the previous 2 tutorials except this one has a few new updates. You can download the project (ProductManager.sln) from the top of the page, we will be working on the initial version. The version described below is the final version that we will eventually make.
- The project contains two HTML pages MainPage.htm as before, plus a new page named ProductSuggestionsPage.htm that will open in a new window to show a snapshot of product suggestions so far.
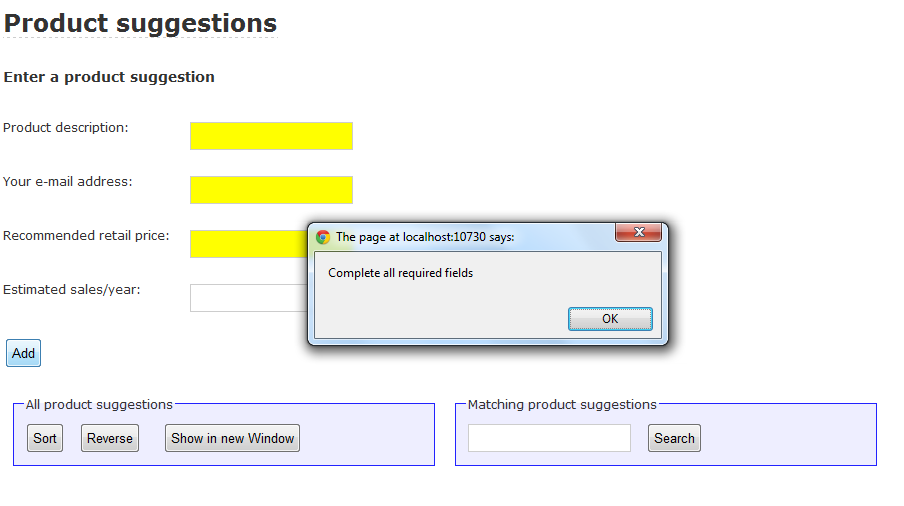
- Run the application. The home page appears as usual. Notice that the first text box automatically receives input focus. Now see what happens if you click Add before entering any data. The Web page has validation rules built-in, forcing the user to enter values for the required fields (we’ve made the first 3 text boxes “required”):
- Also notice the following new features in the home page, which you’ll implement in this lab:
- Whenever you tab into a text box anywhere on the page, the font colour changes to orange. When you tab out again, the font color reverts to black. This enhancement makes it easier for the user to identify which text box currently has the input focus.
- The main form has a check box that allows the user to enable or disable the colour coding feature dynamically. If you uncheck this check box, text boxes no longer change orange when they get input focus. If you re-check the check box, you’re back to square one and colour coding is re-enabled.
- Add some product suggestions, and then click the Show in new Window button (this is new in this lab). A new browser window (or tab) opens, showing the product suggestions as a list and as a table. Move your mouse over the table; the current row is highlighted in light grey, and the current cell is highlighted in dark grey:

- When you’re happy with how all this works, close the browser window, return to Visual Studio, and close the Solution project.
- Understanding the free application enhancements – In Visual Studio, open the initial project (ProductManager.sln) for this lab as follows
- Take a look in MainPage.htm. We’ve enhanced this page so that when the page is loaded, it assigns input focus to the first input control in the main form. Here’s a quick summary of how we did this:
- To ensure input focus is set as soon as the page is loaded, we set the onload property on the <body> tag.
<body id="main" onload="onLoad()">
- In the “onload” JavaScript handler function, we used the HTML5 selector API to get the first input control in the main form:
var firstInputField = document.querySelector("#mainForm input")
- To set focus to this field, we called the focus() method on the field.
firstInputField.focus();
- To ensure input focus is set as soon as the page is loaded, we set the onload property on the <body> tag.
- We also improved the integrity of MainPage.htm so that it forces the user to enter a value in all the “required” text boxes. Any empty boxes will be highlighted in a different colour. Here’s what we did:
- We needed a mechanism to indicate which text boxes are required and which can be left blank. One way to achieve this is to set the class property on the required fields. For example:
<input id="description" name="description" type="text" class="required" />
- We enhanced the doAdd() function so that it validates all required text boxes in the main form, by using the HTML5 selector API as follows:
var requiredFields =

   document.querySelectorAll("#mainForm input[type='text'].required");
- We looped through all the required fields and checked the value property for each one. If the value is empty, we set the field’s background colour to yellow, otherwise reset its background colour to white:
for (var i = 0; i < requiredFields.length; i++ ) {
    var field = requiredFields[i];
    // If the field is empty...
    if (!field.value) {
      // Highlight it to the user.
      field.style.backgroundColor = "Yellow";
      // Is it the first invalid field on the form?
      if (firstInvalidField == null) {
        firstInvalidField = field;
      }
    }
    else {
      // The field is populated, so make sure any previous highlighting is removed.
      field.style.backgroundColor = "White";
    }
  }
- We needed a mechanism to indicate which text boxes are required and which can be left blank. One way to achieve this is to set the class property on the required fields. For example:
- The next addition in MainPage.htm was a Show in new Window button as follows:

- When the user clicks this button, we open the new ProductSuggestionsPage.htm page in a new window. In ProductSuggestionsPage.htm, we handle the onload event so that it displays product data as soon as the window opens. Here's how it works:
- The product data is held in the allProducts global variable in the main window. Global variables are actually properties on the window object. Furthermore, a window can access the window that launched it via the window.opener property. Therefore, the ProductSuggestionsPage.htm page can access the product data from the main page as follows:
window.opener.allProducts
- ProductSuggestionsPage.htm includes the ProductSuggestionsFunctions.js script file. Therefore, it can use displayProducts() to display all the products on this page (we specify "currentProductsList" as the target element name for the output).
// Display the products in a bulleted list.

displayProducts(window.opener.allProducts, "currentProductsList");
- We display the current time in the window's caption bar (we access the caption bar via the document.title property). We also display the current time in the "heading" control on the page as well.
// Update the document's title and the "heading" element, to show current time.

var now = new Date();

var msg = "Products at " + pad(now.getHours()) + ":" + pad(now.getMinutes()) + ":" + pad(now.getSeconds());

document.title = msg;

document.querySelector("#heading").innerHTML = msg;
- The product data is held in the allProducts global variable in the main window. Global variables are actually properties on the window object. Furthermore, a window can access the window that launched it via the window.opener property. Therefore, the ProductSuggestionsPage.htm page can access the product data from the main page as follows:
- We also added some code in ProductSuggestionsPage.htm to populate an HTML table dynamically, to show the current product data in tabular format:
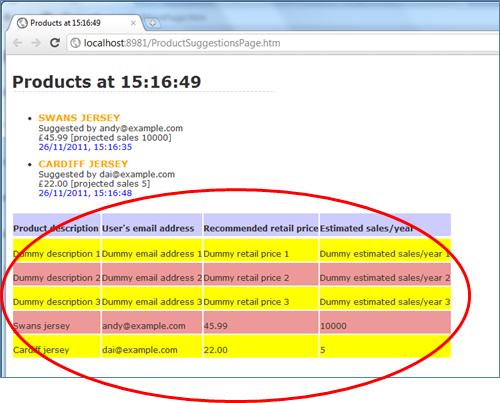
- Here's how we did this:
- ProductSuggestionsPage.htm already contains a <table> with some dummy table rows and table columns, to show the basic syntax for HTML tables.
<tbody id="currentProductsTableBody">

      <tr>

        <td >Dummy description 1</td>

        <td>Dummy email address 1</td>

        <td>Dummy retail price 1</td>

        <td>Dummy estimated sales/year 1</td>

      </tr>

      ...
- The body of the table is designated by a <tbody> element with an id of "currentProductsTableBody".
<tbody id="currentProductsTableBody">
- We wrote code in the onload handler function, to create a series of new <tr> elements (one per product) and append each <tr> to the <tbody>. For each <tr> element, we created 4 new <td> elements (one per property in a Product object) and appended each <td> to the <tr>. We used the following DOM APIs to achieve all this:
// To create a new element:

var newElem = document.createElement("newElemTagName");

// To set the value of an element:

newElem.innerHTML = elemValue;

// To append an element to a parent element:

parentElem.appendChild(newElem)
- ProductSuggestionsPage.htm already contains a <table> with some dummy table rows and table columns, to show the basic syntax for HTML tables.
Lab 2: Event flow
- Overview of Event Flow
- An event has a lifecycle that comprises 3 phases:
- Capture
- Target
- Bubbling
- The Event object has an eventPhase property that identifies the current phase
function anEventHandlerFunction(e) {

  if (e.eventPhase == Event.CAPTURING_PHASE) {

    ...

  }

  else if (e.eventPhase == Event.AT_TARGET) {

    ...

  }

  else { // e.eventPhase == Event.BUBBLING_PHASE

    ...

  }

}
- An event has a lifecycle that comprises 3 phases:
- Understanding the Capture Phase
- When an event is triggered, the browser identifies the element the event relates to
- This is known as the event target
- The browser identifies all of the ancestor elements, from <body> down to the target element
- ... to see if any ancestors have registered an interest in handling events generated by their descendants
- The browser triggers any such handlers before triggering the handler on the target itself
- When an event is triggered, the browser identifies the element the event relates to
- Handling Descendant Events
- For an element to handling events generated by its descendent elements:
- On the high-level element, call addEventListener()
- For parameter 1, specify the name of the event
- For parameter 2, specify the high-level event-handler function
- For parameter 3, pass true - Tells the browser that the high-level element
wants to receive events for its descendants during the capture phase
aHighLevelElement.addEventListener("anEventName", highLevelEventHandler, true);
- For an element to handling events generated by its descendent elements:
- Identifying the Target of an Event
- The Event object has two properties that help you to identify the target of the event:
- target
- currentTarget
- The target property:
- This is the real target of the event
- E.g. a low-level <span> that you mouse-over
- The currentTarget property:
- This is the current ancestor element, which intercepted the event on its downward journey during the capture phase
- E.g. a parent <div> that contains the <span>
- The Event object has two properties that help you to identify the target of the event:
- Stopping Propagation
- The Event object has two functions that allow an event handler to stop flow of an event on its journey
- stopPropagation()
- stopImmediatePropagation()
- The stopPropagation() function:
- The stopImmediatePropagation() function:
- Ignores any un-triggered event listeners
- Stops event from going any further, as per stopPropagation()
- The Event object has two functions that allow an event handler to stop flow of an event on its journey
- Understanding the Target Phase
- The "target" phase is the simplest of the 3 phases in the lifecycle of an event
- When the "capture" phase has finished ...
- The browser triggers any event-handler functions registered on the target element itself
- If stopPropagation() / stopImmediatePropagation() is invoked during the "target" phase:
- The browser will stop the flow of the event
- The "bubble" phase won't be performed
- The "target" phase is the simplest of the 3 phases in the lifecycle of an event
- Understanding the Bubble Phase
- The "bubble" phase is the last of the 3 phases in the lifecycle of an event
- When the "target" phase has finished ...
- The browser starts working its way back up the chain of ancestor elements, towards the <body> element
- The browser looks for any event-handler functions that are not "capture-enabled"
- i.e. where the 3rd argument to addEventListener() is false
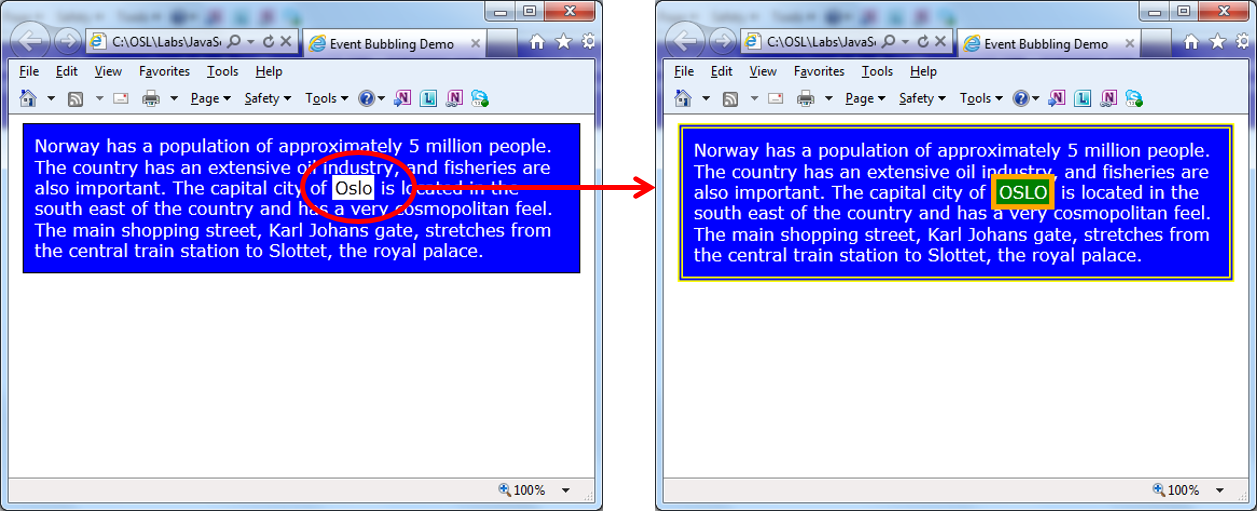
- This is known as "event bubbling"
- Note:
- Not all events support bubbling
- The Event object has a bubbles property (true or false)
- The "bubble" phase is the last of the 3 phases in the lifecycle of an event
- For a good example of everything discussed in this lab look at EventFlow.html
- View code file.
- Working with Cancelable Events
- Some events have a default action
- E.g. <a> elements have a click event, whose default action is to tell the browser to load the content at the specified href
- For events that have a default action:
- The Event object has a cancelable property set to true
- We can prevent the default action by calling preventDefault()
function handleClickForHyperlink(e) {

  if (!confirm("Do you want to navigate to " + e.target.href + " ?")) {

    e.preventDefault();

  }

}
- For an example on this look at CancelingEvents.html
- View code file.
- Some events have a default action
- Handling focus and blur events in the capture phase - Now it's time for you to add event-handling code for this lab.
- In this exercise, you'll enhance MainPage.htm so that it intercepts focus and blur events on all text boxes anywhere on the page. When a text box gains focus, you want its text to change to orange. When a text box loses focus, you want its text to revert to black.
- The most obvious way to do this would be to find all the text boxes on the page and handle the focus and blur events on each text box individually. This approach would certainly work, but there is a smarter way...
- JavaScript events have a "capture phase", which allows high-level elements (such as <body> ) to intercept events triggered by lower-level elements (such as <input> ). For example, you can define a single focus event-handler function on the <<body> element, and it will see all the focus events triggered by descendent elements (ditto for blur events).
- To implement this behavior, follow these steps:
- In MainPage.htm, note that the <body> tag already has an onload event-handler function named onLoad(). You can find this function in ProductSuggestionsFunctions.js.
- In the onLoad() function, add code to handle the focus event on the <body> element. To do this, locate the <body> element and call addEventListener() to handle the "focus" event (remember to set the 3rd parameter to true, to ensure the event-handler intercepts events triggered by descendent elements).
// In onLoad()

// Enable color coding on all text boxes.

setColorCoding(true);

// Create the function setColorCoding

function setColorCoding(enabled) {

  // Intercept all focus and blur events anywhere in the body, making use of the "capture" events mechanism.

  var body = document.querySelector("body");

  if (enabled) {

    body.addEventListener("focus", onFocusBlur, true);

    body.addEventListener("blur", onFocusBlur, true);

  }

  else {

    body.removeEventListener("focus", onFocusBlur, true);

    body.removeEventListener("blur", onFocusBlur, true);

  }

}
- Implement the event-handler function for the focus event. The function should first test whether the actual target of the event is a text box (you're not interested in focus events from any other controls, such as buttons or check boxes). You can use the following code to see if the event's target is a text box:
if (e.target["type"] == "text") {
- If the actual target element really is a text box, set its colour to orange. You can use the following code to do this:
e.target.style.color = "orange";
- Repeat the previous 2 steps to handle the blur event, to set the text box color to black in this situation:
function onFocusBlur(e) {

  // We're only interested in text boxes (i.e. <input type="text"...> controls).

  if (e.target["type"] == "text") {

    // If it's a "focus" event, set the text color to orange. If it's a "blur" event, set the text color to black.

    if (e.type == "focus") {

      e.target.style.color = "orange";

    }

    else if (e.type == "blur") {

      e.target.style.color = "black";

    }

  }

}
- Run the Web application. Verify that text boxes display orange text when they have input focus, and black text otherwise.
Lab 3: Working with HTML events
- Overview
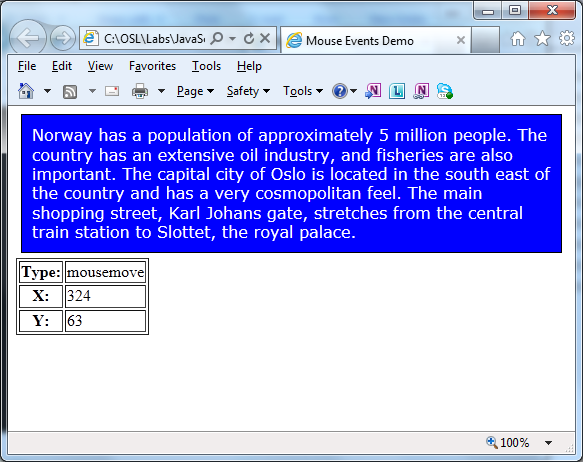
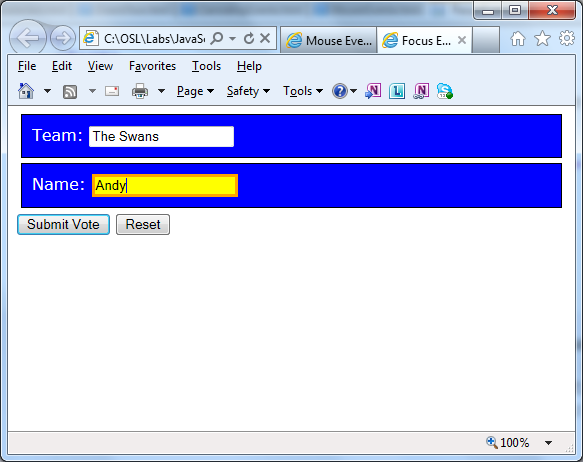
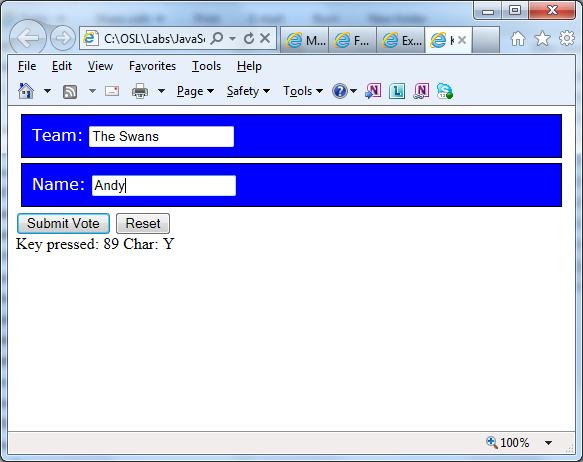
- HTML defines a set of events grouped by type:
- Mouse events
- Focus events
- Keyboard events
- The best way to understand these events is by looking at sample code
- HTML defines a set of events grouped by type:
- Mouse Events
- For an example of mouse events - See MouseEvents.html
- View code file.
- Focus Events
- For an example of focus events - See FocusEvents.html
- View code file.
- Keyboard Events
- For an example of keyboard events - See KeyboardEvents.html
- View code file.
- Handling mouseover and mouseout events on table cells - In this exercise, you'll enhance the ProductSuggestionsPage.htm page so that it highlights <td> table cells when the user moves over them with the mouse.
- Follow these steps:
- In Solution Explorer, open ProductSuggestionsPage.htm and locate the onLoad() function. This function initializes the contents of the page, including creating an HTML table dynamically to display product data in tabular format. Review the code in this function, and make sure you're happy with it before proceeding.
- Add code to find all <td> elements in the table body, and handle the mouseover and mouseout events on all the <td> elements.
// Allow allelements (in the ) to be highlighted in dark grey.
var tdElems = document.querySelectorAll("tbody * td");
for (var i = 0; i < tdElems.length; i++) { tdElems[i].addEventListener("mouseover", onMouseOverOutTd); tdElems[i].addEventListener("mouseout", onMouseOverOutTd); }- Implement the mouseover event-handler function so that it sets the target element's style to be white text on a light-grey background. The following code will do the trick:
e.target.style.cssText = "color:white; background-color:#888888";
- Implement the mouseout event-handler function so that it removes the styling:
function onMouseOverOutTd(e) {
if (e.type == "mouseover") {
e.target.style.cssText = "color:white; background-color:#888888";
}
else {
e.target.style.cssText = "";
}
}
- Run the Web application. In the main page, add some project suggestions and then click the Show in new Window button. When the ProductSuggestionsPage.htm page appears, move your mouse over some table cells and verify they change colour to grey. When you move away from a cell, it should revert to its original colour.
Well done. You have completed the tutorial in the HTML5/CSS3/JS course. The next tutorial is
4. Using jQuery
Back to beginning
Copyright © 2016 TalkIT®
Manage cookie consentYou can view this website without consenting to extra cookies. However you will need to accept the 'marketing' cookies to send messages via the contact forms & see any maps displayed on the site
Functional Always active
Cookies necessary for the website to work.Preferences
The technical storage or access is necessary for the legitimate purpose of storing preferences that are not requested by the subscriber or user.Statistics
The technical storage or access that is used exclusively for statistical purposes. Cookies used to track user interaction on the site, which helps us to evaluate & improve the website.Marketing: Forms & additional content (Marketing)
We need your permission to place ‘marketing’ cookies, so you are able to use the contact forms & see embedded content e.g. videos and maps. - - - - We have added protection to our contact forms to help prove that a human (rather than a spambot) is fillingScroll to Top - Implement the mouseover event-handler function so that it sets the target element's style to be white text on a light-grey background. The following code will do the trick:


If you would like to see more content like this in the future, please fill-in our quick survey.